How to build progressive web app(PWA) in Angular 9 ?
Last Updated :
19 Jul, 2021
In this article, we will develop a PWA (Progressive Web App) using Angular.
What is PWA ?
Progressive Web Apps (PWAs) are web applications that have been designed so that they are capable, reliable, and installable. PWA are built and enhanced with modern APIs to deliver enhanced capabilities, reliability, and installability yet reaching anyone, anywhere, on any device with a single codebase. PWA does not require to be deployed via app stores; instead, we use different approaches and deploy it through the web servers through URLs. But while developing PWA, we have to take care following factors:
- Responsiveness: Works on every device like desktop, mobile, or tablet without any breakage.
- Secure & Safe: Using HTTPS to serve the data to our PWA ensures security.
- Progressive: Usage of modern web capabilities to develop an app-like experience for every user.
- Auto-Updated: The updates are downloaded and installed without user intervention. (this is with the help of Service Worker)
- Discoverable: PWA should be searchable through search engines. (using web app manifest)
- Installable: Installable on users’ device home screen.
- Works offline: It should configured for offline work and on sparse networks.
Step 1: Initialize new Angular project: Now, let’s start with creating an angular app at first. Here, we will be creating a simple Weather App. To do so, firstly, create a new Angular App and navigate inside the project directory using the following commands.
ng new weather-app
cd weather-app
Step 2: Adding Bootstrap Links: We will be using Bootstrap for styling while developing our frontend. Add following links in the index.html file of your project.
<link href=”https://cdn.jsdelivr.net/npm/bootstrap@5.0.0-beta3/dist/css/bootstrap.min.css” rel=”stylesheet” integrity=”sha384-eOJMYsd53ii+scO/bJGFsiCZc+5NDVN2yr8+0RDqr0Ql0h+rP48ckxlpbzKgwra6″ crossorigin=”anonymous”>
<script src=”https://cdn.jsdelivr.net/npm/bootstrap@5.0.0-beta3/dist/js/bootstrap.bundle.min.js” integrity=”sha384-JEW9xMcG8R+pH31jmWH6WWP0WintQrMb4s7ZOdauHnUtxwoG2vI5DkLtS3qm9Ekf” crossorigin=”anonymous”></script>
Step 3: OpenWeatherMap API for getting weather data: For getting live data of weather, we will be using openweathemap API. Get an API key by creating your account.
Step 4: Developing the UI for WeatherApp: Create an angular component named weather and angular service named API by running the following commands:
ng generate component components/weather
ng generate service services/API
Now, paste the following codes in their respective files.
weather.component.ts
import { Component, OnInit } from '@angular/core';
import { WeatherService }
from 'src/app/services/weather.service';
@Component({
selector: 'app-weather',
templateUrl: './weather.component.html',
styleUrls: ['./weather.component.css'],
})
export class WeatherComponent implements OnInit {
city: any = '';
country: any = '';
weather: any = null;
constructor(private
_weatherService: WeatherService) {}
ngOnInit(): void {}
getDate(str: string) {
return str.split(' ')[0];
}
getTime(str: string) {
return str.split(' ')[1];
}
displayWeather() {
this._weatherService
.getWeather(this.city, this.country)
.subscribe(
(data) => (this.weather = data),
(err) => console.log(err)
);
}
}
|
weather.component.html
<div class="container-fluid">
<div class="input card">
<div class="mb-4">
<label for="city" class="form-label">
City<span class="text-danger">*
</span>
</label>
<input type="text" class="form-control"
name="city" id="city" [(ngModel)]="city"/>
</div>
<div class="mb-1">
<label for="country" class="form-label">
Country<span class="text-danger">*
</span></label>
<input type="text" class="form-control"
name="country" id="country"
[(ngModel)]="country"/>
</div>
<div class="text-center mt-4">
<button type="submit" class="btn btn-primary"
(click)="displayWeather()">
Get Weather</button>
</div>
</div>
<div class="row" *ngIf="weather"
[(ngModel)]="weather">
<div class="col-md-3" *ngFor="let wth of weather.list">
<div class="weather-info">
<div class="d-flex justify-content-between">
<div class="info-date">
<h1>{{ wth.dt_txt | date: "shortTime" }}</h1>
<span>{{ getDate(wth.dt_txt) | date }}</span>
<span class="weather-city">{{ city }},
{{ country }}</span>
</div>
<div class="info-weather">
<div class="weather-wrapper">
<span class="weather-temperature">
{{ wth.main.temp - 273.15 | number: "1.1-1" }}°C
</span>
<div class="weather-type">
<img src=
width="64px" height="64px"
alt="Weather Icon"/>
</div>
<br />
</div>
<span class="weather-description">
{{ wth.weather[0].description | titlecase }}
</span>
</div>
</div>
<div class="d-flex justify-content-between mt-3">
<div class="humidity"><img src="" alt="">
Humidity {{ wth.main.humidity }}%</div>
<div class="wind">
<i class="fas fa-wind"></i>Wind
{{ wth.wind.speed }} km/h
</div>
<div class="pressure">Pressure
{{ wth.main.pressure }}</div>
</div>
</div>
</div>
</div>
</div>
|
weather.component.css
.col-md-3 {
margin: 5px auto;
}
.input {
margin: 2% 25%;
padding: 2% 2.5%;
font-size: 16px;
box-shadow: 0 4px 8px 0 rgba(0, 0, 0, 0.2);
transition: 0.3s;
}
input {
padding: 10px 12px;
}
.weather-info {
width: 100%;
height: 100%;
padding: 20px 20px;
border-radius: 8px;
border: 2px solid #fff;
box-shadow: 0 0 4px rgba(255, 255, 255, 0.3);
background: linear-gradient(to right, #00a4ff, #0072ff);
transition: transform 0.2s ease;
color: whitesmoke;
}
.info-date {
display: flex;
flex-direction: column;
justify-content: center;
}
.info-date h1 {
margin-bottom: 0.65rem;
font-size: 2rem;
letter-spacing: 2px;
}
.info-weather {
display: flex;
flex-direction: column;
align-items: flex-end;
justify-content: center;
text-align: right;
}
.weather-wrapper {
display: flex;
align-items: center;
justify-content: flex-end;
width: 100%;
}
@keyframes animation-icon {
from {
transform: scale(1);
}
to {
transform: scale(1.2);
}
}
.weather-type {
display: inline-block;
width: 48px;
height: 48px;
transition: all 0.2s ease-in;
animation: animation-icon 0.8s infinite;
animation-timing-function: linear;
animation-direction: alternate;
}
.weather-temperature {
font-size: 1.5rem;
font-weight: 800;
}
.weather-description {
margin-top: 1rem;
font-size: 20px;
font-weight: bold;
}
.weather-city {
margin-top: 0.25rem;
font-size: 16px;
}
.wind i {
margin: 10px;
}
|
weather.service.ts
import { Injectable } from '@angular/core';
import { HttpClient } from '@angular/common/http';
@Injectable({
providedIn: 'root',
})
export class WeatherService {
private readonly apiKey: string = <your API key>;
constructor(private _http: HttpClient) {}
getWeather(city: string, country: string) {
const apiUrl =
`https:
return this._http.get(apiUrl);
}
}
|
Now call the weather component in app.component.html
<app-weather></app-weather>
Output:

Step 5: Converting to the angular app to PWA: Converting your Angular app to PWA is easy using Angular CLI. Navigate to your project’s folder. Now, run the following command to add PWA features.
ng add @angular/pwa
The above command adds the following new files:
- Manifest file named manifest.webmanifest for PWA information
- ngsw-config.json file for configuring the service worker
- Default icons with many sizes in the assets/icons directory (these icons can be changed later)
- Service worker using the @angular/service-worker package
Now, let us take a look at what each file does.
manifest.webmanifest
This file contains the name of the application, theme, and background color, and various sizes of icons. This configuration is applied when you add the app to the mobile it creates a web view by adding the name and icons to the app list and when the app is run the background and theme colors are applied.
Javascript
{
"name": "weather-app",
"short_name": "weather-app",
"theme_color": "#1976d2",
"background_color": "#fafafa",
"display": "standalone",
"scope": "./",
"start_url": "./",
"icons": [
{
"src": "assets/icons/icon-72x72.png",
"sizes": "72x72",
"type": "image/png",
"purpose": "maskable any"
},
{
"src": "assets/icons/icon-96x96.png",
"sizes": "96x96",
"type": "image/png",
"purpose": "maskable any"
},
{
"src": "assets/icons/icon-128x128.png",
"sizes": "128x128",
"type": "image/png",
"purpose": "maskable any"
},
{
"src": "assets/icons/icon-144x144.png",
"sizes": "144x144",
"type": "image/png",
"purpose": "maskable any"
},
{
"src": "assets/icons/icon-152x152.png",
"sizes": "152x152",
"type": "image/png",
"purpose": "maskable any"
},
{
"src": "assets/icons/icon-192x192.png",
"sizes": "192x192",
"type": "image/png",
"purpose": "maskable any"
},
{
"src": "assets/icons/icon-384x384.png",
"sizes": "384x384",
"type": "image/png",
"purpose": "maskable any"
},
{
"src": "assets/icons/icon-512x512.png",
"sizes": "512x512",
"type": "image/png",
"purpose": "maskable any"
}
]
}
|
ngsw-config The presence of this file, one will be able to manage a wide variety of different things associated with PWA. This is where we cache the API endpoint.
Javascript
{
"$schema": "./node_modules/@angular/service-worker/config/schema.json",
"index": "/index.html",
"assetGroups": [
{
"name": "app",
"installMode": "prefetch",
"resources": {
"files": [
"/favicon.ico",
"/index.html",
"/manifest.webmanifest",
"/*.css",
"/*.js"
]
}
},
{
"name": "assets",
"installMode": "lazy",
"updateMode": "prefetch",
"resources": {
"files": [
"/assets/**",
"/*.(eot|svg|cur|jpg|png|webp|gif|otf|ttf|woff|woff2|ani)"
]
}
}
]
}
|
Step 6: Build our Angular App for production environment:
ng build --prod
After running the above command, our build folder is created inside dist/weather-app. Now, move to the build folder with cd dist/weather-app.
cd dist/weather-app
Install http-server package globally using NPM.
npm install -g http-server
You can find the code to this weather app here.
Step 7: Add our Weather App icon on the desktop to launch: Once you will launch the angular app in the browser, a download icon will come up at the right side of URL bar as follows:
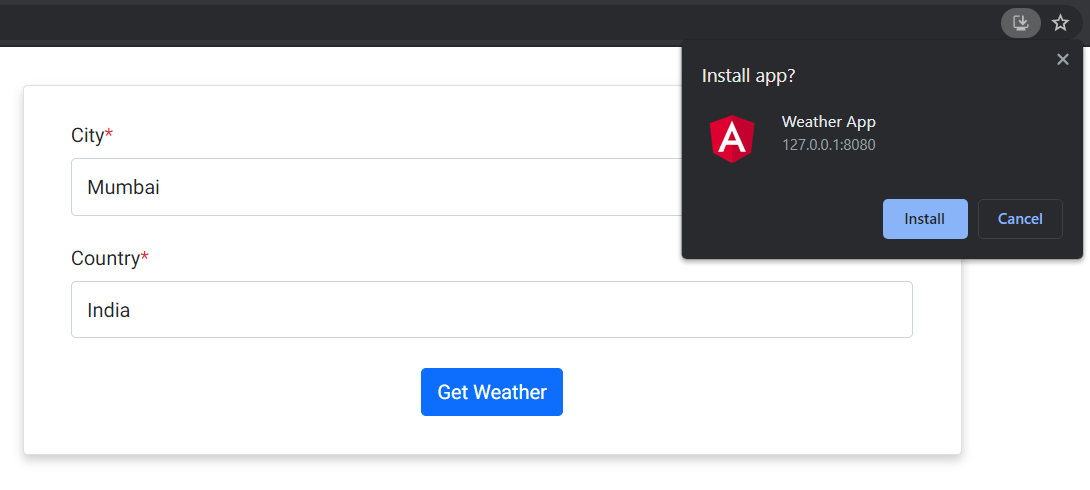
Install Weather App
Click on Install button to add the icon on Desktop for launching the app. Now, you click on the app icon created on the Desktop. You will see the following screen. (Note: When you click on the icon, it will not open in browser)
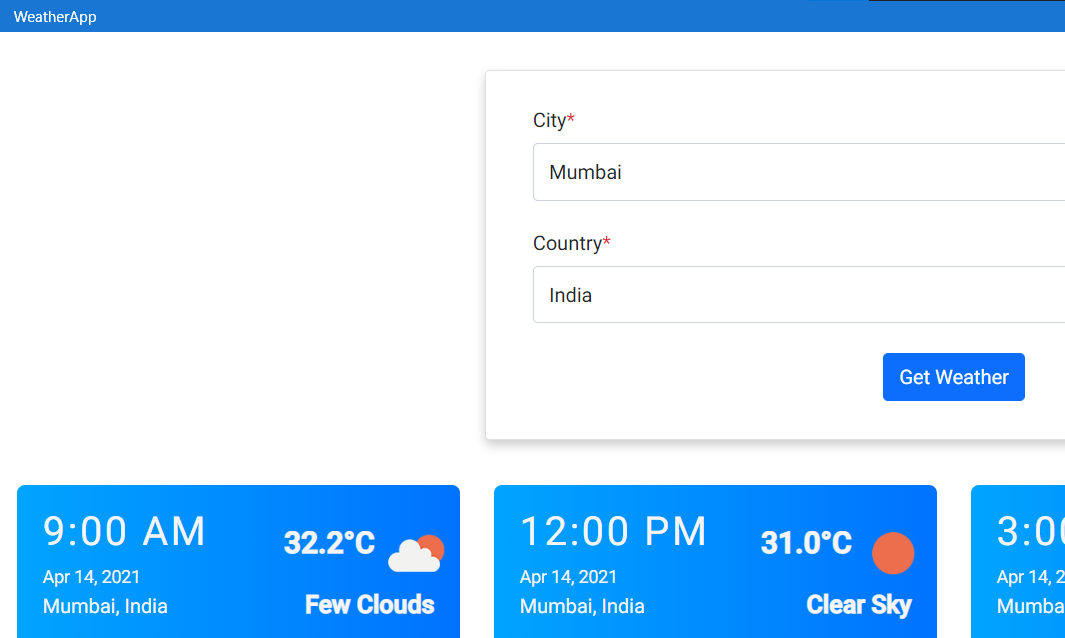
Launching App from Desktop (any device)
Uninstalling PWA is easy. Just click the three dots in top-nav and then click “Uninstall Weather App”.
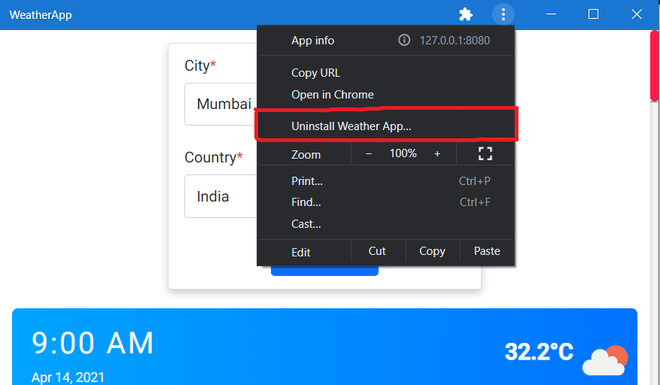
Uninstalling PWA
Like Article
Suggest improvement
Share your thoughts in the comments
Please Login to comment...