How to Build a WiFi Scanner in Python using Scapy?
Last Updated :
24 Feb, 2021
In this article, we are going to build a WiFi Scanner in Python using Scapy. WiFi Scanning or Network scanning refers to the scanning of the whole network to which we are connected and try to find out what are all the clients connected to our network. We can identify each client using their IP and MAC address. We can use ARP ping to find out the alive systems in our network.
The network scanner will send the ARP request indicating who has some specific IP address, let’s say “192.168.1.1”, the owner of that IP address ( the target ) will automatically respond saying that he is “192.168.1.1”, with that response, the MAC address will also be included in the packet, this allows us to successfully retrieve all network users’ IP and MAC addresses simultaneously when we send a broadcast packet ( sending a packet to all the devices in the network ).
Some important functions for creating a Network scanner:
- ARP(): This function defined in scapy module which allows us to create ARP packets (request or response). By default, if we are calling it, it will create an ARP request packet for us. This method provides us with the status of the packet that we have created. It does not provide detailed information about the packet, it just gives us the basic idea like what is the type of packet, what is the destination of the packet, etc. For example, if we want to create an ARP packet using ARP() method which is present in the scapy module and wants to see the summary of the packet then we can do this by creating the object of ARP class.
- show() Method: This method is very similar to summary() method. It gives more detailed information about the packet. The usage of this function is also much similar to a summary() method.
- ls() Function: This method is present in the scapy class. By using this method, we can see what are the fields that we can set for a specific packet.
we will create an ARP packet and the with the help of ls() function, we will see what are the available fields for this packet.
Approach:
- Create an ARP packet using ARP() method.
- Set the network range using a variable.
- Create an Ethernet packet using Ether() method.
- Set the destination to broadcast using variable hwdst.
- Combine ARP request packet and Ethernet frame using ‘/’.
- Send this to your network and capture the response from different devices.#scapy.srp()
- Print the IP and MAC address from the response packets.
Below is the Python implementation:
Python3
import scapy.all as scapy
request = scapy.ARP()
request.pdst = '192.168.0.1/24'
broadcast = scapy.Ether()
broadcast.dst = 'ff:ff:ff:ff:ff:ff'
request_broadcast = broadcast / request
clients = scapy.srp(request_broadcast, timeout = 10,verbose = 1)[0]
for element in clients:
print(element[1].psrc + " " + element[1].hwsrc)
|
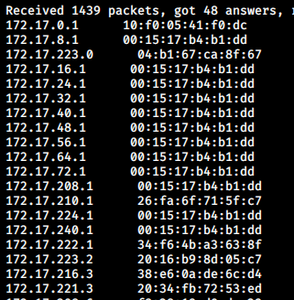
Output:
Explanation:
Here x = Network range. For example x = 192.168.0.1/24, 172.16.5.1/16 etc
- pdst is where the ARP packet should go (target),
- psrc is the IP to update in the target’s arp table,
- hwsrc is the sender’s hardware address.
- hwdst is a target hardware address
Like Article
Suggest improvement
Share your thoughts in the comments
Please Login to comment...