How to Autofill Months and Years in Excel?
Last Updated :
10 Jun, 2022
Excel is a spreadsheet developed by Microsoft for Windows, macOS, Android, and iOS. The calculation, computation, visualization tools, pivot tables, and VBA are all available in excel. In a spreadsheet, you will find a large number of cells. The columns are named in alphabets and rows are named in numeric digits. Each cell’s location can be identified using its row and column address. The first top-left cell in the spreadsheet is A1. The total number of rows in one spreadsheet is 1048576 and columns is 16384 (A to XFD).
Autofill Months and Years in Excel
- Autofill Month Name Sequentially (Row-Wise)
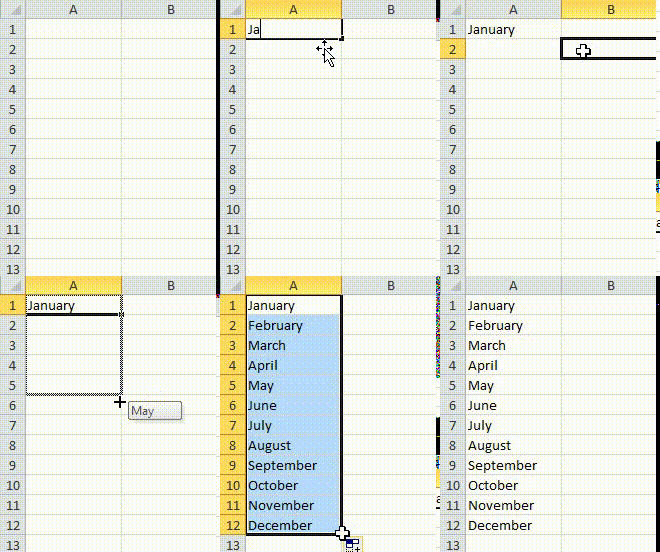
Step A: Write “January” (Suppose) in one cell (Suppose A1) of the Spreadsheet.
Step B: Hover the mouse to the bottom right corner of that cell till the cursor design changes to the ‘+‘ sign.
Step C: Drag the cursor row-wise till December is shown.

Autofill Month name Sequentially (Row-wise)
- Autofill Month Name Sequentially (Column- Wise)
Step A: Write “January” (Suppose) in one cell (Suppose A1) of the Spreadsheet.
Step B: Hover the mouse to the bottom right corner of that cell till the cursor design changes to the ‘+‘ sign.
Step C: Drag the cursor column-wise till December is shown.

Autofill Month name Sequentially (Column-wise)
Autofill Month Name Non-Sequentially (Particular Interval) (Row-Wise)
Step A: Write “January”(Suppose) in one cell (Suppose A1) of the Spreadsheet.
Step B: Write the name of the next month in the next cell (B2) to show the series to the system.
Step C: Select both the cells and hover the mouse to the bottom right corner of the second cell till the cursor design changes to the ‘+‘ sign.
Step D: Drag the cursor row-wise till required.

Autofill Month name Non-Sequentially (Row-wise)
- Autofill Month Name Non-Sequentially (Particular Interval)(Column- Wise)
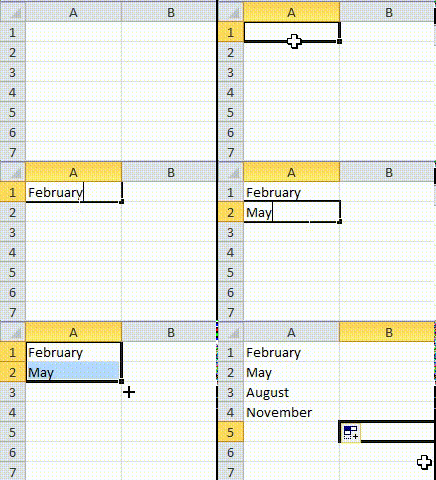
Step A: Write “February” (Suppose) in one cell (Suppose A1) of the Spreadsheet.
Step B: Write the name of the next month in the next cell (A2) to show the series to the system.
Step C: Select both the cells and hover the mouse to the bottom right corner of the second cell till the cursor design changes to the ‘+’ sign.
Step D: Drag the cursor column-wise till required.

Autofill Month name Non-Sequentially (Row-wise)
Autofill Year
The auto-filling year is similar to the auto-filling month name. Just instead of the month name, we have to type the year number.
- Autofill Year number Sequentially & Non-Sequentially (Row- Wise)
Step A: Write the year number (Suppose: “2010”) in one cell (Suppose A1) of the Spreadsheet.
Step B: Write the name of the next year (“2011” in case of sequential) in the next cell (B2) to show the series to the system.
Step C: Select both the cells and hover the mouse to the bottom right corner of the second cell till the cursor design changes to the ‘+’ sign.
Step D: Drag the cursor row-wise till required.

Autofill year number Sequentially (Row-wise)
- Autofill Year number Sequentially & Non-Sequentially (Column- Wise)
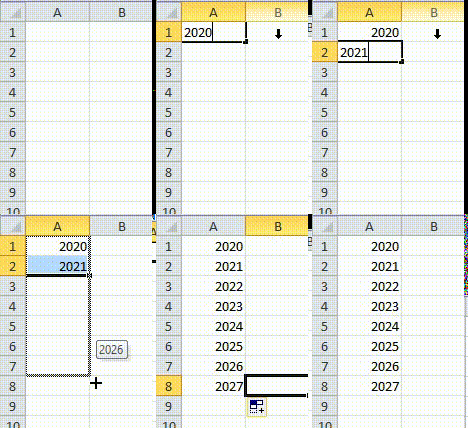
Step A: Write the year number (Suppose: “2020”) in one cell (Suppose A1) of the Spreadsheet.
Step B: Write the name of the next year (“2021” in case of sequential) in the next cell (A2) to show the series to the system.
Step C: Select both the cells and hover the mouse to the bottom right corner of the second cell till the cursor design changes to the ‘+’ sign.
Step D: Drag the cursor column-wise till required.

Autofill year number Sequentially (Column-wise)
Note: The process for auto-filling year names sequentially and non-sequentially is the same.
Like Article
Suggest improvement
Share your thoughts in the comments
Please Login to comment...