EBS is a block type durable and persistent storage that can be attached to EC2-instances for additional storage. Unlike EC-2 instance storage volumes which are suitable for holding temporary data EBS volumes are highly suitable for essential and long term data. EBS volumes are specific to availability zones and can only be attached to instances within the same availability zone.
How it works
Amazon Elastic Block Store (Amazon EBS) stands as a versatile and scalable block storage solution tailored for Amazon Elastic Compute Cloud (Amazon EC2). Within the expansive AWS ecosystem, users enjoy the liberty to create new EBS volumes seamlessly, geared to supplement instances with additional storage capacity. However, the journey to harnessing the potential of an EBS volume hinges significantly on the pivotal task of mounting it to a specific directory within an instance.
Uses Of Attaching An Amazon EBS Volume To An Instance
Following are the some use cases of attaching an EBS to EC2 instance:
- EBS volumes are independent of the EC2 instance even the instance got terminated your data will not get lost this are also called as persistent volumes.
- Depending up on the incoming data you can scale up the volume. Which will helps you to store more amount of data.
- There is no restriction to for data type you are going to store you can store any type of data it can be dynamic data or static data.
- Data which is stored in the EBS can be backed up with the help of snapshots which can be attached to other EBS and restore it.
- EBS volumes are high availability so you can have the data even in the times of instance failures.
Steps To Attach An EBS Volume To An Instance Using The Console
Before creating an EC2 instance you need to have AWS account to create Free tier AWS account refer to Amazon Web Services (AWS) – Free Tier Account Set up.
Step 1: Create an EC2 instance if you don’t have any
For detail information to create the ec2 instance refer this link.
Step 2: Create an EBS Volume
- Go to Volumes Section: In the EC2 Dashboard, locate the “Volumes” option in the left-hand navigation pane and click on it.
- Create Volume: On the Volumes page, click the “Create Volume” button.
- Configure Volume: In the “Create Volume” wizard, configure the volume settings such as volume type, size, availability zone, and any additional settings as needed.
- Review and Create: After configuring the volume settings, review the settings to ensure they are correct, and then click the “Create Volume” button.
.jpg)
Step 3: Attach EBS Volume to EC2 Instance
- Select Volume: In the AWS Management Console, navigate to the EC2 Dashboard and click on the “Volumes” option in the left-hand navigation pane. Select the volume you want to attach by clicking on its row in the volume list.
- Click Action Button: After selecting the volume, locate the “Actions” button above the volume list and click on it.
- Choose Attach: From the dropdown menu that appears after clicking the “Actions” button, select the “Attach Volume” option.
- Select Instance: In the “Attach Volume” dialog box, select the instance to which you want to attach the volume from the dropdown menu. Ensure that the instance and the volume are in the same availability zone.
- Specify Device: After selecting the instance, specify the device name for the volume in the “Device” field. This is the device name that will be used to mount the volume on the instance (e.g., /dev/sdf).
- Attach Volume: Once you have selected the instance and specified the device name, click the “Attach” button to attach the volume to the instance.
- Confirmation: After clicking “Attach”, you will receive a confirmation message indicating that the volume has been successfully attached to the instance.
.png)
Step 4: Connect to your EC2 Instance
- SSH Connection: Open your terminal or command prompt and use the SSH command to connect to your EC2 instance. Replace
your-ec2-instance-ip with the public IP address of your EC2 instance, and your-ec2-key.pem with the path to your private key file:
ssh -i /path/to/your-ec2-key.pem ec2-user@your-ec2-instance-ip
- Click attach after selecting the instance to which you want it to attach. The instance has now been given access to your volume. Now use the instructions below to connect to the root.
$ sudo su
$ cd
- You can now list the disk available on your EC2 instance by firing the below command.
lsblk
- If you want to check whether the disk is mounted to the server or not. You can use the below command
$ df -h
Step 5: Create a Filesystem on the EBS Volume
- Using the following command, format the volume as ext4 filesystem.
$ mkfs.extr /dev/xvd

Step 6: Mount the EBS Volume
- View all the disks which are attached to the instance by using following command.The output of lsblk removes the /dev/ prefix from full device paths.
lsblk
- After formating the EBS volume know mount the EBS volume with EC2 instance by using the following command.
mount /dev/xvdf /mnt/ebs
Step 6: Configure Automatic Mount on Boot
- After mounting your volume click the following command
$ blkid
- After clicking this you will get a UUID. Copy that UUID of your extra volume.
Then log in to the vi editor firing the below command.
$ vi /etc/fstab
Paste the UUID and the path where you want to mount and the filesystem you format.
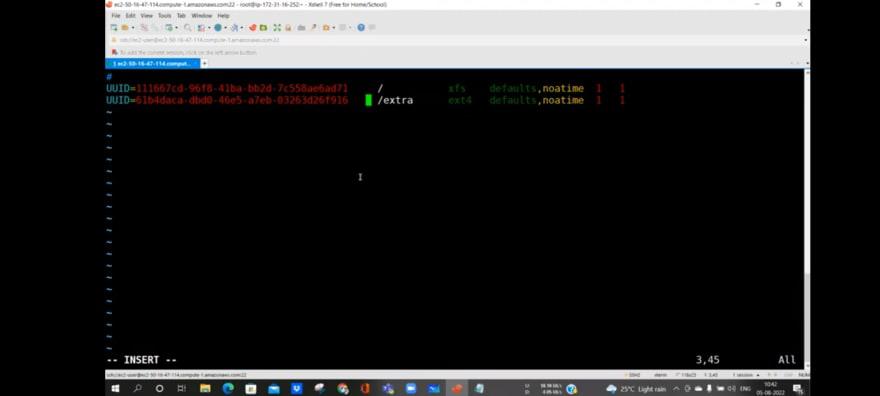
That’s it your file is permanently mounted. Now if you stop your instance and start again your data won’t be lost. Now you can mount and unmount as much as files of your choice by following these steps.
Steps to add Multiple EBS Volumes to EC2 Instance
Step 1: Use the following command to attach the ebs volume with aws ec instance in the following command just teplace few things like <volume-id>,<instance-id> with the your IDs.
aws ec2 attach-volume --volume-id <volume-id> --instance-id <instance-id> --device /dev/xvdf
Step 2: Do the formating on the EBS volume by using file system with the help of following command.
mkfs.ext4 /dev/xvdf
Step 3: Mount the EBS volumes which are formatted and attached to the EC2 you can use the following command to mount.
mount /dev/xvdf /mnt/ebs
Repeat the steps mentioned above to attache the multiple EBS volumes.
Mount one EBS volume to Multiple EC2 Instances
No, it’s not possible to mount one EBS volume to multiple EC2 instances simultaneously. Amazon Elastic Block Store (EBS) volumes are designed to be attached to a single EC2 instance at a time.
If you need to share data between multiple EC2 instances, you can consider using other AWS services like Amazon Elastic File System (EFS) which provides a scalable and shared file storage system that can be mounted to multiple EC2 instances concurrently.
How many EBS volumes can I attach to an Instance?
The number of storage volumes you can attach to an instance depends on its size. Larger instances usually allow more volumes.
Volume Limit Table: The Volume Limit Table provides a breakdown of the maximum number of storage volumes allowed for various AWS EC2 instance sizes.
- Small to large instances: Up to 32 volumes.
- Larger instances like 16xlarge to 48xlarge: Up to 48 to 128 volumes.
- Specialized metal instances: Up to 39 to 79 volumes.
Step 3: Click the action button after selecting the volume, and then choose the attach button.
Note: Verify that the instance and the EBS volume are in the same availability zone.
Step 4: Click attach after selecting the instance to which you want it to attach. The instance has now been given access to your volume. Now use the instructions below to connect to the root.
$ sudo su
$ cd
Step 6: You can now list the disk available on your EC2 instance by firing the below command.
lsblk
Step 7: For a detailed description of the volumes throw the below commands.
$ fdisk -l
Step 8: If you want to check whether the disk is mounted to the server or not. You can use the below command
$ df -h
Step 9: Using the following command, format the volume as ext4 filesystem.
$ mkfs.extr /dev/xvdf
Note: You can also format it into the xfs filesystem. (Usually used for larger volumes)
Step 10: Create an extra directory of your choice to mount out a new ext4 volume. I am using the name /extra. You can name it something of your choice.
Note: You can also format it into the xfs filesystem. (Usually used for larger volumes)
Step 11:- Create an extra directory of your choice to mount out a new ext4 volume. I am using the name /extra. You can name it something of your choice.
$ mkdir /extra
Step 12: Mount the volume to the /extra directory using the following command.
$ mount /dev/xvdf /extra
Now with df -h command you can check whether it is mounted or not. By using the below command you can go into the extra directory and can create files
$ cd /
Now here is the problem if you stop and start your instance the data will be gone… So we have to permanently mount the volume.
Steps To Permanently Mount The Volume To The Instance
Step 1: After mounting your volume click the following command
$ blkid
Step 2: After clicking this you will get a UUID. Copy that UUID of your extra volume.
Step 3: Then log in to the vi editor firing the below command.
$ vi /etc/fstab
Paste the UUID and the path where you want to mount and the filesystem you format.
That’s it your file is permanently mounted. Now if you stop your instance and start again your data won’t be lost. Now you can mount and unmount as much as files of your choice by following these steps.
Make An Amazon EBS Volume Available For Use On Linux
After attaching an EBS volume to AWS EC2 instance the volume will be in the form block device which is not formated before using the EBS volume you need to format the disk which which you can perform the operations. The data which is going to add to this file system will be stored in the EBS volume you can take the backup of the data by using snapshots.
Format And Mount An Attached Volume
Before making available to perform the task you need to perform some taks means you need to formate the disk which is /dev/sdf. And root volume refer to the /dev/xvda.
You can use the following command to check the total no.of disks avalible:
lsblk -l
Steps To Format And Mount An EBS Volume On Linux
Step 1: Connect to the EC2 instance using terminal or putty with the help of SSH.
Step 2: View all the disks which are attached to the instance by using following command.The output of lsblk removes the /dev/ prefix from full device paths.
lsblk
Step 3: Create a filesystem on the EBS volume by using the following command.
mkfs.ext4 /dev/xvdf
Step 4: After formating the EBS volume know mount the EBS volume with EC2 instance by using the following command.
mount /dev/xvdf /mnt/ebs
Steps To Add Multiple EBS Volumes To EC2 Instance
Step 1: Use the following command to attach the ebs volume with aws ec instance in the following command just teplace few things like <volume-id>,<instance-id> with the your IDs.
aws ec2 attach-volume --volume-id <volume-id> --instance-id <instance-id> --device /dev/xvdf
Step 2: Do the formating on the EBS volume by using file system with the help of following command.
mkfs.ext4 /dev/xvdf
Step 3: Mount the EBS volumes which are formatted and attached to the EC2 you can use the following command to mount.
mount /dev/xvdf /mnt/ebs
Repeat the steps mentioned above to attache the multiple EBS volumes.
Mount one EBS volume to Multiple EC2 Instances
There are some conditions you need to follow before attaching an single EBS volume to multiple EC2 Instances.Following are listed below:
- The EBS volume which we are going to attach with multiple EC2 instances must be in the same availability zone where the EC2 instances are configured.
- The EBS volume must me large enough to accommodate the large amount of data which is going to be generated by the multiple EC2 isntances.
- Here we are going to mount with multiple mounts we need to formate the EBS with the ext4 or xfs where it will supports the multiple mounts.
Steps to follow To Mount EBS With Multiple Instances
Step 1: Attach the EBS volume by using following command.
aws ec2 attach-volume --volume-id vol-12345678 --instance-id i-12345678 --device /dev/xvdf
Step 2: For mate the EBS volume by using following command.
mkfs.ext4 /dev/xvdf
Step 3: Mount the EBS volume by using following command.
mount /dev/xvdf /mnt/ebs
Step 4: Share the EC2 isntance by mounting it at /mnt/ebs2.
mount /dev/xvdf /mnt/ebs2
Conclusion
By following the steps mentioned above you can perform attach and mount EBS voulume to the EC2 instances. As an DevOps engineer you need to take care of this whole process which will be in real time scenarios.
FAQs On Attach and Mount an Extra Volume to an Linux Instance in AWS
1. How Many EBS Volumes Can I Attach To An Instance?
It depends on the types of instance you are using like
- t1.micro: You can attach only one EBS.
- m1.small : You can attach only four EBS.
- m1.xlarge: You can attach thirty two EBS
2. What Are The Types Of Volumes For EC2 Instances?
There are three types of volumes for Amazon EC2 instances
- Standard EBS volumes.
- Provisioned IOPS (IOPS) EBS volumes.
- Ultra Low Latency (ULD) EBS volumes.
Like Article
Suggest improvement
Share your thoughts in the comments
Please Login to comment...