How to Annotate Matplotlib Scatter Plots?
Last Updated :
24 Feb, 2021
A scatter plot uses dots to represent values for two different numeric variables. In Python, we have a library matplotlib in which there is a function called scatter that helps us to create Scatter Plots. Here, we will use matplotlib.pyplot.scatter() method to plot.
Syntax : matplotlib.pyplot.scatter(x,y)
Parameters:
- x and y are float values and are the necessary parameters to create a scatter plot
- marker : MarkerStyle, default: rcParams[“scatter.marker”] (default: ‘o’)
- cmap : cmapstr or Colormap, default: rcParams[“image.cmap”] (default: ‘viridis’)
- linewidths : float or array-like, default: rcParams[“lines.linewidth”] (default: 1.5)
- alpha : float, default: None → represents the transparency
Annotation of matplotlib means that we want to place a piece of text next to the scatter. There can be two cases depending on the number of the points we have to annotate :
- Single point annotation
- All points annotation
Single Point annotation
In single-point annotation we can use matplotlib.pyplot.text and mention the x coordinate of the scatter point and y coordinate + some factor so that text can be distinctly visible from the plot, and then we have to mention the text.
Syntax: matplotlib.pyplot.text( x, y, s)
Parameters:
- x, y : scalars — The position to place the text. By default, this is in data coordinates. The coordinate system can be changed using the transform parameter.
- s : str — The text.
- fontsize — It is an optional parameter used to set the size of the font to be displayed.
Approach:
- Import libraries.
- Create data.
- Make scatter plot.
- Apply plt.text() method.
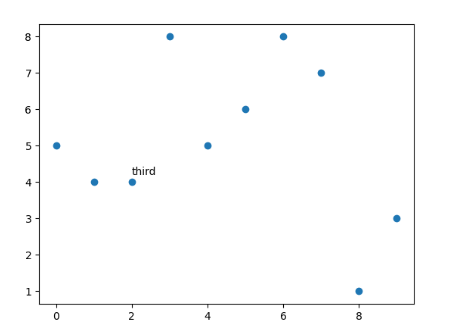
Implementation:
Python3
import matplotlib.pyplot as plt
x = [x for x in range(10)]
y = [5, 4, 4, 8, 5, 6, 8, 7, 1, 3]
plt.scatter(x, y)
plt.text(2,4.2,"third")
plt.show()
|
Output:
All points annotation
If we want to annotate all points in the scatter plot then matplotlib.pyplot has an inbuilt function annotate which takes the text, x, and y coordinates of the point.
Syntax: matplotlib.pyplot.annotate( text, xy )
Parameters:
- text : str — The text of the annotation. s is a deprecated synonym for this parameter.
- xy : (float, float) — The point (x, y) to annotate. The coordinate system is determined by xy coordinates.
Approach:
- Import libraries.
- Create data.
- Store all the annotations in a list in order with the sequence of the points to be displayed.
- Draw the scatter plot.
- Using a for loop annotate each point.
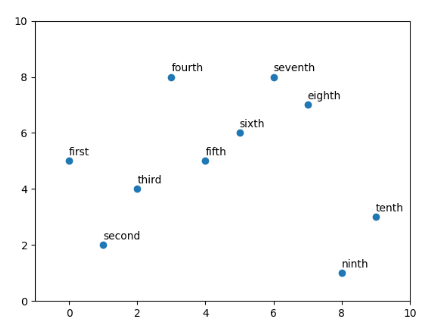
Implementation:
Python3
import matplotlib.pyplot as plt
x = [x for x in range(10)]
y = [5, 2, 4, 8, 5, 6, 8, 7, 1, 3]
text = ["first", "second", "third", "fourth", "fifth",
"sixth", "seventh", "eighth", "ninth", "tenth"]
plt.scatter(x, y)
for i in range(len(x)):
plt.annotate(text[i], (x[i], y[i] + 0.2))
plt.xlim((-1, 10))
plt.ylim((0, 10))
plt.show()
|
Output:
Like Article
Suggest improvement
Share your thoughts in the comments
Please Login to comment...