How to Add a Y-Axis Label to the Secondary Y-Axis in Matplotlib?
Last Updated :
04 Aug, 2022
Sometimes while analyzing any data through graphs we need two x or y-axis to get some more insights into the data. Matplotlib library of Python is the most popular data visualization library, and we can generate any type of plot in Matplotlib. We can create a plot that has two y-axes and can provide different labels to both of the y-axis. We can make a plot with two different y-axes by creating or using two different axes objects with the help of twinx() function. First, we create figure and axis objects and make the first plot. And we also set the x and y-axis labels with the help of the axis object created.
Axes object: Axes are the most basic and flexible unit for creating subplots. Axes are used for the placement of plots at any location in the figure. A given figure of the plot can contain many axes, but a given axes object can only be in one figure of the plot.
Approach:
- Import packages.
- Use the axes object and create a subplot.
- Using the twinx() define the plot values.
- Now label the axis.
- Show plot.
Example 1:
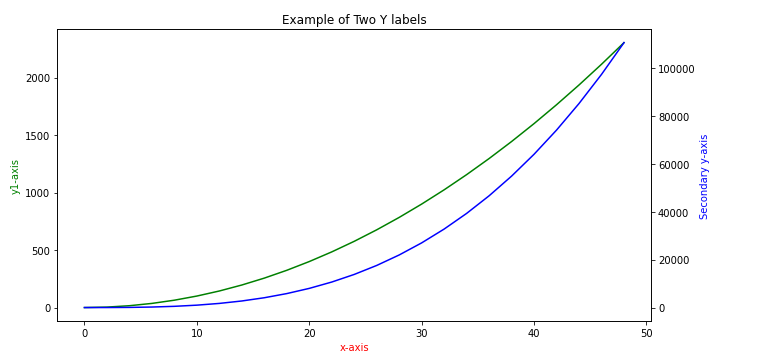
In this example we have created a plot with two different y-axes by using two different axes objects a and a2 with the help of twinx() function. ax.twinx() creates a new Axes object ax2 for a y-axis that is opposite to the original y-axis. The second axes object ax2 is used to make the plot of the second y-axis variable and to update its label.
Python3
import numpy as np
import matplotlib.pyplot as plt
x = np.arange(0, 50, 2)
y1 = x**2
y2 = x**3
fig, ax = plt.subplots(figsize = (10, 5))
plt.title('Example of Two Y labels')
ax2 = ax.twinx()
ax.plot(x, y1, color = 'g')
ax2.plot(x, y2, color = 'b')
ax.set_xlabel('x-axis', color = 'r')
ax.set_ylabel('y1-axis', color = 'g')
ax2.set_ylabel('Secondary y-axis', color = 'b')
plt.tight_layout()
plt.show()
|
Output:
Example 2:
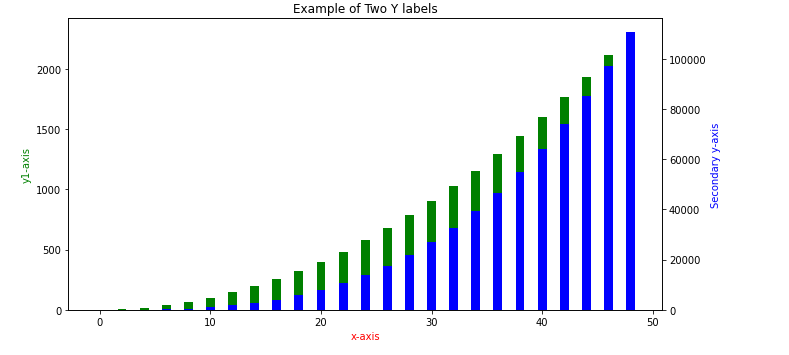
In this example we have created a bar plot using same method.
Python3
import numpy as np
import matplotlib.pyplot as plt
x = np.arange(0, 50, 2)
y1 = x**2
y2 = x**3
fig, ax = plt.subplots(figsize = (10, 5))
plt.title('Example of Two Y labels')
ax2 = ax.twinx()
ax.bar(x, y1, color = 'g')
ax2.bar(x, y2, color = 'b')
ax.set_xlabel('x-axis', color = 'r')
ax.set_ylabel('y1-axis', color = 'g')
ax2.set_ylabel('Secondary y-axis', color = 'b')
plt.tight_layout()
plt.show()
|
Output:
Example 3:
We can add a y-axis label to the secondary y-axis in pandas too. Generating a plot from DataFrame and also without using twinx() function. In this example, we will use simple DataFrame.plot() function with some parameters to specify the plot.
When we set the secondary_y parameter to be True in DataFrame.plot method, it returns different axes that can be used to set the labels.
Python3
import pandas as pd
import matplotlib.pyplot as plt
dataset = pd.DataFrame({'Name':['Rohit', 'Seema',
'Meena', 'Geeta',
'Rajat'],
'Height': [155,129,138,164,145],
'Weight': [60,40,45,55,60]})
ax = dataset.plot(kind = 'line', x = 'Name',
y = 'Height', color = 'Blue',
linewidth = 3)
ax2 = dataset.plot(kind = 'line', x = 'Name',
y = 'Weight', secondary_y = True,
color = 'Red', linewidth = 3,
ax = ax)
plt.title("Student Data")
ax.set_xlabel('Name', color = 'g')
ax.set_ylabel('Height', color = "b")
ax2.set_ylabel('Weight', color = 'r')
plt.tight_layout()
plt.show()
|
Output:
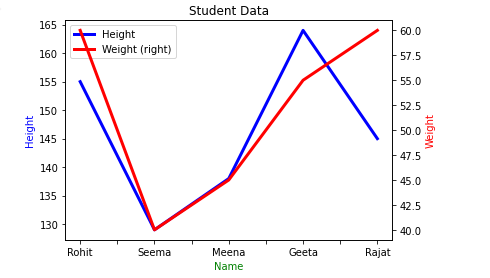
In above example, the plot is created without using twinx() function, but we have created two axis object ax and ax2 as given in other examples for two y-axis to make the plot with two y-axis and update its label.
Like Article
Suggest improvement
Share your thoughts in the comments
Please Login to comment...