Git… The most popular and common tool used by programmers in the programming world.
Forget about this tool for a moment and just look at the picture given below…

Flashback… Are you laughing?? (Yes! You’re….)
The above picture reminds you of your developer journey. This is how you tried to keep the backup of your files when you were scared of doing something wrong in your project. You followed this traditional approach thinking that you may create a mess in your project.

You create some files in your project, you make some changes, you implement something new, and then you copy the files, and give them the name blogPost_new. Again you make some changes, you create another copy with another filename blogPost_backup. This goes on and your directory is now filled with multiple files for a single project. The files in your project are blogPost_old, blogPost_one, blogPost_two, blogPost_backup, blogPost_final etc.
After a couple of days, you open your project. You want to check what you did in the previous copy, but when you see tons of files in your project, you become confused. Now you are unable to identify which file does what and what the sequence of these files. Which file was running smoothly, which files had what kind of changes, why the file was changed, and which file serves no purpose in your project?
You’re not alone, and we all have been there at some point in our development career. It is a huge pain to check the code in files manually to identify their purpose.
Now you might have understood the importance of Git (if you are a programmer, and you are familiar with this tool) in programmers life. It saves your day and makes the life of software development teams much easier.
It’s super easy to manage your code with Git, and also it’s easy to fix your bug if something goes wrong. Today most programmers (especially newbies) know its importance.
You might have used various commands in git….git add, git push, git pull, git commit, etc but if we ask how things work behind the scene and how the flow of Git looks like then what would be your answer…
Most of us know don’t know…
Today in this blog we are going to explore this amazing tool a bit more. We will discuss in-depth how Git works internally.
Take your chair, sit back, relax and give your weekend or a couple of hours to know your favorite tool a bit more.
A Quick Introduction
In case you’re not familiar with this tool then read the blog An Ultimate Guide to Git and Github.
In simple words, Git keeps the backup of your project. It keeps the track of your source code taking the kind of snapshot of them. It assigns a unique value (SHA-1 hash) to each snapshot to differentiate them. In simple words, Git creates save points in your files so that you can check them or retrieve them whenever you want.
Let’s come to the main point….the core functionality of Git. How Git Handle your files and the workflow of it.
States in Git
The core functionality of Git works in mainly three file states modified state, staged state, or committed state. If you include a remote repository then you can divide its core functionality into four states. Your files can be in any one of the states. We will discuss each one of them but for better understanding, we are going to take a real-life example.
Consider a scenario that you are asked to create a nice photo album with some caption or message along with the pictures. How would you do that??
Most probably you will perform the actions given below…
- You will take some pictures to include in your photo album. You haven’t pasted it yet in your album, so it’s not going to affect your photo album. You have the freedom to filter out the pictures which you want to include in your photo album. If you haven’t clicked a good picture, then you also have the choice to take the same picture again if it’s necessary.
- In the next step, you will filter out the pictures which you want to include, and you will print them out. Imagine that you set them next to the empty page in your album. Basically, you are preparing these photos (creating a sort of staging area) to glue in your photo album, but you haven’t done that yet.
- Once you’re ready with your picture you can glue them in your photo album with some message or title describing the moment of the event related to the picture.
At any time you can turn the pages of your album, and you can remind yourself how things looked like at that specific moment. We can relate this example with the four states in Git, and we can understand it much better. How….?? Let’s discuss that.
1. Modified State
In this state, your files are modified, but changes are not saved. You do not instruct Git to monitor these files. Basically, these are uncommitted files. Taking the picture is just like making changes in your files. You create files, you write code to add some features, or you delete the files. You’re preparing these files to save in the Git commit.
These files are not permanently saved, and your work is still in progress. Anytime you can write, re-write, delete or make changes in your file.
2. Staged State
In this state, your files are prepared to be committed in the .git repository. These files are not committed, and they are only prepared to be committed in their current state or version. You just explicitly authorize Git to monitor the file versions.
Git hasn’t committed these files, so even after adding the files to the staging area, you still have the option to modify your files. You can make modifications, and you can add this modification to the staging area. This is like clicking some new pictures and then deciding to paste them into the photo album.
3. Committed State
In this final stage, you successfully save the files in the .git repository, and you create a commit for them. Creating the commit is just like gluing your pictures in the photo album. In this final phase, you record the staged version of your file in the Git directory.
You write a message or the title with these pictures to give information that what these pictures are meant to you. Commit messages in Git works in the same way. You write a commit message to give information that what changes you have done in your code or what features you have added to your code.
Always write a descriptive commit message that describes clearly what features you have added, what changes you have made, or which bug you have resolved in your codebase.
Now let’s talk about the file locations for your files when you are working with your files. Based on the state of a file we will discuss the location where Git will place it.
File Locations
For different states, the locations of your file will be different. We are going to discuss the complete workflow based on the state and locations of the file.
1. Working Directory
When you create any folder in your system it resides in the working directory or local folder or in your workspace. Basically working directory is the local folder for your project files. Now you might have understood that modified files reside in the working directory.
Don’t be confused between the working directory and the .git directory. The working directory is created by the user and. git directory is created by Git.
2. Staging Area
Your files in the staged state reside in the staging area. Basically, the staging area is the “index” in Git parlance located in the .git directory. It stores the information about the files which are queue to be committed.
3. Git Directory
- This directory is the heart of Git where all the magic happens. Files in the committed state reside in this directory.
- The .git directory is created by Git, and it stores the files that are committed or instructed by the user to monitor. The .git folder stores the object databases and metadata of the files.
- git clone command followed by the URL creates a local copy of the repository in your workspace.
- add command add the files from workspace to the index or the staging area. The file is staged, and it is marked to be committed but not yet committed.
- When you execute commit commands all the files that are staged, their changes will be committed to the local repository.
Now, take a look at the picture given below to understand the complete workflow…
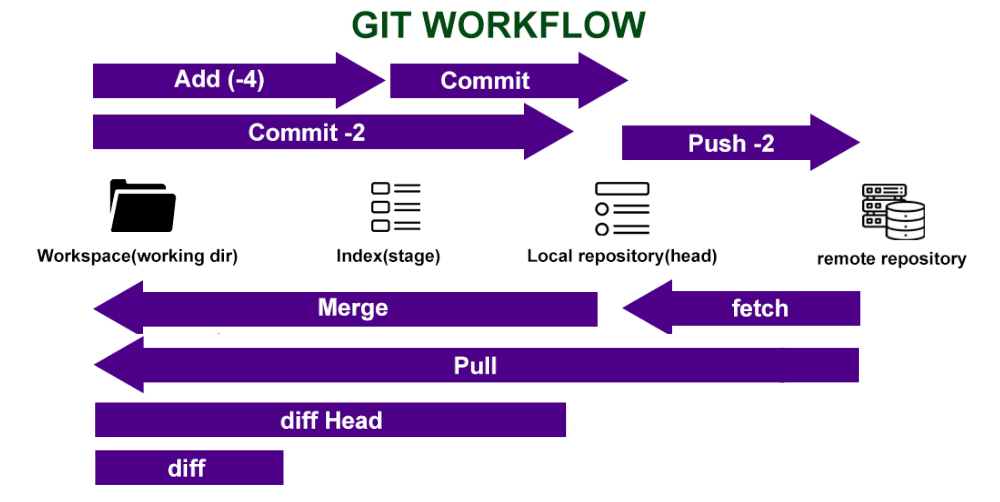
The above image is self-explanatory, and it shows a complete workflow. You might have understood what’s the purpose of each command in Git. Few things, from the above image we would like to explain here to make your concept more clear.
In the above picture, the git fetch command gets the files from the remote repository to the local repository but not yet to your workspace. To get the updated file from the local repository to your workspace you execute the git merge command. Your files in your local workspace will be updated to what is in the remote repository. To perform both the operation at once you can execute the git pull command.
Now the question is…if we can do everything in one single command git pull then why we need to execute two separate commands git fetch and git merge?
The answer is….executing two separate commands allows us to compare files before we actually get the latest version of the files. In other words, you can fetch the files from a remote repository using the git fetch command, and then you can run the git diff HEAD command to check what’s the differences are between the files that exist in the working directory and the files that exist in the local repository. Based on the differences you can decide whether you want to merge the files or not.
git diff (without head) command tells you the difference between the files that exist in the working directory and the files that are staged for commit. This command basically tells you that what you could still add to the stage for the further commit, that you haven’t already.
Git Internals
When you open a project initialized by Git you come across a directory .git. This is the place where all the magic happens and in this section, we will discuss the internal structure of .git.
Taking a closer look at this directory you will find four important subdirectories. Let’s discuss the role of these four subdirectories..
1. objects: This directory acts like a database, and stores all the repos files. Their content is encoded and compressed.
2. refs: Refs have stored as normal text files in the .git/refs directory and this file stores the pointer into commit objects. In simple words, if you need to manipulate an object you need to remember the hash of the object. Memorizing these hashes are difficult so, git has reference. These refs contain the hash of a commit object.
3. HEAD: This file contains the path to the reference that points to the current branch you are working on check out.
4. config: In this file, you can find repo configuration.
Some Plumbing Commands You Should Know
Almost all the git commands such as git add, git commit is made up of some low-level core commands. These commands are called plumbing commands (We know this is a new word for you…).
Take a look at the picture given below, and then we will explain it in detail…

- Suppose you have a working directory, and you initialize it with Git. After initializing your project if you create or put a file into it, Git creates the working tree, and at this moment when you run git status command you see something like this…

- When your files are staged git creates a blob. Blob contains the content of the file in binary format. This blob is assigned with a 40 characters hash(Sha 1 hash) value so that it can be identified uniquely. After that this blob will be saved to the objects database in the Git repo.
- There will be multiple blobs in the staging area, so Git creates a tree to prepare the blobs to be committed. A tree contains the pointer to the blob and names it A. This will be the snapshot of all the files that you want to commit.

- Before committing the files, we take the user’s identification to track who made the commit. Tree stores the author,and the committer, and also the message of this commit.
Final Thought
We tried our best to make you familiar with the internal structure of Git, and now you might have some idea about the workflow of Git. How the git commands works under the hood and what operations are performed internally.
Like Article
Suggest improvement
Share your thoughts in the comments
Please Login to comment...