Hosting MySQL Server on Linux
Last Updated :
14 Oct, 2020
To Host a MySQL server on Linux we will follow the below-mentioned steps:
- Set up a Linux Server to host this MySQL.
- Get our Users configured in MySQL.
- Write some Python code and try to connect to that server.
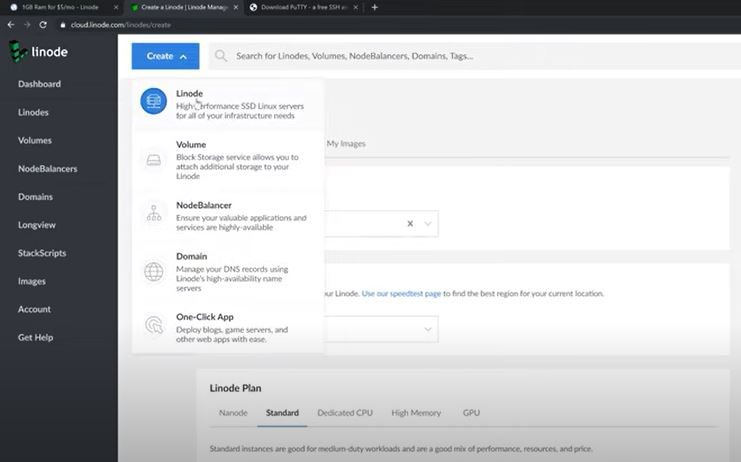
The first thing we need is Linux Server and for that, we are using Linode :
1. Open Lincode and click on Create then Lincode.
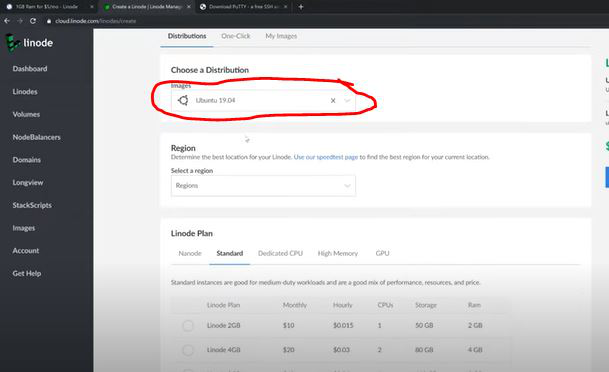
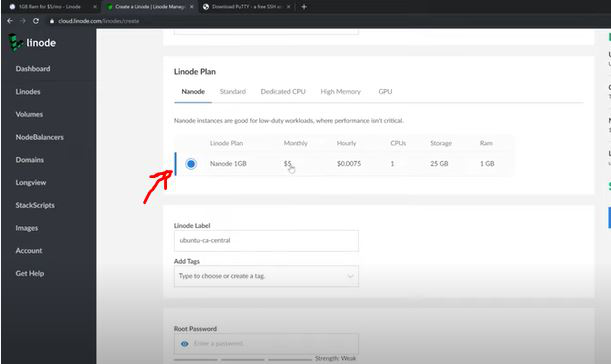
2. Now fill the details as shown below :
images : Ubuntu 19.04
Linode Plan : Ninode 1 GB
Lincode Label : mysql-server
Reset Password : your_password

3. Now click on Create, once created your screen looks like as shown below :

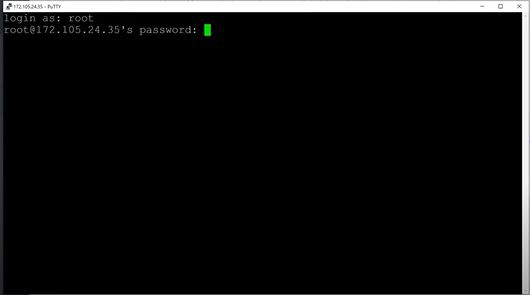
4. Now we are going to download a program called PuTTY which will allow us to SSH into our Server. Once Putty has installed open it and paste your Linux Server IP Address in it as shown :
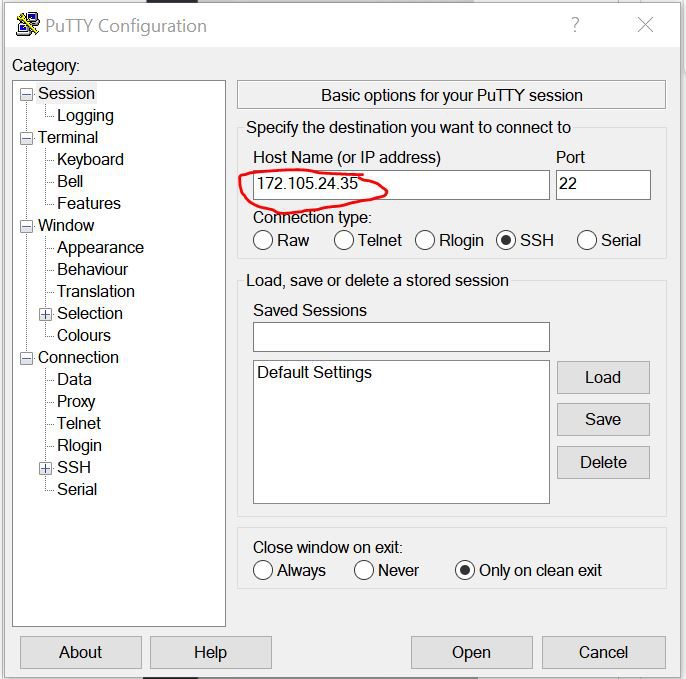
5. Click Open, if you see a warning just press Ok,
6. Now type route as login and the password is going to be whatever that root password that we created and then hit enter.
7. Once done, now we can actually start installing the MySQL server so the first thing we will do is install MySQL and run some other commands as well which are given below :
sudo apt-get install mysql-server
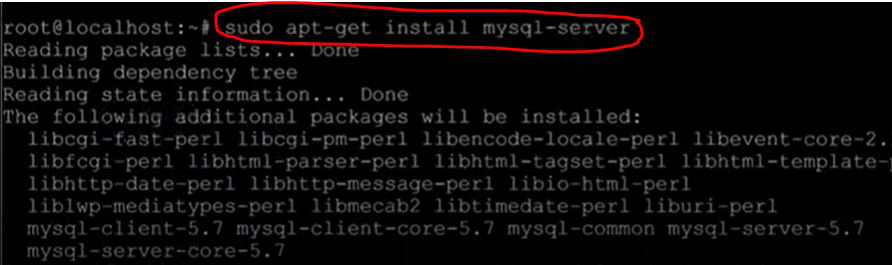
8. Type yes when asked. Now we’ve successfully installed MySQL on the server, now we will configure it set up a few things that allow remote access because by default MySQL is localhost which means you can only connect to it locally from the server and that’s fine in most cases because sometimes we’ll run like MySQL server on the same machine as a website and in that case, you only need localhost access because you’re on the same machine so you can modify the database directly from the website but in our case, we need a remote, so we will run some other commands and open a Command Utility Window for MySQL which will allow us to modify some security issues.
sudo mysql_secure_installation utility
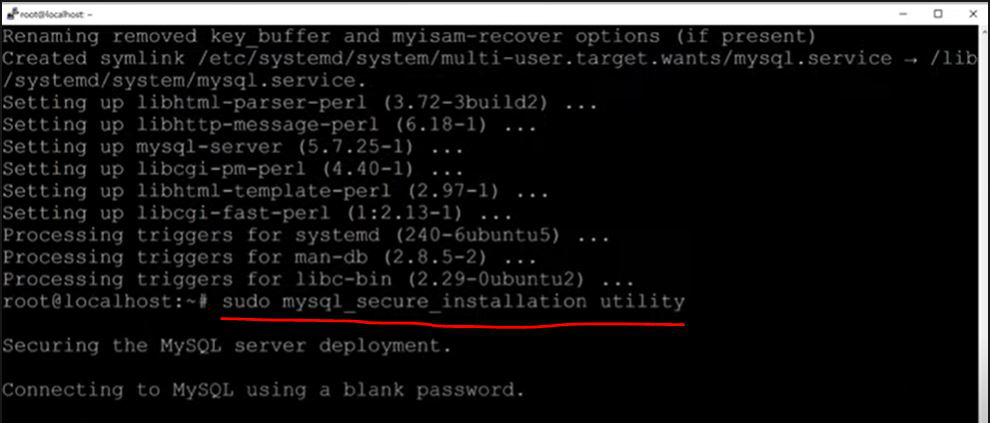
9. Now it is going to ask us some questions here like validate password plug-in, which can be used to test passwords and improve security, we want it to be secure, so we are going to type Y for yes and validate our password, so now we’ll enter what the minimum strength of a password could be for us to log so in our case we’ll enter 0 as low because we just want to do a basic password for this but you can do strong, that means every time you create a new user it needs to have a strong password, now it will ask for a root password before our MySQL server, I’ll recommend using a strong password because this password will be used to log into like an admin part of MySQL and modify in set permissions so you don’t want anyone to accidentally get in here. Once you type your password it will show the Estimated strength of the password, type Y for yes, now it says remove anonymous users we press Y.
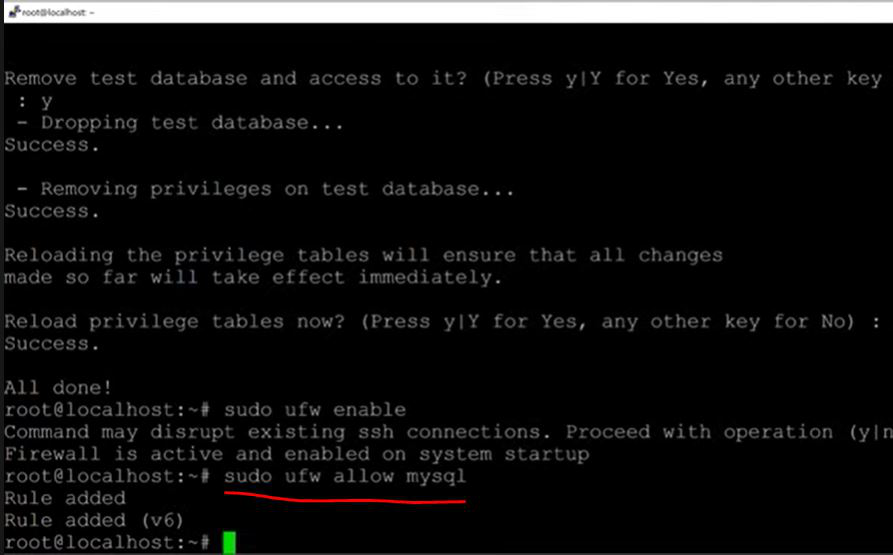
Now it says root should only be allowed to connect from localhost this ensures that someone cannot guess at the root password from the network, so we will hit yes as well, this means that there’s no way that you can log in to the MySQL server as the root server unless you’re actually on my machine. Then it says remove test database and access to it, we will hit yes to it, now it says reload privilege tables now, hit yes.
10. Now we’re ready to get in and actually creating a user and actually creating a user and changing a few things so that this can be seen by any machine. Now we have to set a basic firewall on our machine. To do this run the command below :
sudo ufw enable

11. Run the below -mentioned command now, it allows MySQL to bypass this firewall and see other connections.
sudo ufw allow mysql
12. Now we’ll work on the setting MySQL which is the server binding now to gain access to this file. Run the following commands :
cd /etc/mysql/mysql.conf.d
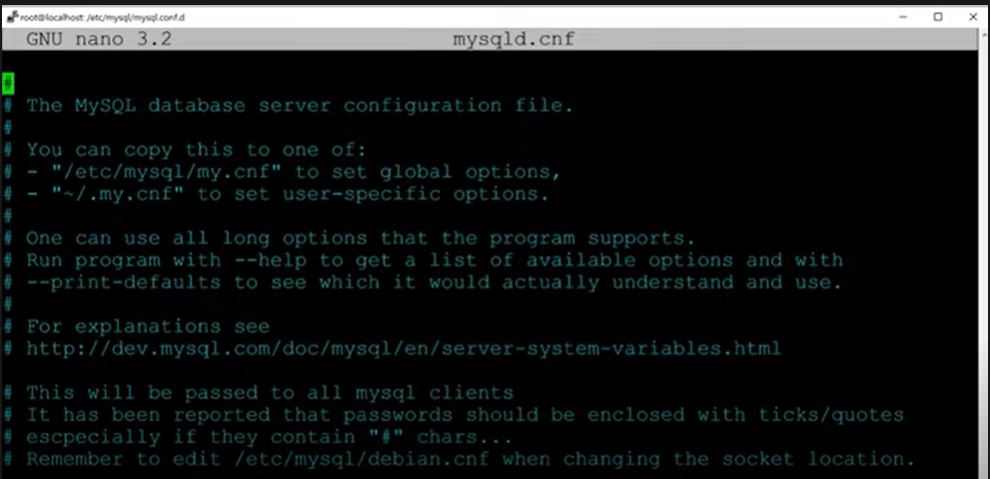
13. Now we will use nano to modify the specific file, now the file we need is going to be :
nano mysqld.cnf
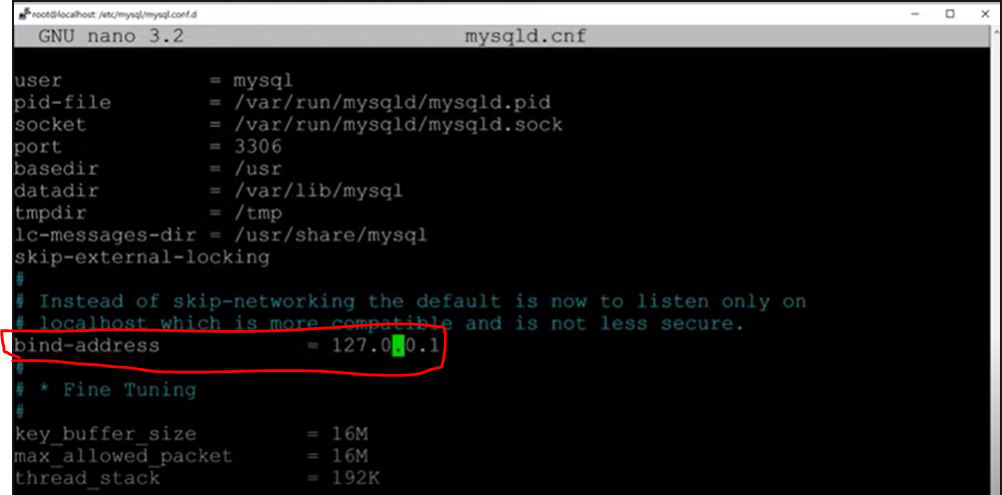
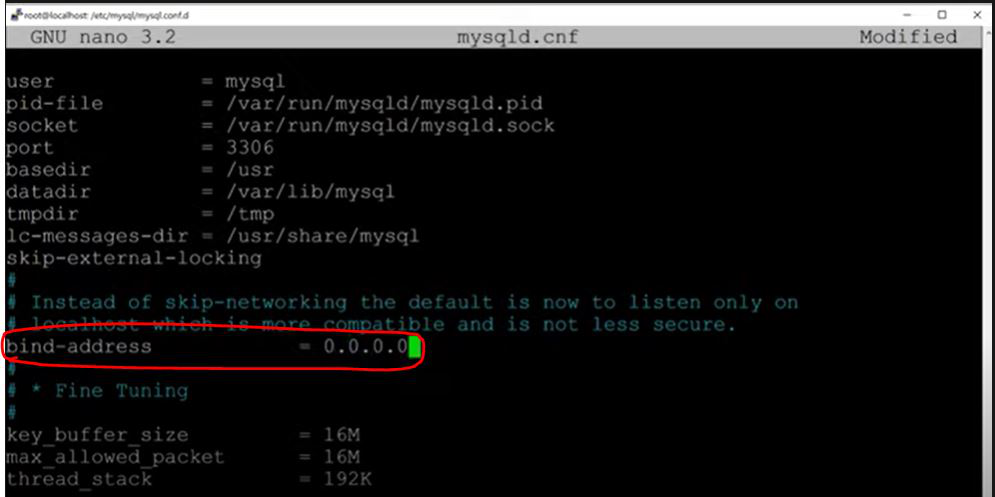
14. After typing the above command you’ll see something like this.
15. Now move your cursor to bind-address using down arrow key, it’s default value is given 127.0.0.1 this means that this is actually bound to the local host which means that only the local host which is the actual machine can access the server we obviously don’t want to build to access that from outside this, so we will change this to 0.0.0.0 which means that anything can access this server so it’s binding to it essentially any IP address that the server has which means we can access it from anywhere else. Now save this with CTRL+S and then exit by CTRL+X.
16. Now we will simply set up a user that we can actually use to access the database, set up a basic database, and then we will connect from our Python code. Now we also want to make sure that our MySQL server is always running on the server whether we turn it off or reboot it. Now the command to do this is :
sudo systemctl start mysql
sudo systemctl enable mysql
sudo systemctl restart mysql
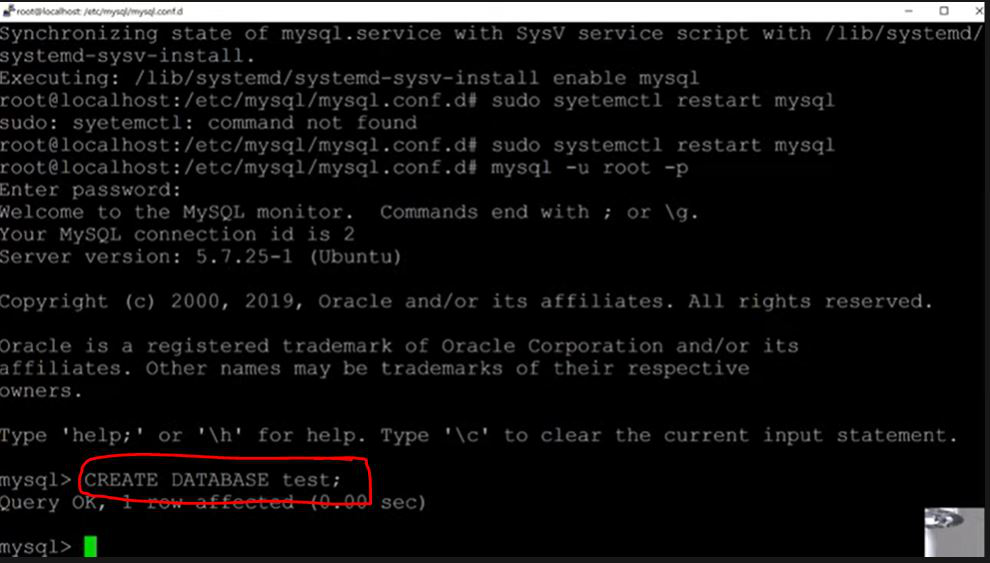
17. Now we will go to MySQL settings and start modifying some things so to do this run the command below :
mysql -u root -p
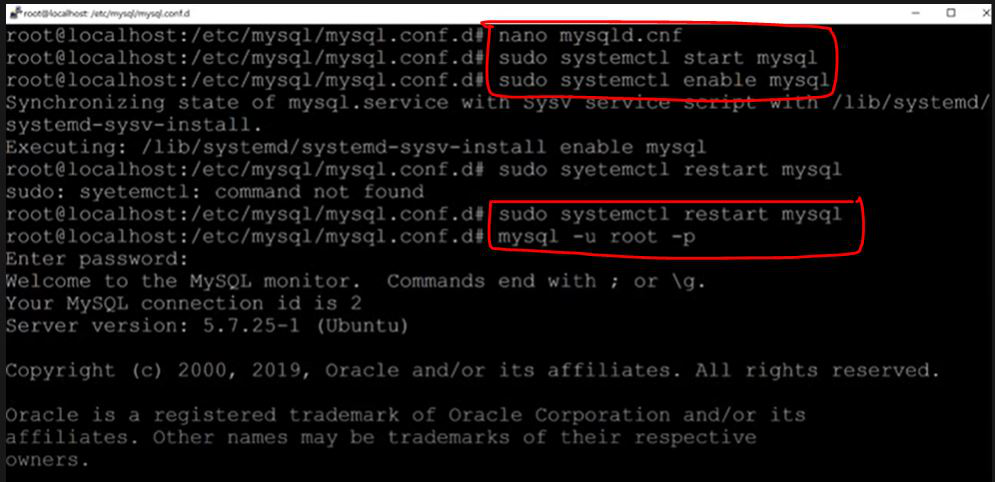
18. Enter the password that we set into the utility. Now we can type our SQL queries. First, we will create a database
CREATE DATABASE test;
GRANT ALL ON test.* TO username@[Your IP Address] IDENTIFIED BY "PASSWORD";
GRANT ALL ON test.* will grant all permissions to all the tables in the database test. Now create a Python file named connect.py :
Python3
import mysql.connector
from datetime import date
import datetime
db = mysql.connector.connect(
host="172.105.24.35",
user="divyansh",
passwd="StrongPassword1234*",
database="test",
)
mycursor = db.cursor()
mycursor.execute("SHOW TABLES")
print(mycursor.fetchone())
|
And that’s it, Now you may connect to MySQL using this python file.
Like Article
Suggest improvement
Share your thoughts in the comments
Please Login to comment...