In this article, we will explore how we can do GUI automation using Python. There are many modules that can do these things, but in this article, we will use a module named PyAutoGUI to perform GUI and desktop automation using python.
We would explore two sections –
- How to automatically use the mouse pointer to perform certain tasks like moving the cursor, clicking on a certain point on the screen, etc
- Also, we would explore how we can automate the keyboard keystrokes.
Installation
This module does not come preloaded with Python. To install it type the below command in the terminal.
pip install pyautogui # for windows
or
pip3 install pyautogui #for linux and Macos
Getting Started
We should know the screen size of my device before doing any automation. Luckily PyautoGUI helps us to easily get it using the .size() function. It returns a size object with two values that represent the width and height of the screen respectively. Implementation is as follows.
Syntax: pyautogui.size()
Parameters: This function does not take any extra parameters
Return Type: It returns us the size of the present screen in pixels in a Size object
Below is the implementation:
Python3
import pyautogui
print(pyautogui.size())
|
Output:
Size(width=1920, height=1080)
Automating Mouse Movements
Getting the current position of the mouse cursor:
Firstly, we would where currently my mouse cursor is at, for that we can use the .position() function. The function again returns a point object with x and y values that gets the current position of the mouse.
Syntax: pyautogui.position()
Parameters: This function does not take any extra parameters
Return Type: It returns us the position of the mouse cursor in a Point object
Below is the implementation:
Python3
import pyautogui
print(pyautogui.position())
|
Output:
Point(x=1710, y=81)
Moving the cursor and clicking on specific spots:
Now we would try to move the mouse cursor and click at specific spots and perform opening an application and closing it. For moving the mouse pointer we can use .moveto() and specify x,y values along with a duration in which it will perform the operation, and we would use the .click() function to click on the spot where our mouse pointer is located right now. The code basically moves the mouse cursor to (519,1060) (x,y) values and then simulate a click using the .click() where the cursor is situated right now, then we again move to the position (1717,352) using the moveTo() and simulate a click again.
Syntax: pyautogui.moveTo() and pyautogui.click()
Parameters: This moveTo function has two required and one optional parameter, the first two values of x and y are required values while the duration is an extra parameter that kind of animates the movement of the mouse over the no of seconds assigned to the duration parameter. The click method in the example doesn’t take any parameter but an optional pair of parameters can be used to click a particular position on the keyboard.
Return Type: The functions don’t return anything but performs the jobs of the cursor to a specific point and then clicking there programmatically.
Below is the implementation:
Python3
import pyautogui
pyautogui.moveTo(519, 1060, duration = 1)
pyautogui.click()
pyautogui.moveTo(1717, 352, duration = 1)
pyautogui.click()
|
Output:

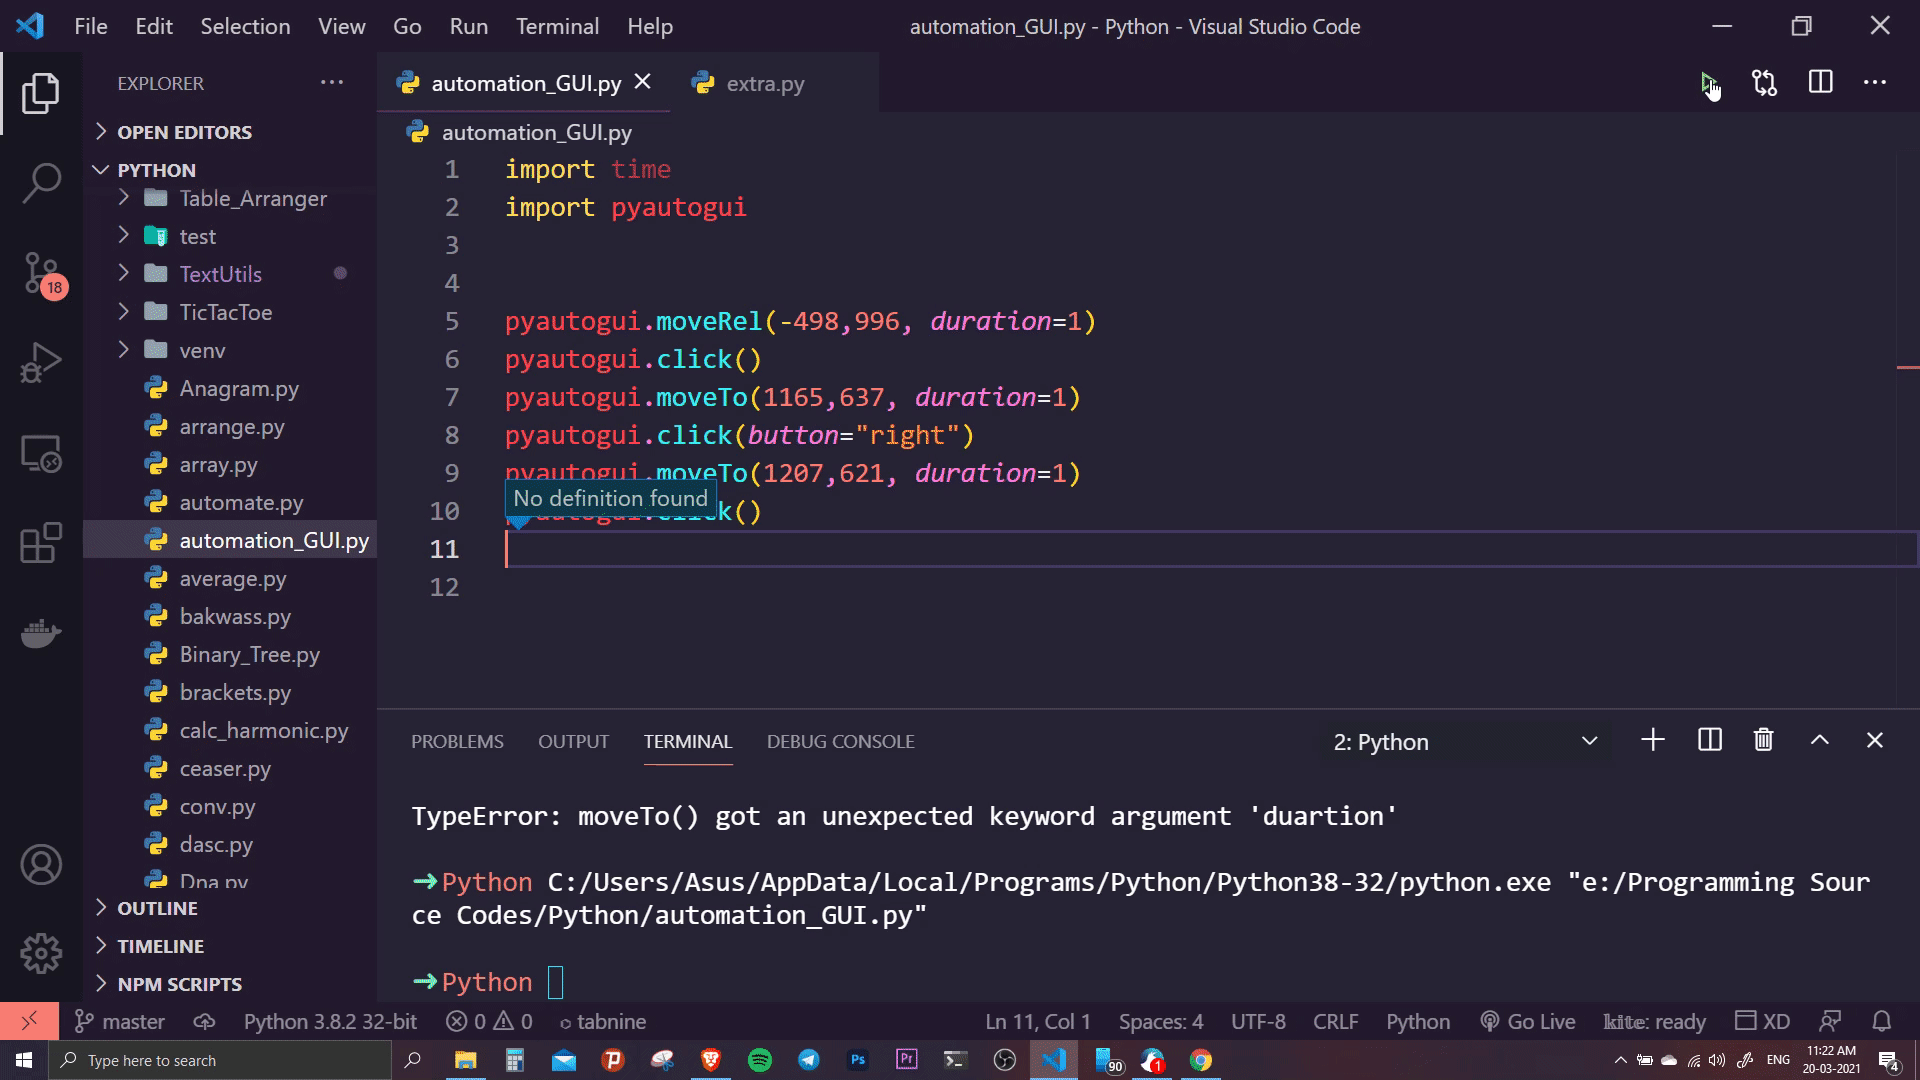
Now we would explore two more methods namely .moveRel() which helps us to move relative to the position we are at right now and finally we would see how we can simulate a right-click using pyAutoGUI. We start with importing the package and stimulate the cursor to move 498 px & down 998px from its current position. Then we use the click() method to simulate a left-click. Then we move to a specific location using the .moveTo() method. Now we again click on the present position of the cursor but this time we instruct to simulate a right-click instead of left by passing the button=” right” parameter (default is button =” left”). Then we gain to move to a specified location and left click there.
Syntax: pyautogui.moveRel()
Parameters: This moveRel function has also two required and one optional parameter, the first two values of x and y are required values while the duration is an extra parameter that kind of animates the movement of the mouse over the no of seconds assigned to the duration parameter. Also, we used an extra parameter for the pyautogui.click() function, we used button=”right” which simulates a right-click instead of the default left-click.
Return Type: The functions don’t return anything but perform the jobs of moving the cursor left 498 px & down 998px from it’s current position and then simulate a right-click programmatically.
Below is the implementation:
Python3
import pyautogui
pyautogui.moveRel(-498,996, duration = 1)
pyautogui.click()
pyautogui.moveTo(1165,637, duration = 1)
pyautogui.click(button="right")
pyautogui.moveTo(1207,621, duration = 1)
pyautogui.click()
|
Output:
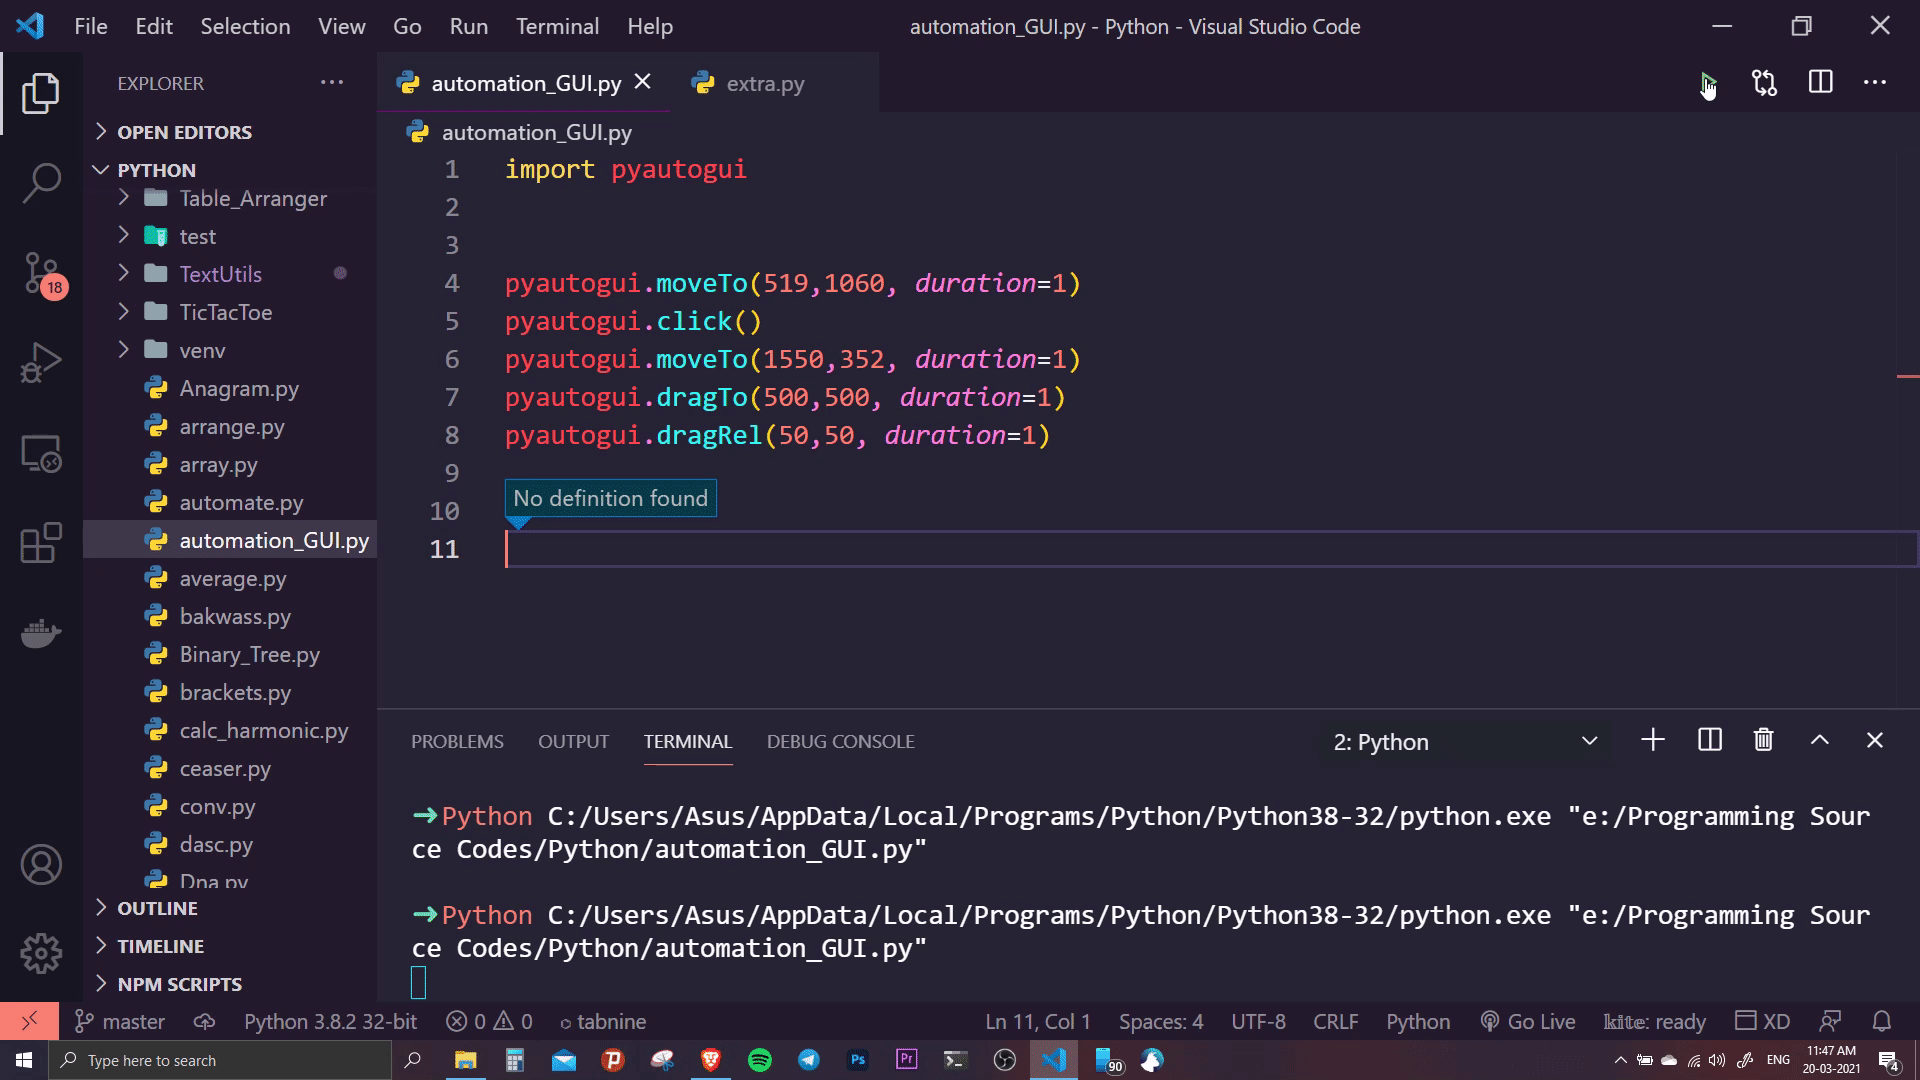
Dragging the cursor to a specific screen position:
Now we would see how can we drag windows using pyAutoGUI. We can use the .dragto() and .dragrel() which are exactly the way the .moveto() and .movrel() works except that in this case, they hold the left click while moving the cursor. In this program we simply, import the modules, then we move to a specified using the .moveTo() function. Then we left-click at the current position of the cursor. Now we again move the cursor to a specified location. Then we use the .dragTo() function to drag (left-click and hold) the to a specific location. Finally, we use the dragRel() function that drags the cursor relative to its current position to 50px right and 50 px down.
Syntax: pyautogui.dragTo() and pyautogui.dragRel()
Parameters: Both the functions has two required and one optional parameter, the first two values of x and y are required values while the duration is an extra parameter that kind of animates the movement of the mouse over the no of seconds assigned to the duration parameter.
Return Type: The functions don’t return anything but perform the jobs of left-click and holding and moves the cursor to (500,500) position and drags the cursor relative to it’s position to 5opx right and 50 px down programmatically.
Below is the implementation:
Python3
import pyautogui
pyautogui.moveTo(519,1060, duration = 1)
pyautogui.click()
pyautogui.moveTo(1550,352, duration = 1)
pyautogui.dragTo(500,500, duration = 1)
pyautogui.dragRel(50,50, duration=1)
|
Output:
Note: Duration parameter in .moveTo(), .moveRel(), .dragTo() and .dragRel() functions are optional, but it is provided to get a animation effect, without the property functions will execute instantly, and it would be tough to understand. Also we optionally pass x and y values in .click() function which can be used to click at a different location that the location the cursor is currently at.
Automating Keyboard
Automatically typing with keyboard:
First, we would learn how to simulate typing something using pyAutoGUI. Here in this example, we would type something in a notepad file using the .typewrite() function. In this code, we first import the time and pyAutoGUI module and then use time.sleep() function to pause the execution of the program for some specified seconds. Then we use the pyautogui.typewrite() function to simulate typing of alphanumeric keys. The phrase inside the quotes would be typed. Implementation is as follows:
Syntax: pyautogui.typewrite()
Parameters: The function has only one parameter which is the string that needs to be typed.
Return Type: The functions don’t return anything but perform the jobs of simulating the typing of a string that is passed inside it.
Below is the implementation:
Python3
import time
import pyautogui
time.sleep(5)
pyautogui.typewrite("Geeks For Geeks!")
|
Output:

Pressing specific keys and simulating hotkey:
Next, we would explore two functions, the first one is .press() and the second one is .hotkey(), first one helps you to press a key generally used to press non-alphanumeric keys and the .hotkeys() functions helps us to press hotkeys like ctrl+shift+esc, etc. Here also we start the code by importing two modules, time and pyAutoGUI. Then we pause the execution of the program for 5 seconds using the sleep function. we type the string using the typewrite function. Then we use the .press() function to simulate a keypress and finally the .hotkey() function to simulate the pressing of hotkeys. In our example, we used hotkey ctrl+a that selects all the text. The implementation is as follows:
Syntax: pyautogui.press() and pyautogui.hotkey()
Parameters: The .press() function has only one parameter which is the key that needs to be pressed and the .hotkey() function has a number of parameters depending upon the number of keys to simulate the hotkey action.
Return Type: The functions don’t return anything but perform the job of simulating of pressing the enter key and simulates pressing the hotkey ctrl+a.
Below is the implementation:
Python3
import time
import pyautogui
time.sleep(5)
pyautogui.typewrite("Geeks For Geeks!")
pyautogui.press("enter")
pyautogui.hotkey("ctrl","a")
|
Output:

Displaying message boxes
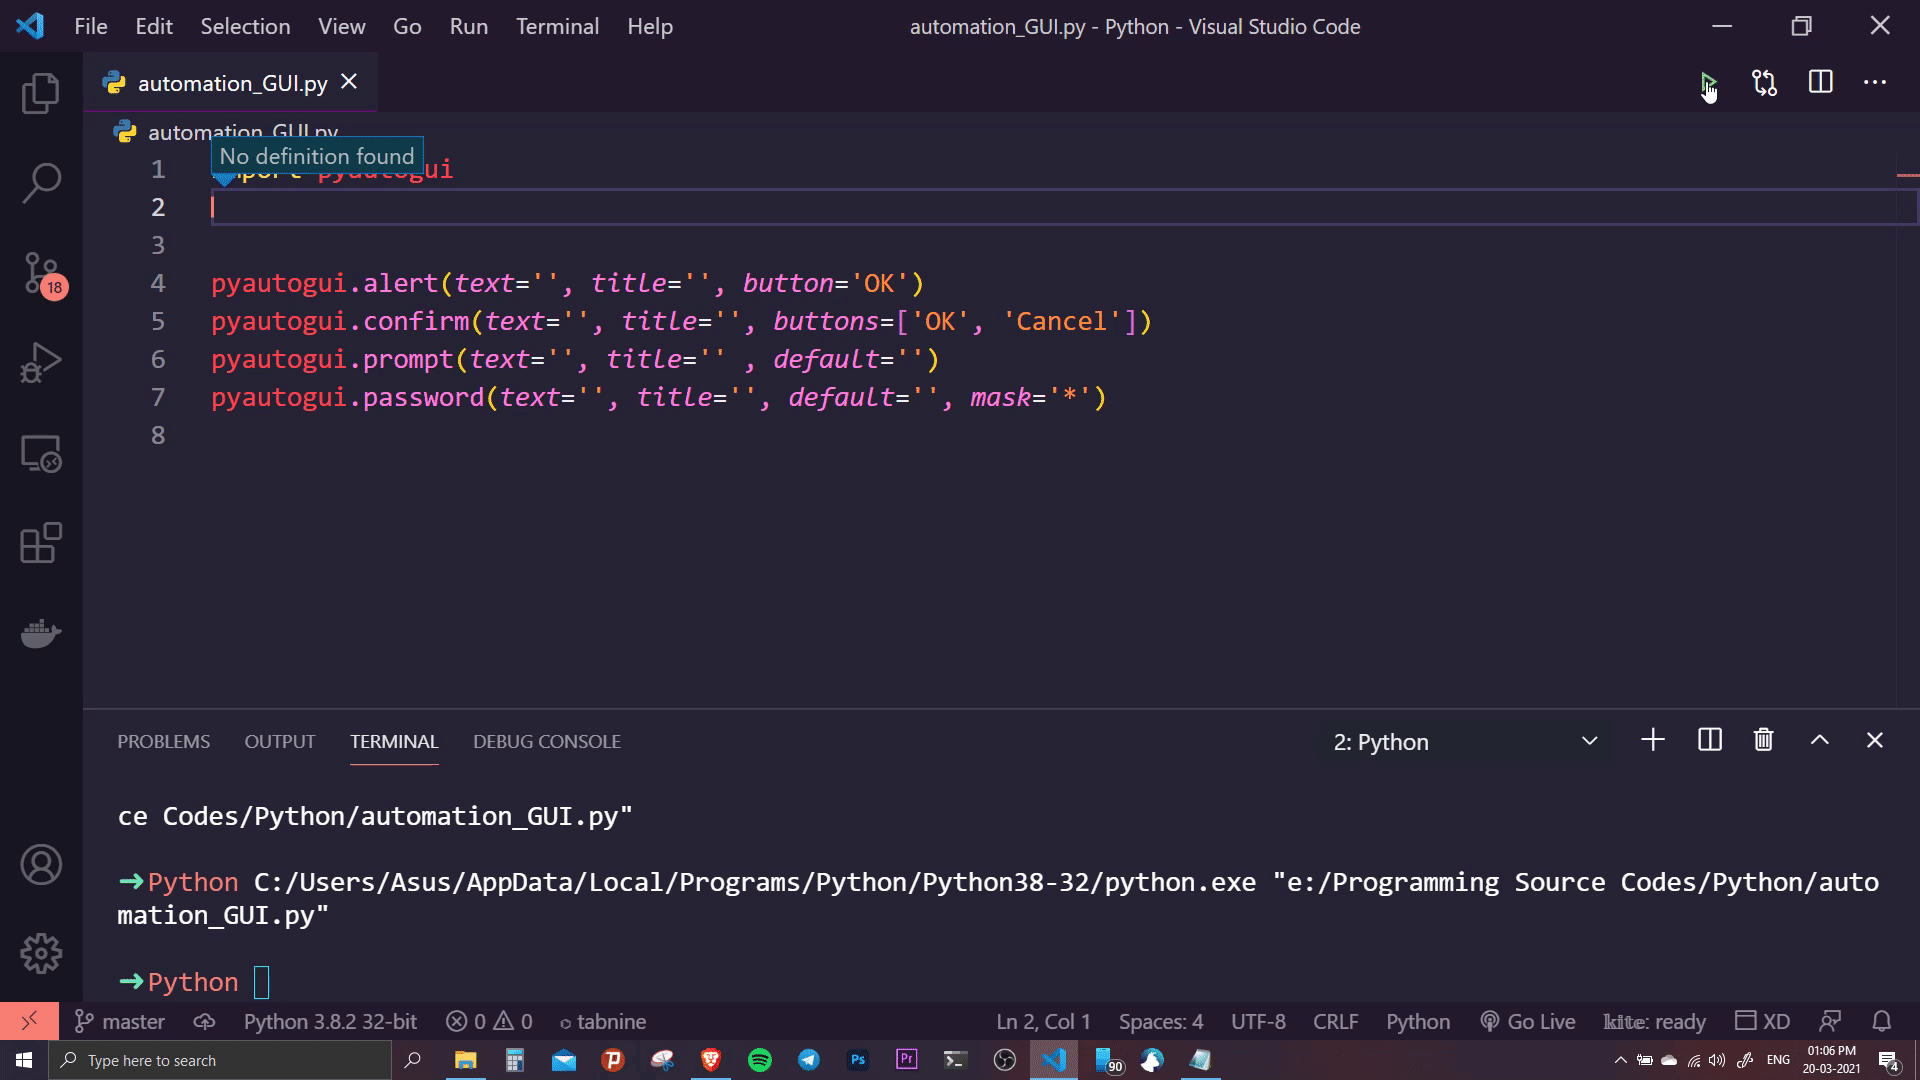
Now we would try to explore some cross-platform JavaScript style message boxes provided to us by pyAutoGUI. It uses Tkinter and PyMsgBox module to display these boxes. The code starts with importing modules, then we use different message boxes to display different messages. The .alert() function displays an alert in which we set the title and text to be blank with an “OK” button. Then the .confirm() function displays a confirm dialog box in which we again set the title and text to be blank and keep two buttons “OK” & “CANCEL” button. Then the .prompt() function displays a confirmation prompt box in which we again set the title, text, and default (what would be written by default in the prompt box before the user starts typing) to be blank. Finally, the .password() function displays a password dialog box in which we again set the title and text to be blank and set the mask (The character that gets replaced instead of the original letters in the password) to be “*”. The implementation is as follows:
Syntax: pyautogui.alert(), pyautogui.confirm(), pyautogui.prompt() and pyautogui.password()
Parameters: The .alert() function has three parameters defining the title, text and buttons to be placed. The .confirm() function also has three parameters for text, title and buttons. The .prompt() function has three parameters for text, title and default value. The .password() has four parameters for text, title, default value and mask (The character that gets replaced instead of the original letters in the password).
Return Type: The functions don’t return anything but show up an alert in which we set the title and text to be blank with an “OK” button. Then it displays a confirm dialogue box in which we again set the title and text to be blank and keep two buttons “OK” & “CANCEL” button. Then the .prompt() function displays a confirmation prompt box in which we again set the title, text and default (what would be written by default in the prompt box before the user starts typing) to be blank. Finally, the .password() function displays a password dialogue box in which we again set the title and text to be blank and set the mask to be “*”.
Below is the implementation:
Python3
import pyautogui
pyautogui.alert(text='', title='', button='OK')
pyautogui.confirm(text='', title='', buttons=['OK', 'Cancel'])
pyautogui.prompt(text='', title='' , default='')
pyautogui.password(text='', title='', default='', mask='*')
|
Output:
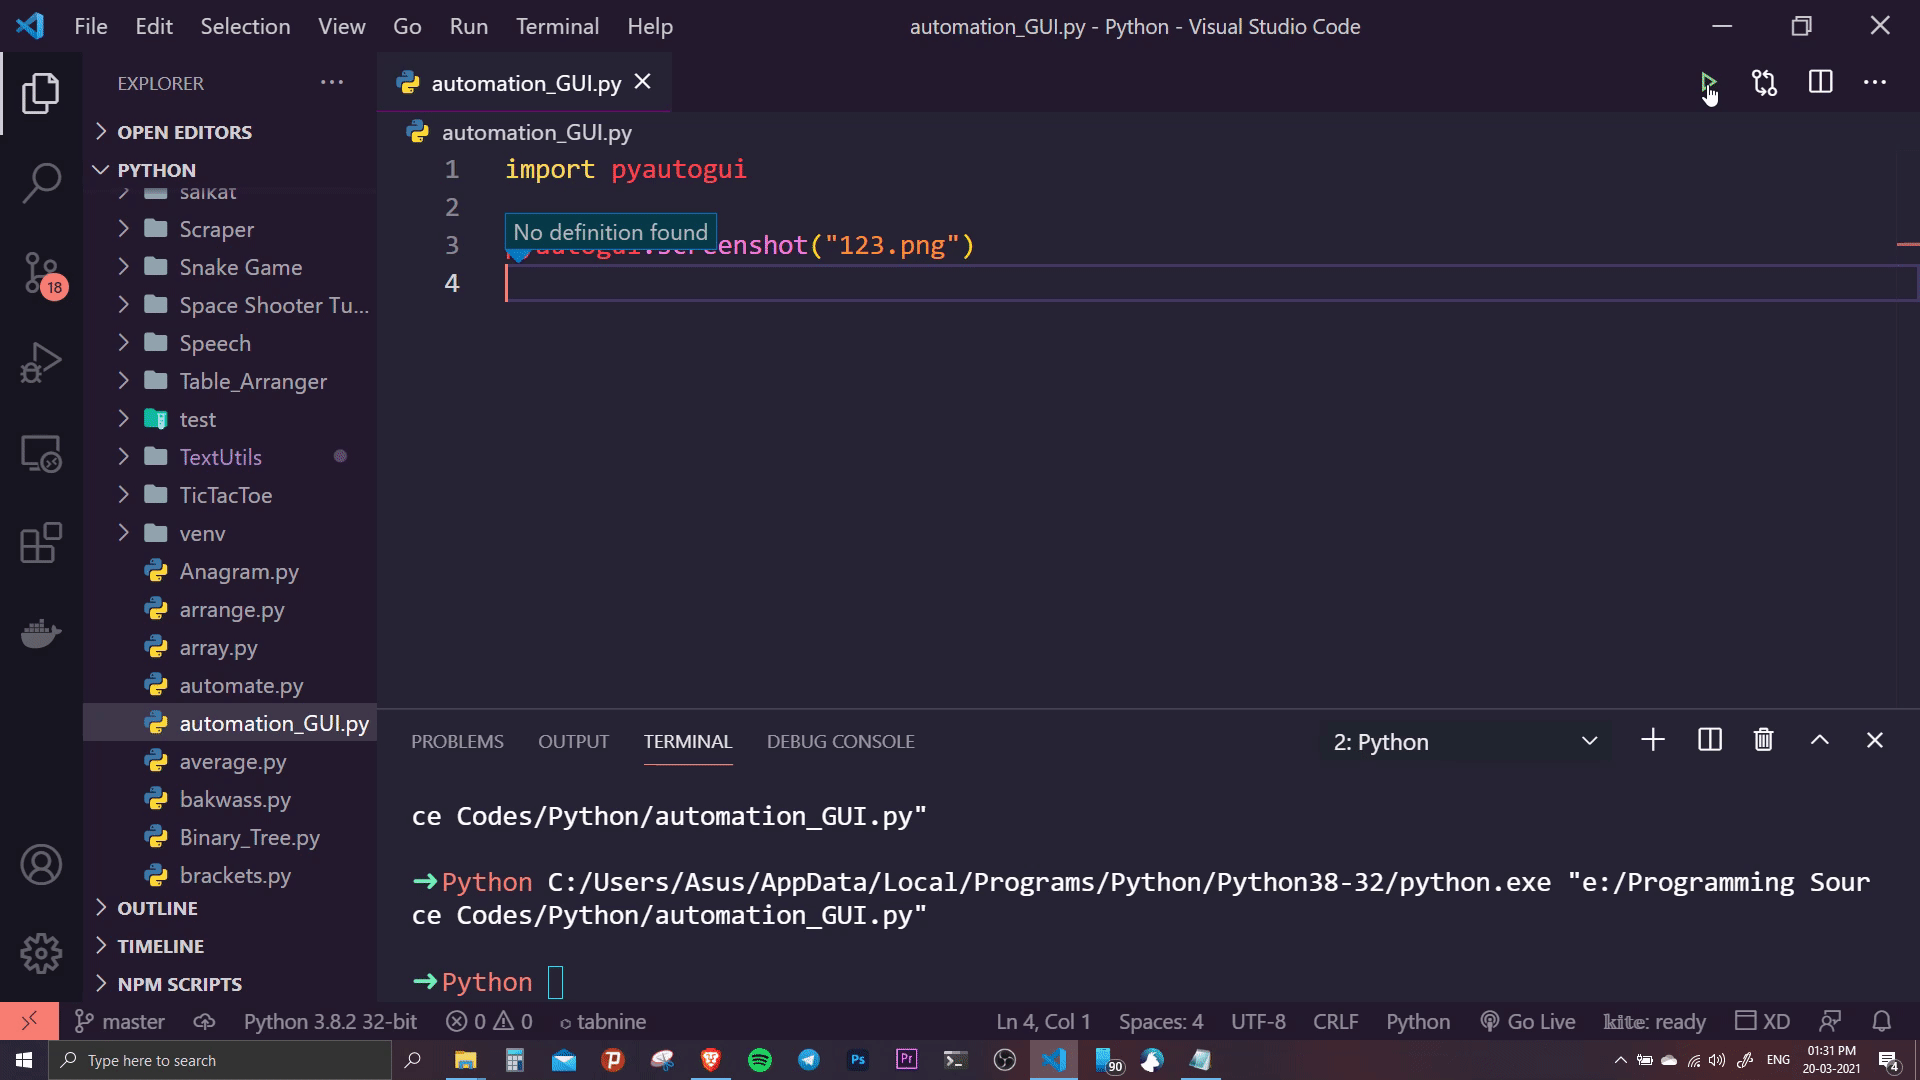
Taking screenshots
Finally, we would see how to take a screenshot using pyAutoGUI using the .screenshot() function. We would start by importing the pyAutoGUI module. Then we use the .screenshot() function that takes a screenshot of the present window and stores it as “123.png” in the same directory, for storing in another directory, we need to provide its relative or absolute path. The implementation would be as follows:
Syntax: pyautogui.screenshot()
Parameters: The function has one optional parameter which is the path of the file along with the filename in which the screenshot needs to be stored.
Return Type: The function doesn’t return anything but takes a screenshot and stores it in the path passed inside it as a parameter.
Below is the implementation:
Python3
import pyautogui
pyautogui.screenshot("123.png")
|
Output:
Like Article
Suggest improvement
Share your thoughts in the comments
Please Login to comment...