Gradients are considered to be eye-catching elements in UI/UX and graphic design. Having gradient elements in your apps can really elate your app in terms of user experience and feel.
In this tutorial, we will be looking at how we can implement gradients in flutter.
Flutter offers 3 types of gradients:
- Linear Gradient
- Radial Gradient
- Sweep Gradient
Note: In order to implement any type of gradient we need to make use of Box Decoration. The Box Decoration constructor can be assigned to the decoration property of Containers.
Box decoration Constructor:
const BoxDecoration(
{Color? color,
DecorationImage? image,
BoxBorder? border,
BorderRadiusGeometry? borderRadius,
List<BoxShadow>? boxShadow,
Gradient? gradient,
BlendMode? backgroundBlendMode,
BoxShape shape = BoxShape.rectangle}
)
To add gradients to our widget we will be using the gradient property of the BoxDecoration constructor. The gradient property accepts three constructors Linear Gradient, Radial Gradient & Sweep Gradient.
Out of all the three, Linear and Radial are the most preferred, Sweep offers more control though.
Let’s start off with Linear Gradient. Let’s start by looking at the Linear Gradient constructor:
LinearGradient (
{
    AlignmentGeometry begin = Alignment.centerLeft,
    AlignmentGeometry end = Alignment.centerRight,
    required List<Color> colors,
    List<double>? stops,
    TileMode tileMode = TileMode.clamp,
    GradientTransform? Transform
}
)
From the constructor, it is clear that the argument colors are required. By default, the values of begin & end properties are set to centerLeft & centerRight respectively.
The begin & end parameters define the path of our Linear gradient. Begin refers to where the path starts and the end refers to where it ends.
The begin and end parameters accept the following values:
- centerLeft
- center
- ceterRight
- topLeft
- topCenter
- topRight
- bottomLeft
- bottomCenter
- bottomRight
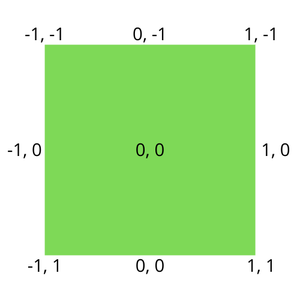
You can also use the Alignment(x, y) value. Here the x value represents the offset on the X-axis and the y value represents the offset on the Y-axis. You will get a clear understanding by looking at the below image which shows all the possible alignments in flutter with respect to the gradients.
(x, y):
The stops parameter:
The stops list is not a required widget. The stops list specifies the fractions of the vector from start to end. The stops parameter takes a List of values between 0.0 and 1.0 for each color. If the stops parameter is not mentioned/null then a uniform distribution is applied.
Let’s make a container with a Linear gradient.
Dart
child: Container(
height: MediaQuery.of(context).size.height * 0.7,
width: MediaQuery.of(context).size.width * 0.9,
decoration: const BoxDecoration(
gradient: LinearGradient(
colors: [Colors.purple, Colors.blue],
begin: Alignment.bottomLeft,
end: Alignment.topRight,
),
),
)
|
From the above example, we have seen how to add a gradient to a container.
In the above example, we set the path of the gradient from bottomLeft to topRight and set only 2 colors, whereas you can add any number of colors to the list. The best practice is to add not more than 3 colors.
The reason for not adding more colors is that with too many colors the gradient becomes sharp. There won’t be a smooth transition of the colors and looks clumsy.
This is how you implement a Linear gradient in flutter. Though we haven’t used the properties like stops, tileMode & transform, our gradient still looks better that is the beauty of flutter.
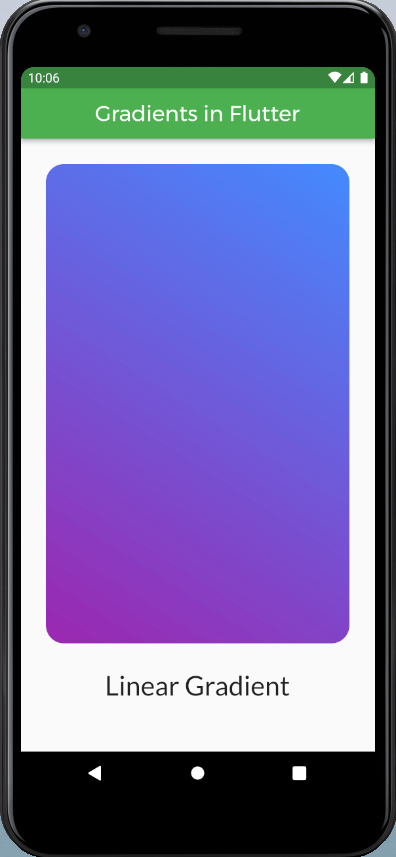
Linear Gradient
You will be now be seeing what exactly does stops and tileMode do.
Dart
child: Container(
height: MediaQuery.of(context).size.height * 0.7,
width: MediaQuery.of(context).size.width * 0.9,
decoration: BoxDecoration(
borderRadius: BorderRadius.circular(20),
gradient: const LinearGradient(
colors: [Colors.purple, Colors.blueAccent],
begin: Alignment.bottomLeft,
end: Alignment.topRight,
stops: [0.4, 0.7],
tileMode: TileMode.repeated,
),
),
)
|
The above code looks like this:

Linear Gradient with stops and tile mode
This is all about linear gradients.
Now let’s move to Radial Gradient:
As learned, the RadialGradient class is also used by BoxDecoration. A radial gradient is similar to linear-gradient but as the name suggests the gradient is Radial (circular). It displays a gradient in concentric circles. Hence, a radial gradient has a center and radius. The center point has a value of 0.0 and the radius ranges from 0.0 to 1.0 units. These lengths are processed as fractions which allows us to use the same code for any box shape with minimal changes or at large no changes.
Let’s take a look at the constructor for Radial Gradient.
RadialGradient({
    AlignmentGeometry center = Alignment.center,
    double radius = 0.5,
    required List<Color> colors,
    List<double>? stops,
    TileMode tileMode = TileMode.clamp,
    AlignmentGeometry? focal,
    double focalRadius = 0.0,
    GradientTransform? transform
})
From the constructor, it is clear that the colors property is a required one and by default, the alignment is set to center, and the radius is set to 0.5 (pixels).
Let’s make a container with Radial Gradient:
Dart
child: Container(
height: MediaQuery.of(context).size.height * 0.7,
width: MediaQuery.of(context).size.width * 0.9,
decoration: BoxDecoration(
borderRadius: BorderRadius.circular(20),
gradient: const RadialGradient(
colors: [Colors.red, Colors.yellow],
radius: 0.75,
),
),
),
|
The above looks like this:
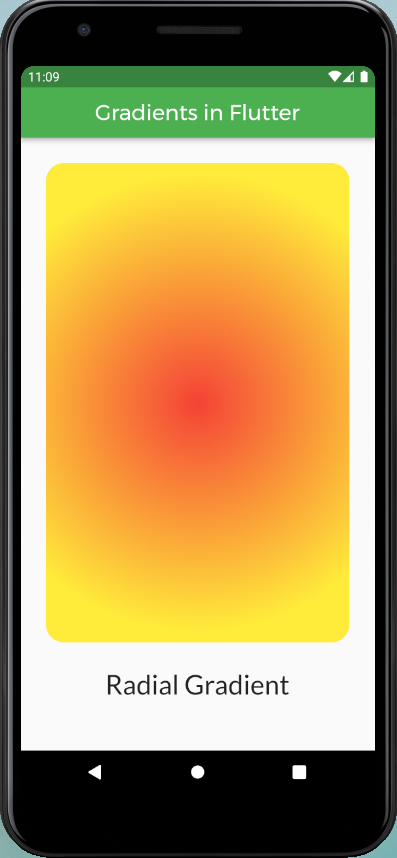
Radial Gradient
The stops and tileMode have the same applications as we have discussed in Liner Gradients. Adding stops will give the ability to control the path of the gradient very precisely and let you have the desired shape.
By default, if we don’t mention the alignment it is set to center. we can also alter the alignment in the following way:
Dart
child: Container(
height: MediaQuery.of(context).size.height * 0.7,
width: MediaQuery.of(context).size.width * 0.9,
decoration: BoxDecoration(
borderRadius: BorderRadius.circular(20),
gradient: const RadialGradient(
colors: [Colors.red, Colors.yellow],
radius: 0.75,
focal: Alignment(0.7, -0.7),
tileMode: TileMode.clamp,
),
),
),
|
The above code looks like this:
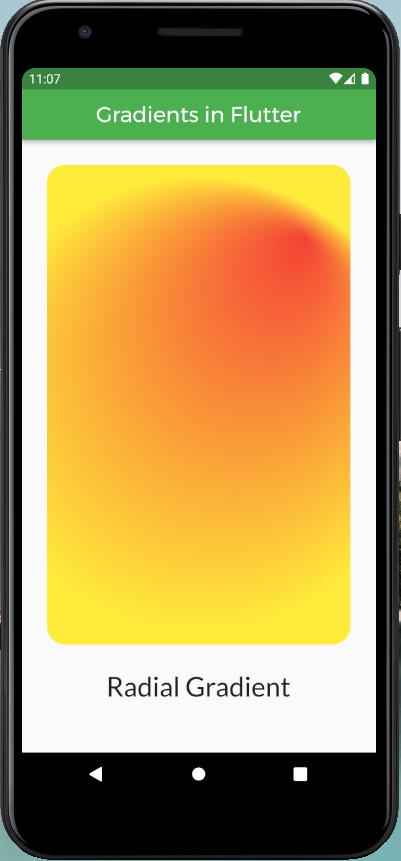
Radial Gradient with stops and tileMode
This is about Radial Gradients in Flutter.
Let’s move to Sweep Gradients. As the name suggests the Sweep Gradient displays a gradient in a sweeping arc around a center point.
Let’s have a look at the constructor of SweepGradient:
SweepGradient(
{AlignmentGeometry center = Alignment.center,
double startAngle = 0.0,
double endAngle = math.pi * 2,
required List<Color> colors,
List<double>? stops,
TileMode tileMode = TileMode.clamp,
GradientTransform? transform}
)
It is clear that the argument colors are required, and the colors argument must not be null if a stops argument is provided. By default, the alignment, startAngle, and the endAngle are set to center, 0.0 and 2*pi respectively.
As we have seen in Linear Gradient and Radial Gradient, stops values range from 0.0 to 1.0. In the case of Sweep Gradient, the gradient follows an arc so we deal with angles here. The startAngle refers to the point at which the stop 0.0 of the gradient is placed and similarly the endAngle refers to the point at which the stop 1.0 of the gradient is placed. The start and end angles are measured in radians. Note: If the stops list is null, then a uniform distribution is assumed.
Let’s see how to make a SweepGradient:
Dart
child: Container (
height: MediaQuery.of(context).size.height * 0.7,
width: MediaQuery.of(context).size.width * 0.9,
decoration: BoxDecoration(
borderRadius: BorderRadius.circular(20),
gradient: const SweepGradient(
colors: [
Colors.red,
Colors.yellow,
Colors.blue,
Colors.green,
Colors.red,
],
stops: <double>[0.0, 0.25, 0.5, 0.75, 1.0],
tileMode: TileMode.clamp,
),
),
|
The above code would look like this:
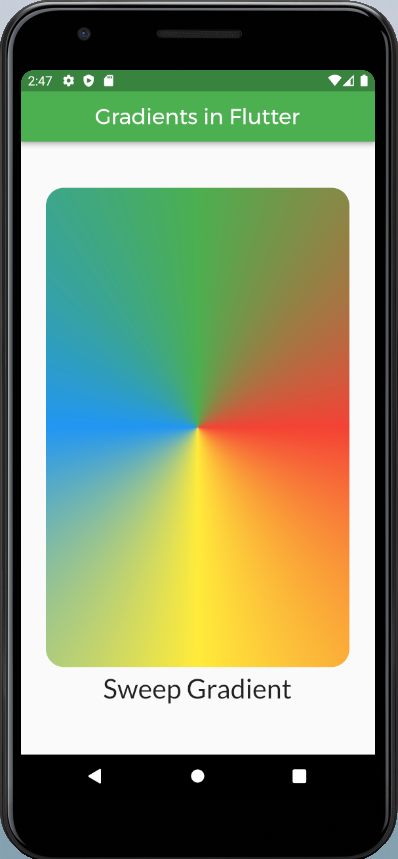
Sweep Gradient without start and end angles.
In the above piece of code, we can see how easy it is to create a SweepGradient in flutter with a minimum no. of lines of code. In the above code, we did not mention the startAngle and endAngle properties because the default values 0.0 and t 2π are what exactly we wanted. If you wish to change the angle you can do it as you wish. To use π constant, simply import the math library into your working file and use the constant needed. Follow the below steps.
import 'dart:math' as math;
To use the required math element in your project. For now π:
void main() {
    print(math.pi * 4);
}
With custom start and stop angles the gradient would look like:
Dart
child: Container(
height: MediaQuery.of(context).size.height * 0.7,
width: MediaQuery.of(context).size.width * 0.9,
decoration: BoxDecoration(
borderRadius: BorderRadius.circular(20),
gradient: const SweepGradient(
startAngle: math.pi * 0.2,
endAngle: math.pi * 1.7,
colors: [
Colors.red,
Colors.yellow,
Colors.blue,
Colors.green,
Colors.red,
],
stops: <double>[0.0, 0.25, 0.5, 0.75, 1.0],
tileMode: TileMode.clamp,
),
),
),
|
The above code would look like this:
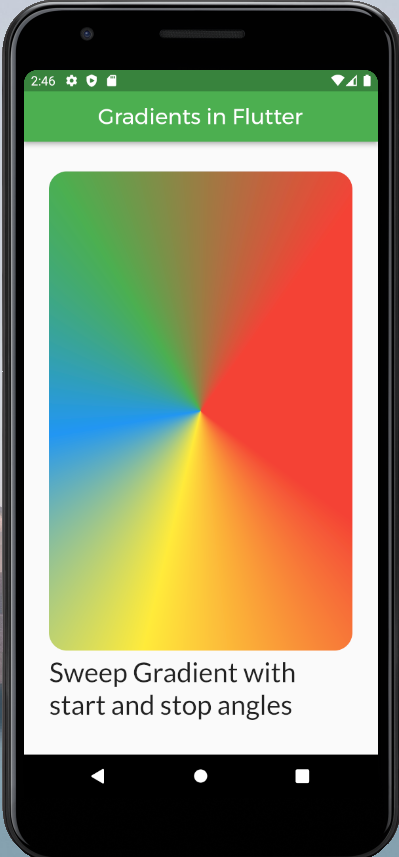
Sweep Gradient with custom start and stop angles.
This is how you work out with gradient in flutter. Gradients can be applied to the whole screen of your app. To apply the gradient to the whole screen just assign a Container widget to your body parameter, give the width and height of the container as double.infinity and double.infinity respectively this way you can a gradient to the whole of your app.
Like Article
Suggest improvement
Share your thoughts in the comments
Please Login to comment...