Deep Learning is a branch of Machine Learning where algorithms are written that mimic the functioning of a human brain. The most commonly used libraries in deep learning are Tensorflow and PyTorch. Pytorch is an open-source deep learning framework available with a Python and C++ interface. The PyTorch resides inside the torch module. In PyTorch, the data that has to be processed is input in the form of a tensor.
How to Install Pytorch?
If you have Anaconda Python Package manager installed in your system, then using by running the following command in the terminal will install PyTorch:
conda install pytorch torchvision cpuonly -c pytorch
This command will install the latest Stable version of PyTorch. Stable represents the most currently tested and supported version of PyTorch. The latest stable version of Pytorch is 1.12.1. If you want to use PyTorch without explicitly installing it on your local machine, you can use Google Colab.
How PyTorch Works?
Here is an overview of How PyTorch Works –
Tensors: At the core of PyTorch is the torch.Tensor class, which is a multi-dimensional array similar to NumPy arrays.
Python3
import torch
x = torch.tensor([1, 2, 3])
|
Dynamic Computational Graphs: In PyTorch, the graph is built on-the-fly as operations are performed, allowing for dynamic changes during runtime. This is in contrast to static computation graphs used by some other deep learning frameworks.
Autograd: It automatically computes gradients of tensors with respect to some scalar value. This is crucial for training neural networks using gradient-based optimization algorithms.
Python3
z.backward()
print(x.grad)
|
Neural Network Module: PyTorch provides the torch.nn module, which includes pre-defined layers, loss functions, and other components for building neural networks. Users can also define custom neural network architectures by subclassing the torch.nn.Module class.
Python3
import torch.nn as nn
class SimpleNN(nn.Module):
def __init__(self):
super(SimpleNN, self).__init__()
self.fc = nn.Linear(10, 5)
def forward(self, x):
return self.fc(x)
|
PyTorch tensors
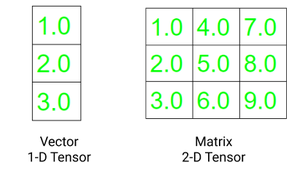
The Pytorch is used to process the tensors. Tensors are multidimensional arrays like n-dimensional NumPy array. However, tensors can be used in GPUs as well, which is not in the case of NumPy array. PyTorch accelerates the scientific computation of tensors as it has various inbuilt functions.
A vector is a one-dimensional tensor, and a matrix is a two-dimensional tensor. One significant difference between the Tensor and multidimensional array used in C, C++, and Java is tensors should have the same size of columns in all dimensions. Also, the tensors can contain only numeric data types.
The two fundamental attributes of a tensor are:
- Shape: refers to the dimensionality of array or matrix
- Rank: refers to the number of dimensions present in tensor
Example 1:
Python3
import torch
t1=torch.tensor([1, 2, 3, 4])
t2=torch.tensor([[1, 2, 3, 4],
[5, 6, 7, 8],
[9, 10, 11, 12]])
print("Tensor t1: \n", t1)
print("\nTensor t2: \n", t2)
print("\nRank of t1: ", len(t1.shape))
print("Rank of t2: ", len(t2.shape))
print("\nRank of t1: ", t1.shape)
print("Rank of t2: ", t2.shape)
|
Output:
Tensor t1:
 tensor([1, 2, 3, 4])

Tensor t2:
 tensor([[ 1,  2,  3,  4],
        [ 5,  6,  7,  8],
        [ 9, 10, 11, 12]])

Rank of t1:  1
Rank of t2:  2

Rank of t1:  torch.Size([4])
Rank of t2:  torch.Size([3, 4])
Creating Tensor in PyTorch
There are various methods to create a tensor in PyTorch. A tensor can contain elements of a single data type. We can create a tensor using a python list or NumPy array. The torch has 10 variants of tensors for both GPU and CPU. Below are different ways of defining a tensor.
- torch.Tensor() : It copies the data and creates its tensor. It is an alias for torch.FloatTensor.
- torch.tensor() : It also copies the data to create a tensor; however, it infers the data type automatically.
- torch.as_tensor() : The data is shared and not copied in this case while creating the data and accepts any type of array for tensor creation.
- torch.from_numpy() : It is similar to tensor.as_tensor() however it accepts only numpy array.
Example 2:
Python3
import torch
import numpy as np
data1 = [1, 2, 3, 4, 5, 6]
data2 = np.array([1.5, 3.4, 6.8,
9.3, 7.0, 2.8])
t1 = torch.tensor(data1)
t2 = torch.Tensor(data1)
t3 = torch.as_tensor(data2)
t4 = torch.from_numpy(data2)
print("Tensor: ",t1, "Data type: ", t1.dtype,"\n")
print("Tensor: ",t2, "Data type: ", t2.dtype,"\n")
print("Tensor: ",t3, "Data type: ", t3.dtype,"\n")
print("Tensor: ",t4, "Data type: ", t4.dtype,"\n")
|
Output:
Tensor:  tensor([1, 2, 3, 4, 5, 6]) Data type:  torch.int64

Tensor:  tensor([1., 2., 3., 4., 5., 6.]) Data type:  torch.float32

Tensor:  tensor([1.5000, 3.4000, 6.8000, 9.3000, 7.0000, 2.8000], dtype=torch.float64) Data type:  torch.float64

Tensor:  tensor([1.5000, 3.4000, 6.8000, 9.3000, 7.0000, 2.8000], dtype=torch.float64) Data type:  torch.float64
Restructuring Tensors in Pytorch
We can modify the shape and size of a tensor as desired in PyTorch. We can also create a transpose of an n-d tensor. Below are three common ways to change the structure of your tensor as desired:
.reshape(a, b) : returns a new tensor with size a,b
.resize(a, b) : returns the same tensor with the size a,b
.transpose(a, b) : returns a tensor transposed in a and b dimension
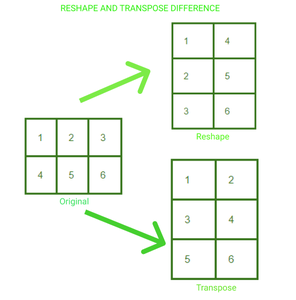
A 2*3 matrix has been reshaped and transposed to 3*2. We can visualize the change in the arrangement of the elements in the tensor in both cases.
Example 3:
Python3
import torch
t = torch.tensor([[1, 2, 3, 4],
[5, 6, 7, 8],
[9, 10, 11, 12]])
print("Reshaping")
print(t.reshape(6, 2))
print("\nResizing")
print(t.resize(2, 6))
print("\nTransposing")
print(t.transpose(1, 0))
|
Output:
Reshaping
tensor([[ 1,  2],
        [ 3,  4],
        [ 5,  6],
        [ 7,  8],
        [ 9, 10],
        [11, 12]])

Resizing
tensor([[ 1,  2,  3,  4,  5,  6],
        [ 7,  8,  9, 10, 11, 12]])

Transposing
tensor([[ 1,  5,  9],
        [ 2,  6, 10],
        [ 3,  7, 11],
        [ 4,  8, 12]])
Mathematical Operations on Tensors in PyTorch
We can perform various mathematical operations on tensors using Pytorch. The code for performing Mathematical operations is the same as in the case with NumPy arrays. Below is the code for performing the four basic operations in tensors.
Example 4:
Python3
import torch
t1 = torch.tensor([1, 2, 3, 4])
t2 = torch.tensor([5, 6, 7, 8])
print("tensor2 + tensor1")
print(torch.add(t2, t1))
print("\ntensor2 - tensor1")
print(torch.sub(t2, t1))
print("\ntensor2 * tensor1")
print(torch.mul(t2, t1))
print("\ntensor2 / tensor1")
print(torch.div(t2, t1))
|
Output:
tensor2 + tensor1
tensor([ 6,  8, 10, 12])

tensor2 - tensor1
tensor([4, 4, 4, 4])

tensor2 * tensor1
tensor([ 5, 12, 21, 32])

tensor2 / tensor1
tensor([5.0000, 3.0000, 2.3333, 2.0000])
For getting into further in-depth matrix multiplication using Pytorch . You can refer to this article –
Python – Matrix multiplication using Pytorch
Pytorch Modules
The PyTorch library modules are essential to create and train neural networks. The three main library modules are Autograd, Optim, and nn.
1. Autograd Module: The autograd provides the functionality of easy calculation of gradients without the explicitly manual implementation of forward and backward pass for all layers.
For training any neural network we perform backpropagation to calculate the gradient. By calling the .backward() function we can calculate every gradient from the root to the leaf.
Example 5:
Python3
import torch
t1=torch.tensor(1.0, requires_grad = True)
t2=torch.tensor(2.0, requires_grad = True)
z=100 * t1 * t2
z.backward()
print("dz/dt1 : ", t1.grad.data)
print("dz/dt2 : ", t2.grad.data)
|
Output:
dz/dt1 :  tensor(200.)
dz/dt2 :  tensor(100.)
2. Optim Module: PyTorch Optium Module which helps in the implementation of various optimization algorithms. This package contains the most commonly used algorithms like Adam, SGD, and RMS-Prop. To use torch.optim we first need to construct an Optimizer object which will keep the parameters and update it accordingly. First, we define the Optimizer by providing the optimizer algorithm we want to use. We set the gradients to zero before backpropagation. Then for updation of parameters the optimizer.step() is called.
optimizer = torch.optim.Adam(model.parameters(), lr=0.01) #defining optimizer
optimizer.zero_grad() #setting gradients to zero
optimizer.step() #parameter updation
3. nn Module: This package helps in the construction of neural networks. It is used to build layers.
For creating a model with a single layer we can simply define it by using nn.Sequential().
model = nn.Sequential( nn.Linear(in, out), nn.Sigmoid(), nn.Linear(_in, _out), nn.Sigmoid() )
For the implementation of the model which is not in a single sequence, we define a model by subclassing the nn. Module class.
Example 6:
Python3
class Model (nn.Module) :
def __init__(self):
super(Model, self).__init__()
self.linear = torch.nn.Linear(1, 1)
def forward(self, x):
y_pred = self.linear(x)
return y_pred
|
PyTorch Dataset and Dataloader
The torch.utils.data.Dataset class contains all the custom datasets. We need to implement two methods, __len__() and __get_item__(), to create our own dataset class. The PyTorch Dataloader has an amazing feature of loading the dataset in parallel with automatic batching. It, therefore, reduces the time of loading the dataset sequentially hence enhancing the speed.
Syntax: DataLoader(dataset, shuffle=True, sampler=None, batch_sampler=None, batch_size=32)
The PyTorch DataLoader supports two types of datasets:
- Map-style datasets: The data items are mapped to the indexes. In these datasets, the __get_item__() method is used to retrieve the index of each item.
- Iterable-style datasets: In these datasets __iter__() protocol is implemented. The data samples are retrieved in sequence.
Please refer to the article on Using a DataLoader in PyTorch to know more.
Building Neural Network with PyTorch
We will see this in a stepwise implementation:
- Dataset Preparation: As everything in PyTorch is represented in the form of tensors, so we should first in tensors.
- Building model: For building a neutral network first we first define the number of input layers, hidden layers, and output layers. We also need to define the initial weights. The values of the weights matrices are chosen randomly using torch.randn(). Torch.randn() returns a tensor consisting of random numbers from a standard normal distribution.
- Forward Propagation: The data is fed to a neural network and a matrix multiplication is performed between the weights and input. This can be easily done using a torch.
- Loss computation: PyTorch.nn functions have multiple loss functions. Loss functions are used to measure the error between the predicted value to the target value.
- Backpropagation: It is used for optimizing weights. The weights are changed such that the loss is minimized.
Now let’s build a neural network from scratch:
Example 7:
Python3
import torch
X = torch.Tensor([[1], [2], [3],
[4], [5], [6]])
y = torch.Tensor([[5], [10], [15],
[20], [25], [30]])
class Model(torch.nn.Module):
def __init__(self):
super(Model, self).__init__()
self.linear = torch.nn.Linear(1, 1)
def forward(self, x):
y_pred = self.linear(x)
return y_pred
model = torch.nn.Linear(1 , 1)
loss_fn = torch.nn.L1Loss()
optimizer = torch.optim.Adam(model.parameters(), lr = 0.01 )
for epoch in range(1000):
y_pred = model(X.requires_grad_())
loss = loss_fn(y_pred, y)
loss.backward()
optimizer.step()
optimizer.zero_grad()
X = torch.Tensor([[7], [8]])
predicted = model(X)
print(predicted)
|
Output:
tensor([[34.8563],
        [39.8085]], grad_fn=<AddmmBackward0>)
Like Article
Suggest improvement
Share your thoughts in the comments
Please Login to comment...