Python Django is a web framework that is used to create web applications very efficiently and quickly. Django is called a battery included framework because it contains a lot of in-built features such as Django Admin Interface, default database – SQLite3, etc. Django provides various ready-made components such as a way to handle user authentication, a management panel for your website, forms, a way to upload files, etc.
In this article, we will learn Django by creating a basic blogging web application.
Why Django Framework?
- Django is a rapid web development framework that can be used to develop fully fleshed web applications in a short period of time.
- It’s very easy to switch databases in the Django framework.
- It has a built-in admin interface which makes it easy to work with it.
- Django is a fully functional framework that requires nothing else.
- It has thousands of additional packages available.
- It is very scalable.
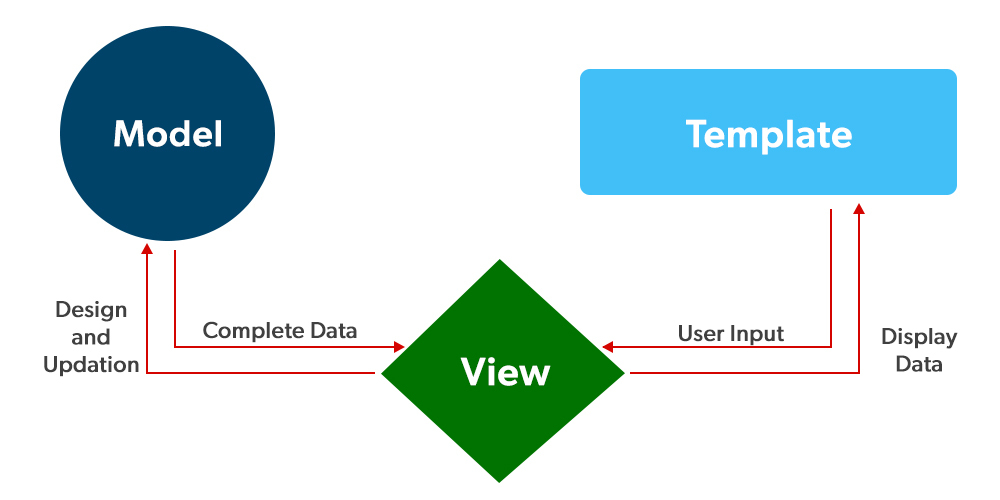
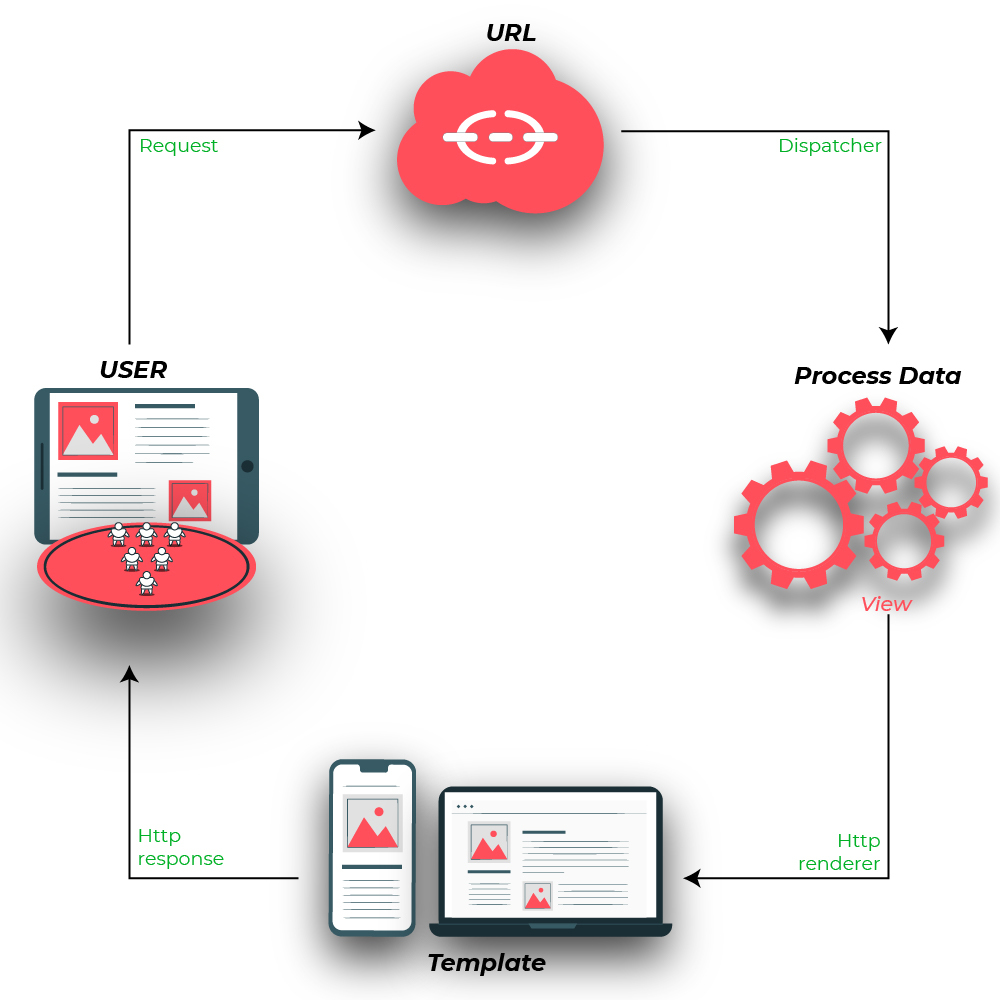
Structure of Django Web Application
Django is based on MVT (Model-View-Template) architecture. MVT is a software design pattern for developing a web application.
- Model: The model is going to act as the interface of your data. It is responsible for maintaining data. It is the logical data structure behind the entire application and is represented by a database (generally relational databases such as MySql, Postgres).
- View: The View is the user interface — what you see in your browser when you render a website. It is represented by HTML/CSS/Javascript and Jinja files.
- Template: A template consists of static parts of the desired HTML output as well as some special syntax describing how dynamic content will be inserted.
Setting the Development Environment
It is always advisable to use a virtual environment before starting any Django project because sometimes when you are working on multiple projects you might need different versions of Django. The virtual environment creates a separate environment for different projects and you can install dependencies of each project separately. To create a virtual environment type the below command in the terminal –
python3 -m venv <name>
Here the name is the name of the virtual environment. We can give any name to our environment. Let’s create the virtual environment with the name as venv only. So the command to create the environment will be –
python3 -m venv venv
After running the above command you will see a folder named venv with the following sub-directories.

After creating the virtual environment let’s activate it. To activate it type the below command in the terminal.
source ./venv/bin/activate
Note: If you have your virtual environment set up in another location and your terminal opened up in another location, then provide the location to the venv folder i.e. our virtual environment folder.
After you run the above command you should see (venv) at the starting of every line of your terminal as shown in the below image.

Installing Django
We can install Django using the pip command. To install this type the below command in the terminal.
pip install django
For more information, refer to Django Introduction and Installation
Starting the Project
- To initiate a project of Django on Your PC, open Terminal and Enter the following command
django-admin startproject projectName
- A New Folder with the name projectName will be created. To enter in the project using the terminal enter command
cd projectName
- Now let’s run the server and see everything is working fine or not. To run the server type the below command in the terminal.
python manage.py runserver
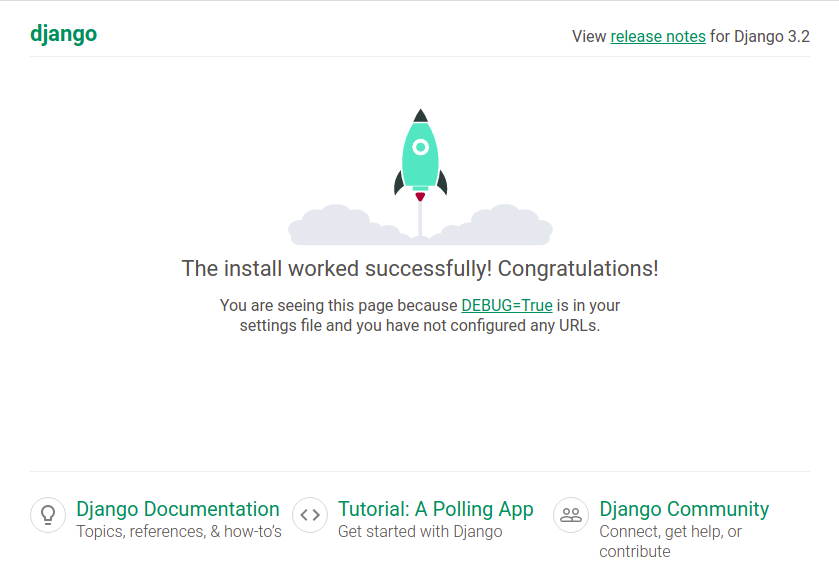
After running the server go to http://127.0.0.1:8000/ and you’ll see something like this –
Project Structure
A Django Project when initialized contains basic files by default such as manage.py, view.py, etc. A simple project structure is enough to create a single-page application. Here are the major files and their explanations. Inside the geeks_site folder ( project folder ) there will be the following files-

Let’s discuss these files in detail –
manage.py: This file is used to interact with your project via the command line(start the server, sync the database… etc). For getting the full list of commands that can be executed by manage.py type this code in the command window-
python manage.py help
- _init_.py: It is a python package. It is invoked when the package or a module in the package is imported. We usually use this to execute package initialization code, for example for the initialization of package-level data.
- settings.py: As the name indicates it contains all the website settings. In this file, we register any applications we create, the location of our static files, database configuration details, etc.
- urls.py: In this file, we store all links of the project and functions to call.
- wsgi.py: This file is used in deploying the project in WSGI. It is used to help your Django application communicate with the webserver.
Creating App
Till now we have created the Django project and now we will create an app. Django is famous for its unique and fully managed app structure. For every functionality, an app can be created like a completely independent module. To create an app we need to go to the directory containing manage.py and run the following command –
python manage.py startapp appname
Now let’s create an app called post, so the command to create the app would be –
python manage.py startapp post
Now our directory looks like this –

To consider the project i our project we need to specify the project name in the INSTALLED_APPS list in settings.py –
Python3
INSTALLED_APPS = [
'django.contrib.admin',
'django.contrib.auth',
'django.contrib.contenttypes',
'django.contrib.sessions',
'django.contrib.messages',
'django.contrib.staticfiles',
'post.apps.PostConfig',
]
|
Defining Models
Now for the post app, we need some models. A Django model is the built-in feature that Django uses to create tables, their fields, and various constraints. In short, Django Models is the SQL of Database one uses with Django. SQL (Structured Query Language) is complex and involves a lot of different queries for creating, deleting, updating, or any other stuff related to the database. Django models simplify the tasks and organize tables into models. Generally, each model maps to a single database table.
Syntax:
from django.db import models
class ModelName(models.Model):
       field_name = models.Field(**options)
Example:
Python3
from django.db import models
from django.utils import timezone
from django.contrib.auth.models import User
class Post(models.Model):
title = models.CharField(max_length=255)
author = models.ForeignKey(User, on_delete=models.CASCADE)
body = models.TextField()
created_on = models.DateTimeField(default=timezone.now)
last_modified = models.DateTimeField(auto_now=True)
def __str__(self) -> str:
return self.title
|
In the above model, each field represents a column in the SQLite database. We have also created a foreign key for the User model. The user model comes built-in with Django.
Note: The on_delete=models.CASCADE command will delete all the posts of an author if the profile for that author is deleted.
Whenever we create a Model, Delete a Model, or update anything in any of models.py of our project. We need to run two commands makemigrations and migrate. makemigrations basically generates the SQL commands for preinstalled apps (which can be viewed in installed apps in settings.py) and your newly created app’s model which you add in installed apps whereas migrate executes those SQL commands in the database file.
So when we run,
python manage.py makemigrations
SQL Query to create the above Model as a Table is created. We can see this under the migrations folder as 0001_initial.py.

To create the table in the database type
python manage.py migrate
Now we have created a model we can perform various operations such as creating a Row for the table or in terms of Django Creating an instance of Model. To know more visit – Django Basic App Model – Makemigrations and Migrate.
Render Model in Django Admin
After creating the model we need to add data from to our model. We can add data in two ways. These are –
- Django Shell
- Django Admin
In this article, we will focus on rendering model data through Admin Interface. If you want to learn about rendering data through Django Shell refer to Django ORM – Inserting, Updating & Deleting Data.
We need to create a superuser for our web application that will access the admin panel. To create a superuser type the below command in the terminal –
python manage.py createsuperuser

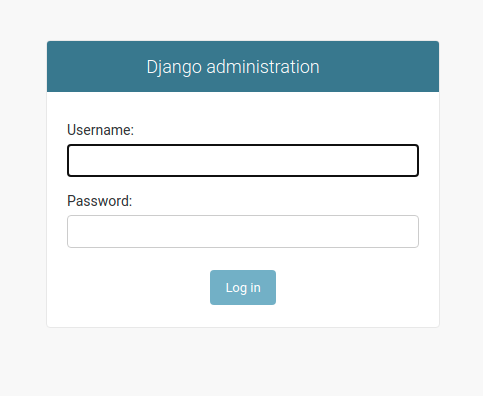
Now go to http://127.0.0.1:8000/admin on the browser to access the admin interface panel.
Give the username and password created for the superuser and then the admin dashboard will open.

To render our model onto our admin panel we need to make changes to the post/admin.py file. Enter the following code to the admin.py file –
Python3
from django.contrib import admin
from .models import Post
admin.site.register(Post)
|
Refreshing your admin panel will let you see the model that we created.

Note: For more information refer to Render Model in Django Admin Interface.
Let’s add some data to our database. Clicking on the Geeks Model we will see something like this –

We can click on the Add Post button on the right top corner and then we will be able to see the fields for adding data. See the below image –

After adding the required data we will see something like this on our admin dashboard –

Django Views
After creating and adding data to our models, we need to display the data to our site. Rendering data is a two-step process. First we need to create our view function and then we need to pass the data to our template. Here we will focus on the view function.
A view function is a Python function that takes a Web request and returns a Web response. This response can be the HTML contents of a Web page, or a redirect, or a 404 error, or an XML document, or an image, anything that a web browser can display. Django views are part of the user interface — they usually render the HTML/CSS/Javascript in your Template files into what you see in your browser when you render a web page.
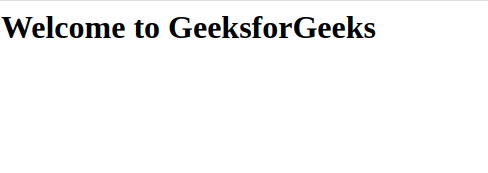
At first, let’s create a sample view function that will simply show normal HTML content.
Python3
from django.http import HttpResponse
def home(request):
return HttpResponse("<h1>Welcome to GeeksforGeeks</h1>")
|
Let’s step through this code one line at a time:
- First, we import the class HttpResponse from the django.http module, along with Python’s datetime library.
- Next, we define a function called home. This is the view function. Each view function takes an HttpRequest object as its first parameter, which is typically named request.
- The view returns an HttpResponse object that contains the generated response. Each view function is responsible for returning an HttpResponse object.
The above Function will render the text Welcome to GeeksforGeeks as h1 on the page. Now the question that may be arising is at what URL this function will be called and how will we handle such URLs. Don’t worry we will handle URL in the section but in this section let us continue with the Django views only.
Types of Views
Django views are divided into two major categories:-
- Function-Based Views
- Class-Based Views

Function-Based Views
Function-based views are writer using a function in python which receives as an argument HttpRequest object and returns an HttpResponse object. Function-based views are generally divided into 4 basic strategies, i.e., CRUD (Create, Retrieve, Update, Delete). CRUD is the base of any framework one is using for development. The one we created above is a function-basedClass-Based Views
Class-Based Views
Class-based views provide an alternative way to implement views as Python objects instead of functions. They do not replace function-based views, but have certain differences and advantages when compared to function-based views:
- Organization of code related to specific HTTP methods (GET, POST, etc.) can be addressed by separate methods instead of conditional branching.
- Object-oriented techniques such as mixins (multiple inheritances) can be used to factor code into reusable components. view.
Django URL Patterns
In Django, each view needs to be mapped to a corresponding URL pattern. This is done via a Python module called URLConf(URL configuration). Every URLConf module must contain a variable urlpatterns which is a set of URL patterns to be matched against the requested URL. These patterns will be checked in sequence until the first match is found. Then the view corresponding to the first match is invoked. If no URL pattern matches, Django invokes an appropriate error handling view.
Now if we see our project we have created an app called gfg_site, the Python module to be used as URLConf is the value of ROOT_URLCONF in gfg_site/settings.py. By default this is set to ‘gfg_site.urls’. Every URLConf module must contain a variable urlpatterns which is a set of URL patterns to be matched against the requested URL. These patterns will be checked in sequence until the first match is found. Then the view corresponding to the first match is invoked. If no URL pattern matches, Django invokes an appropriate error handling view.
Here’s a sample code for post/urls.py:
Python3
from django.urls import path
from . import views
urlpatterns = [
path('', views.home, name='home'),
]
|
Including other URLConf modules
It is a good practice to have a URLConf module for every app in Django. This module needs to be included in the root URLConf module as follows:
Python3
from django.contrib import admin
from django.urls import path, include
urlpatterns = [
path('admin/', admin.site.urls),
path('', include('post.urls'))
]
|
Now if head towards http://127.0.0.1:8000/ then our site will be –
In the above example, the include statement will look into the URLpatterns list in the gfg_site_app/urls.py And then it will look into all the paths defined in the url.py file and will call the respective views function.
Django Templates
Templates are the third and most important part of Django’s MVT Structure. A template in Django is basically written in HTML, CSS, and Javascript in a .html file. Django framework efficiently handles and generates dynamically HTML web pages that are visible to the end-user. Django mainly functions with a backend so, in order to provide a frontend and provide a layout to our website, we use templates. There are two methods of adding the template to our website depending on our needs.
- We can use a single template directory which will be spread over the entire project.
- For each app of our project, we can create a different template directory.
For our current project, we will create a single template directory that will be spread over the entire project for simplicity. App-level templates are generally used in big projects or in case we want to provide a different layout to each component of our webpage.
Now let’s create the templates directory and add that directory to our settings.py file.

Adding this templates folder to our settings.py file –
Python3
TEMPLATES = [
{
'BACKEND': 'django.template.backends.django.DjangoTemplates',
'DIRS': [BASE_DIR/'templates'],
'APP_DIRS': True,
'OPTIONS': {
'context_processors': [
'django.template.context_processors.debug',
'django.template.context_processors.request',
'django.contrib.auth.context_processors.auth',
'django.contrib.messages.context_processors.messages',
],
},
},
]
|
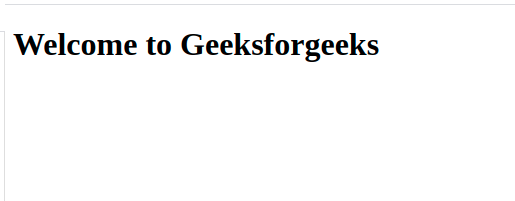
After adding the location of the template directory we will create a simple HTML file and name it as home.html and then we will render this file from our view function.
HTML file:
HTML
<h1>Welcome to GeeksforGeeks</h1>
|
To render this HTML on our site we need to use the render function from the django.shortcuts. Below is the updated view function.
views.py
Python3
from django.http import HttpResponse
from django.shortcuts import render
def home(request):
context = {}
return render(request, 'home.html', context)
|
If we head to our website we will see the HTML data on our site as –
After learning about the views, URLs, and templates let’s see how to show the data from our database to our home page.
First, we need to update our views.py file to get the data from our database. Here, we will use class based views for our project.
views.py
Python3
from .models import Post
from django.views.generic import ListView
class HomeView(ListView):
model = Post
template_name = 'home.html'
|
The above code is similar to –
Python3
def home(request):
posts = Post.objects.all()
context = {
'Posts': posts
}
return render(request, 'home.html', context)
|
Now for class based views we also need to make changes to the urls.py file. See the below code –
Python3
from django.urls import path
from .views import HomeView
urlpatterns = [
path('', HomeView.as_view(), name='home'),
]
|
Here as_view() function is used to make class HomeView as a view function. Now finally we need to make changes to the home.html file.
HTML
{% for post in object_list %}
<h1>{{post.title}}</h1>
<small>By: {{post.author.first_name}} {{post.author.last_name}}</small>
<p>{{post.body}}</p>
{% endfor %}
|
In the above HTML file object_list is the context variable which contains the list of all the objects of the model which is specified in the HomeView class. Now when we head to http://127.0.0.1:8000/ we will see something like this –
Note: Make sure to add first name and last name for the superuser from the admin panel.

Let’s add some more post from the admin panel and see whether they gets render to our site or not.

Styling Project
We can see that without making any changes to the site all our post from our database gets render to our home page. But all these posts does not looks good. So let’s see how to add some styling to our web application. We can style our web application using some bootstrap.
Note: We will not get into the detailing of bootstrap, you can learn more about bootstrap from our Bootstrap tutorial.
For our project we can head to documentation of bootstrap and we can use the starter template. We will create another HTML file in our templates folder as base.html and then we will inherit that HTML file on our main home.html. Let’s see how to do this –
base.html
HTML
<!doctype html>
<html lang="en">
<head>
<meta charset="utf-8">
<meta name="viewport" content="width=device-width, initial-scale=1">
<title>Hello, world!</title>
</head>
<body>
<div class="container">
{% block body %}
{% endblock %}
</div>
</body>
</html>
|
Now we need to inherit this base HTMl in our home.html file. extends tag is used for inheritance of templates in django. One needs to repeat the same code again and again. Using extends we can inherit templates as well as variables.
Syntax:
{% extends 'template_name.html' %}
Note: extends is always used with block tags so that can be inherited and overridden. {% block body %} in the case of above HTML file.
Now our home.html looks like this –
HTML
{% extends 'base.html' %}
{% block body %}
{% for post in object_list %}
<h1>{{post.title}}</h1>
<small>By: {{post.author.first_name}} {{post.author.last_name}}</small>
<p>{{post.body}}</p>
{% endfor %}
{% endblock %}
|
Our web application now looks like this –

Django Forms
Django Projects
For more information on Django Basics as well as Django Advance refer to our in depth Django Tutorial.
Like Article
Suggest improvement
Share your thoughts in the comments
Please Login to comment...