Generate square or circular thumbnail image with Python – Pillow
Last Updated :
17 Mar, 2021
Prerequisites: Pillow, Numpy
In the word “THUMBNAIL” the word THUMB means short. A thumbnail is the compressed preview image of the original image or a Thumbnail is the smaller version of an image. In simple words, the thumbnail is the smaller image that represents the larger/original image.
Usually, the shape of the thumbnail is dependent on the original image, but in this article, we are going to generate the circular and square thumbnail image using Pillow Library in Python.
Installation:
For installing pillow and NumPy libraries, write the following command on your command prompt.
pip install pillow
pip install numpy
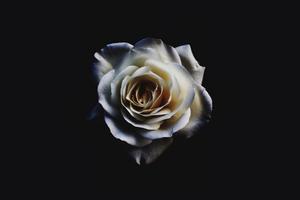
Example 1: Opening image using Pillow Library.
Python
from PIL import Image
orig_img=Image.open('Geekwork/sebastian-molina.jpg')
orig_img.show()
|
Output:
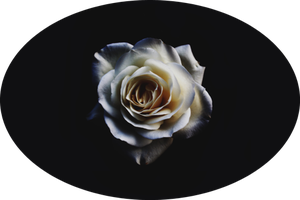
Example 2: Generating circular thumbnail image using Pillow Library.
Approach:
- Convert the image into NumPy array using NumPy library.
- Now create a new mask image using PIL.Image.new() function by pass the mode, image size, and color, then draw the image using PIL.Image.Draw.Draw() function by passing the size of the new mask image and let be stored in the variable named “draw”.
- Make the circle on the mask image using ImageDraw.Draw.peislice() function by passing four points to define a boundary, starting angle=0, ending angle=360 this creates the circle on the mask image and with them pass fill parameter for filling the color in an image.
- Convert the mask image to numpy array then stack the array depth-wise along with the third axis using numpy.dstack() function and pass the original image array and mask image array as we had converted in above steps to get the circular image, and let it be stored in the variable named as “npImage”.
- As this “npImage” is in array format we have to convert this array into an image, this is done with the help of PIL.Image.fromarray() function into this pass npImage as a parameter and let it be stored in the variable named as “final_image”.
- As we had generated the circular image.
Below is the full implementation:
Python
from PIL import Image, ImageDraw
import numpy as np
orig_img=Image.open('sebastian-molina.jpg')
height,width=orig_img.size
npImage=np.array(orig_img)
new_img = Image.new('L', orig_img.size,0)
draw = ImageDraw.Draw(new_img)
draw.pieslice([0,0,height,width],0,360,fill=255)
np_new=np.array(new_img)
npImage=np.dstack((npImage,np_new))
final_img = Image.fromarray(npImage)
final_img.thumbnail((500,500))
final_img.save('Circular_thumbnail.png')
|
Output:
Example 3: Generating square thumbnail image using Pillow Library.
Approach:
- Check the three conditions if height==width or height>width or width>height if the dimension of the image falls in any of the last two conditions.
- Then we have to create the new mask image using new() function with the longest side/dimension of the image.
- Then paste the original image on the new mask image by using paste() function and pass the original image with calculated dimensions which we will discuss in the explanation of the example.
- Now we will get the square image by following the above steps.
- Now we have to generate the thumbnail image, we can do this by using PIL.Image.thumbnail() method by passing the size as a parameter, then save this using PIL.Image.save() method and pass the name of the image with standard image format.
Below is the full implementation:
Python
from PIL import Image, ImageDraw
import numpy as np
def square_thumb(thum_img,width,height):
if height == width:
return thum_img
elif height > width:
square_img = Image.new(thum_img.mode, (height, height))
square_img.paste(thum_img, ((height - width) // 2,0))
return square_img
else:
square_img = Image.new(thum_img.mode, (width, width))
square_img.paste(thum_img, (0, (width - height) // 2))
return square_img
if __name__ == "__main__":
orig_img=Image.open('sebastian-molina.jpg')
w,h = orig_img.size
sq_img = square_thumb(orig_img,w,h)
sq_img.thumbnail((400,400))
sq_img.save('Square_thumbnail.jpg')
|
Output:
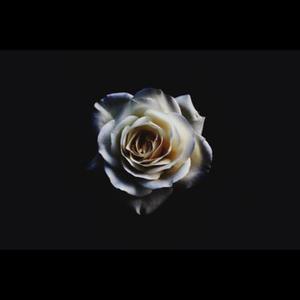
Explanation: We had created the function to generate a square image by passing the image, it’s width and height as a parameter. In the function we had checked three conditions on the basis of that we had generated the square image.
- In the first condition, we had checked if the height of the image is equal to the width or not if True then we had returned the image as it is because when height and width are equal images is already in the square shape.
- In the second condition, if the height of an image is greater than the width, then we created the new mask image using Image.new() function by passing the mode of an image and size as it’s the height (i.e, height, height) and paste the original image on the created mask image using paste() function by passing original image and dimension at which original image is pasted on mask image i.e, from calculated dimension (subtracting the height of original image with a width of the original image and then divide it by 2) to 0, so that original image can be perfectly pasted on the mask image.
- In the third condition, if the width of an image is greater than the height, then we did the same process as we had done in the second condition, but the only change is we had created the mask image of size as it’s the width (i.e, width, width) and in case of pasting we had to pass original image and dimension i.e, from 0 to the calculated dimension (by subtracting the width of the original image with a height of the original image and then divide it by 2 ) so that original image can be perfectly pasted on the mask image.
Like Article
Suggest improvement
Share your thoughts in the comments
Please Login to comment...