Flutter – Schedule Local Notification using Timezone
Last Updated :
31 Mar, 2022
In this article, we will explore the process of scheduling local notifications using the Timezone package in Flutter.
Local Notification:
Flutter Local Notification is a cross-platform plugin used to show notifications in the Flutter application. These notifications can be simple, scheduled, or periodical and these notifications can have custom sound, no sound, vibrative or non-vibrative and these can react when it is tapped.
Scheduled Local Notification:
Local Notification is scheduled for a second or a minute or an hour or a day or a month or as well as a year. The notification will be notified only during the scheduled time. Like the other type of notification, it can also have sounds, vibrations, and reactions after tapping it. In this, we are going to use the zonedschedule() method of the Timezone package. We can also implement scheduled notification using schedule() method but the method is deprecated in flutter_local_notifications: ^9.3.1 package. So we are using zonedschedule() method instead of this method.
Timezones:
The timezone package provides the IANA time zone database. The timezone package provides various features like getting the location of the time zone, converting datetimes between time zones, etc. But we are only going to use the zonedschedule() method. The zonedschedule() method schedules a notification to be shown at the specified date and time relative to a specific time zone.
Well, let us dive into the implementation
Before getting into the main area, we should add some dependencies for the above packages into the pubspec.yaml file and save it, pubget action will be performed automatically after saving the dependencies.
dependencies:
  flutter:
    sdk: flutter

  cupertino_icons: ^1.0.2
  flutter_local_notifications: ^9.3.1

  timezone: ^0.8.0
Let’s get into the main coding area.
Before implementing in the main.dart file, let us create another dart file named notificationservice.dart to initialize and schedule the notification.
The notificationservice.dart implementation:
We should import two libraries of timezone into the file with the object.
import 'package:timezone/timezone.dart' as tz;
import 'package:timezone/data/latest.dart' as tz;
After that, we should create object for FlutterLocalNotificationsPlugin().
final FlutterLocalNotificationsPlugin flutterLocalNotificationsPlugin =
      FlutterLocalNotificationsPlugin();
Then we should create appropriate Notification initialization settings for both android and iOS and initialize them.
Future<void> initNotification() async {

    // Android initialization
    final AndroidInitializationSettings initializationSettingsAndroid =
        AndroidInitializationSettings('@mipmap/ic_launcher');// should mention the app icon
                                                             // during initialization itself


    // Ios initialization
    final IOSInitializationSettings initializationSettingsIOS =
        IOSInitializationSettings(
      requestAlertPermission: false,
      requestBadgePermission: false,
      requestSoundPermission: false,
    );

    final InitializationSettings initializationSettings =
        InitializationSettings(
            android: initializationSettingsAndroid,
            iOS: initializationSettingsIOS);

    // the initialization settings are initialized after they are setted
    await flutterLocalNotificationsPlugin.initialize(initializationSettings);
  }
- After the Initialization, the notification can be scheduled using zonedschedule() method.
- In that, we should give notification details like Title, description, etc.
- Android and iOS get their own notification details like android has channels, so we should give channel id, channel name, importance, priority, etc. and we should give specific details for iOS as well as for mac and Linux. In this, we are initializing only for android and iOS.
Notification channel in Android
- After that, we can schedule the notification using TZDateTime to get the exact time now and add duration to it like in seconds, minutes, hours, etc.
- For example, let us set the duration at 2 seconds.
Future<void> showNotification(int id, String title, String body) async {
    await flutterLocalNotificationsPlugin.zonedSchedule(
      id,
      title,
      body,
      tz.TZDateTime.now(tz.local).add(Duration(seconds: 1)),
      const NotificationDetails(
        // Android details
        android: AndroidNotificationDetails('main_channel', 'Main Channel',
            channelDescription: "ashwin",
            importance: Importance.max,
            priority: Priority.max),
        // iOS details
        iOS: IOSNotificationDetails(
          sound: 'default.wav',
          presentAlert: true,
          presentBadge: true,
          presentSound: true,
        ),
      ),
      // Type of time interpretation
      uiLocalNotificationDateInterpretation:
          UILocalNotificationDateInterpretation.absoluteTime,
      androidAllowWhileIdle: true,//To show notification even when the app is closed
    );
  }
The notificationservice.dart file:
Dart
import 'package:flutter/material.dart';
import 'package:flutter_local_notifications/flutter_local_notifications.dart';
import 'package:timezone/timezone.dart' as tz;
import 'package:timezone/data/latest.dart' as tz;
class NotificationService {
static final NotificationService _notificationService =
NotificationService._internal();
factory NotificationService() {
return _notificationService;
}
final FlutterLocalNotificationsPlugin flutterLocalNotificationsPlugin =
FlutterLocalNotificationsPlugin();
NotificationService._internal();
Future<void> initNotification() async {
final AndroidInitializationSettings initializationSettingsAndroid =
AndroidInitializationSettings('@mipmap/ic_launcher');
final IOSInitializationSettings initializationSettingsIOS =
IOSInitializationSettings(
requestAlertPermission: false,
requestBadgePermission: false,
requestSoundPermission: false,
);
final InitializationSettings initializationSettings =
InitializationSettings(
android: initializationSettingsAndroid,
iOS: initializationSettingsIOS);
await flutterLocalNotificationsPlugin.initialize(initializationSettings);
}
Future<void> showNotification(int id, String title, String body) async {
await flutterLocalNotificationsPlugin.zonedSchedule(
id,
title,
body,
tz.TZDateTime.now(tz.local).add(Duration(
seconds: 1)),
const NotificationDetails(
android: AndroidNotificationDetails('main_channel', 'Main Channel',
channelDescription: "ashwin",
importance: Importance.max,
priority: Priority.max),
iOS: IOSNotificationDetails(
sound: 'default.wav',
presentAlert: true,
presentBadge: true,
presentSound: true,
),
),
uiLocalNotificationDateInterpretation:
UILocalNotificationDateInterpretation.absoluteTime,
androidAllowWhileIdle:
true,
);
}
}
|
Well, after the above implementation of the notification service, we can add the essential elements in the main.dart file.
The main.dart implementation:
- We should import notificationservice() class from the notificationservice.dart and the packages timezone, flutter_local_notification packages.
- When the app starts, we should initiate the notification service and we should ensure whether the widgets implemented in the application are initialized in the main() function.
void main() {
  WidgetsFlutterBinding.ensureInitialized();
  NotificationService().initNotification();
  runApp(const MyApp());
}
- The Notification should contain Title and body, so we can create TextFiled() to get them. To get the values entered in the text field, we should implement TextEditingController() for appropriate textfields.
- Then we are going to add a container with GestureDetector() which will show the notification with the title and description which were got from the user.
The main.dart file:
Dart
import 'package:flutter/material.dart';
import 'package:flutter_local_notifications/flutter_local_notifications.dart';
import 'package:schedule_local_notification/notificationservice.dart';
import 'package:timezone/timezone.dart' as tz;
import 'package:timezone/data/latest.dart' as tz;
void main() {
WidgetsFlutterBinding.ensureInitialized();
NotificationService().initNotification();
runApp(const MyApp());
}
class MyApp extends StatelessWidget {
const MyApp({Key? key}) : super(key: key);
@override
Widget build(BuildContext context) {
return MaterialApp(
title: 'Flutter Demo',
theme: ThemeData(
primarySwatch: Colors.green,
),
home: const MyHomePage(title: 'GeeksForGeeks'),
);
}
}
class MyHomePage extends StatefulWidget {
const MyHomePage({Key? key, required this.title}) : super(key: key);
final String title;
@override
_MyHomePageState createState() => _MyHomePageState();
}
class _MyHomePageState extends State<MyHomePage> {
TextEditingController Notification_title = TextEditingController();
TextEditingController Notification_descrp = TextEditingController();
@override
void initState() {
super.initState();
tz.initializeTimeZones();
}
@override
Widget build(BuildContext context) {
return Scaffold(
appBar: AppBar(
title: Text(widget.title),
),
body: Center(
child: Column(
mainAxisAlignment: MainAxisAlignment.center,
children: [
Text("GeeksForGeeks"),
Padding(
padding: EdgeInsets.all(20),
child: TextField(
controller: Notification_title,
decoration: InputDecoration(
border: OutlineInputBorder(),
labelText: "Enter Title",
),
),
),
Padding(
padding: EdgeInsets.all(20),
child: TextField(
controller: Notification_descrp,
decoration: InputDecoration(
border: OutlineInputBorder(),
labelText: "Enter Description",
),
),
),
Padding(
padding: EdgeInsets.all(20),
child: GestureDetector(
onTap: () {
NotificationService().showNotification(
1, Notification_title.text, Notification_descrp.text);
},
child: Container(
height: 40,
width: 200,
color: Colors.green,
child: Center(
child: Text(
"Show Notification",
style: TextStyle(color: Colors.white),
),
),
),
),
),
],
),
),
);
}
}
|
Output:
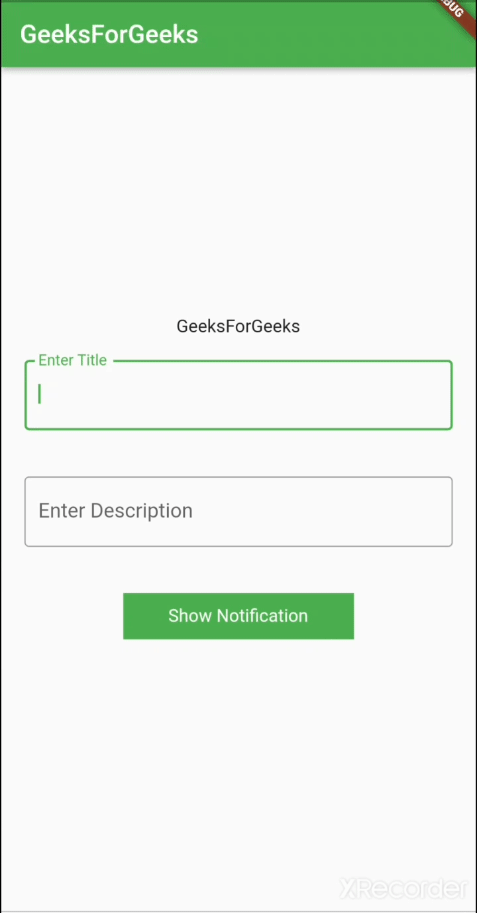
Resulted App
References:
Like Article
Suggest improvement
Share your thoughts in the comments
Please Login to comment...