Flutter – Draggable Scrollable Sheet
Last Updated :
16 Aug, 2021
In this tutorial, we are going to learn what the DraggableScrollableSheet widget is and how to implement it in Flutter.
Table of Contents
- What is Flutter
- DraggableScrollableSheet
- Project Setup
- Project Code
Flutter:
Flutter is an open-source UI software development kit created by Google with which we can develop applications for Android, IOS, Desktop, and Web with a single codebase.
Draggable Scrollable Sheet:
A DraggableScrollableSheet is a widget in Flutter that responds to drag gestures by resizing the scrollable.
Project Setup:
In this tutorial, we are going to make an Animal Details app wherein the main screen will be a list of animals and we will create a DraggableScrollableSheet widget to display the features of animals. The app will be focused on the DraggableScrollableSheet widget.
Let’s get started by creating a new project. Enter the following command on Command Prompt / Terminal in your preferred directory or you can also use your existing project.
flutter create draggable_scrollable_sheet_tutorial
We don’t need any extra packages for this tutorial.
Code
The Starting code is here and is in the main.dart file.
Dart
import 'dart:math';
import 'dart:ui';
import 'package:flutter/material.dart';
void main() {
runApp(MyApp());
}
class MyApp extends StatelessWidget {
@override
Widget build(BuildContext context) {
return MaterialApp(
title: 'Flutter Demo',
theme: ThemeData(
primarySwatch: Colors.green,
),
home: HomePage(),
);
}
}
class HomePage extends StatefulWidget {
const HomePage({Key? key}) : super(key: key);
@override
_HomePageState createState() => _HomePageState();
}
class _HomePageState extends State<HomePage> {
@override
Widget build(BuildContext context) {
return Scaffold(
appBar: AppBar(
title: Text('GeeksForGeeks'),
),
body: Container(),
),
);
}
}
|
We are going to use the Stack Widget to display the main screen in the background and the draggable Sheet widget in the front.
So, use Stack as the child of the Container.
Dart
Container(
child: Stack(
children: [],
),
),
|
So let us create a separate ListView widget with some animal names. We will name it animalsList.
Dart
Widget animalsList() {
return ListView(
children: [],
);
}
|
Now we will create some ListTiles with names of animals. But here we are going to create a separate ListTile widget and we will name it animalListTile. We are going to do this for simplifying our code.
Dart
Widget animalListTile(int index, String animalName) {
return ListTile(
onTap: () {
print(index);
},
title: Text(animalName),
);
}
|
Here we are taking to parameters, first is the index of ListTile and the second is animalName. We are using the index to update the DraggableScrollableSheet. The animalName is for the name of the animal.
Now let us create our DraggableScrollableSheet. Create a separate widget and name it bottomDetailsSheet.
Dart
Widget bottomDetailsSheet() {
return DraggableScrollableSheet(
initialChildSize: ,
minChildSize: ,
maxChildSize: ,
builder: (BuildContext context, ScrollController scrollController) {
return Container();
},
);
}
|
Now here we have got so many new parameters. Let’s learn about them one by one.
- initialChildSize: This field specifies the initial size of the bottom draggable sheet you want to appear on the fraction of the screen and takes a double value. Its default value is 0.5. Its value range from 0 – 1.0.
- minChildSize: This field specifies the minimum size of the DraggableScrollableSheet widget that is when any user will scroll down to close the widget, the minimum height will appear. Its default value is 0.25 and ranges from 0 – 1.0. It also specifies the fraction of the screen to be occupied.
- maxChildSize: This field specifies the maximum size of the DraggableScrollableSheet widget that is when any user will scroll up to open the widget, the maximum height will appear. Its default value is 1.0 and ranges from 0 – 1.0. It also specifies the fraction of the screen to be occupied.
- builder: This function returns a widget. Here we will use a ListView and display the details of the animal tapped. By default, we will display the details of the first animal.
- expand: This field specifies whether the widget should expand to fill the available space in its parent or not. The default value is true. We have not specified because we want it to be true.
Let us specify the first three fields.
Dart
initialChildSize: .2,
minChildSize: .1,
maxChildSize: .6,
|
Let us create variables for our app. You can copy from below. All variables are self-explanatory.
Dart
List<String> animalNames = ['Elephant', 'Tiger', 'Kangaroo'];
List<String> animalFamily = ['Elephantidae', 'Panthera', 'Macropodidae'];
List<String> animalLifeSpan = ['60-70', '8-10', '15-20'];
List<String> animalWeight = ['2700-6000', '90-310', '47-66'];
int selectedTile = 0;
|
Now let us design the builder function. Designing is your own choice and so you can either proceed by copying my design or your own. Here is the full design of DraggableScrollableSheet.
Dart
Widget bottomDetailsSheet() {
return DraggableScrollableSheet(
initialChildSize: .2,
minChildSize: .1,
maxChildSize: .6,
builder: (BuildContext context, ScrollController scrollController) {
return Container(
color: Colors.lightGreen[100],
child: ListView(
controller: scrollController,
children: [
ListTile(
title: Text(
"NAME",
),
subtitle: Text(
animalNames[selectedTile],
),
),
ListTile(
title: Text(
"FAMILY",
),
subtitle: Text(
animalFamily[selectedTile],
),
),
ListTile(
title: Text(
"LIFESPAN",
),
subtitle: Text(
animalLifeSpan[selectedTile],
),
),
ListTile(
title: Text(
"WEIGHT",
),
subtitle: Text(
animalWeight[selectedTile],
),
),
],
),
);
},
);
}
|
Here we used the ScrollController scrollController to make our list scrollable.
If you run the app you will see as follows.
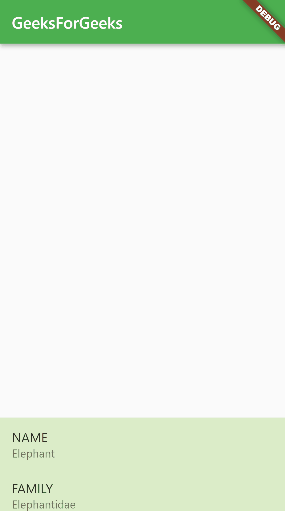
DraggableScrollableSheet
And now is the time for the animalList widget. We have already created our widget. Add the animalListTile widget as children of animalList.
Dart
Widget animalsList() {
return ListView(
children: [
animalListTile(0, animalNames[0]),
animalListTile(1, animalNames[1]),
animalListTile(2, animalNames[2]),
],
);
}
Widget animalListTile(int index, String animalName) {
return ListTile(
onTap: () {
print(index);
},
title: Text(animalName),
);
}
|
Here instead of printing the index, we will change the selectedTile value. But we also need to design the active list tile so that we can distinguish which one is active. Also, we will tweak the design of the animalListTile. So here is the final design.
Dart
Widget animalListTile(int index, String animalName) {
return Padding(
padding: EdgeInsets.all(8.0),
child: ListTile(
onTap: () {
setState(() {
selectedTile = index;
});
},
title: Text(
animalName,
style: TextStyle(
color: Colors.brown,
fontSize: 24.0,
fontWeight: FontWeight.w600,
),
),
tileColor: Colors.lightGreen[300],
selected: index == selectedTile,
selectedTileColor: Colors.lightGreen[600],
),
);
}
|
So our app is almost ready. Add the animalList in Stack widget’s children.
Dart
Stack(
children: [
animalsList(),
bottomDetailsSheet(),
],
),
|
Now run the app.
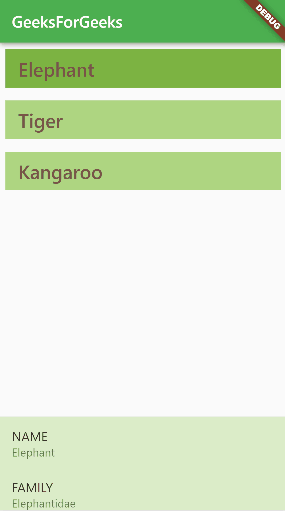
Complete DraggableScrollableSheet App
We have successfully created our app. If you had any problems comment below. Also here is the full Code.
Dart
import 'package:flutter/material.dart';
void main() {
runApp(MyApp());
}
class MyApp extends StatelessWidget {
@override
Widget build(BuildContext context) {
return MaterialApp(
title: 'DraggableScrollableSheet GFG',
theme: ThemeData(
primarySwatch: Colors.green,
),
home: HomePage(),
);
}
}
class HomePage extends StatefulWidget {
const HomePage({Key? key}) : super(key: key);
@override
_HomePageState createState() => _HomePageState();
}
class _HomePageState extends State<HomePage> {
List<String> animalNames = ['Elephant', 'Tiger', 'Kangaroo'];
List<String> animalFamily = ['Elephantidae', 'Panthera', 'Macropodidae'];
List<String> animalLifeSpan = ['60-70', '8-10', '15-20'];
List<String> animalWeight = ['2700-6000', '90-310', '47-66'];
int selectedTile = 0;
@override
Widget build(BuildContext context) {
return Scaffold(
appBar: AppBar(
title: Text('GeeksForGeeks'),
),
body: Container(
child: Stack(
children: [
animalsList(),
bottomDetailsSheet(),
],
),
),
);
}
Widget animalsList() {
return ListView(
children: [
animalListTile(0, animalNames[0]),
animalListTile(1, animalNames[1]),
animalListTile(2, animalNames[2]),
],
);
}
Widget animalListTile(int index, String animalName) {
return Padding(
padding: EdgeInsets.all(8.0),
child: ListTile(
onTap: () {
setState(() {
selectedTile = index;
});
},
title: Text(
animalName,
style: TextStyle(
color: Colors.brown,
fontSize: 24.0,
fontWeight: FontWeight.w600,
),
),
tileColor: Colors.lightGreen[300],
selected: index == selectedTile,
selectedTileColor: Colors.lightGreen[600],
),
);
}
Widget bottomDetailsSheet() {
return DraggableScrollableSheet(
initialChildSize: .2,
minChildSize: .1,
maxChildSize: .6,
builder: (BuildContext context, ScrollController scrollController) {
return Container(
color: Colors.lightGreen[100],
child: ListView(
controller: scrollController,
children: [
ListTile(
title: Text(
"NAME",
),
subtitle: Text(
animalNames[selectedTile],
),
),
ListTile(
title: Text(
"FAMILY",
),
subtitle: Text(
animalFamily[selectedTile],
),
),
ListTile(
title: Text(
"LIFESPAN",
),
subtitle: Text(
animalLifeSpan[selectedTile],
),
),
ListTile(
title: Text(
"WEIGHT",
),
subtitle: Text(
animalWeight[selectedTile],
),
),
],
),
);
},
);
}
}
|
Hope you liked the tutorial. Thank you.
Like Article
Suggest improvement
Share your thoughts in the comments
Please Login to comment...