Flutter – DatePicker
Last Updated :
15 Feb, 2021
The flutter, syncfusion date range picker is a widget that is used to select single or multiple dates along with the range between two dates. The use of this library makes the navigation between dates, weeks, months, years, and even centuries simple and easy.
The following are the key features of DatePicker:
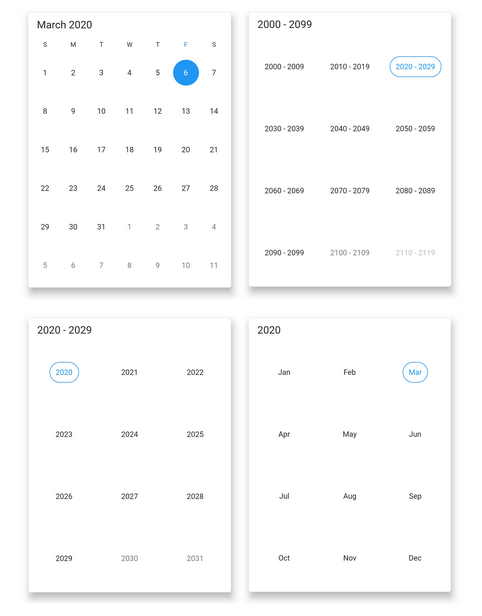
1. Multiple Picker View:
This feature allows the user to navigate between dates, months, year, and centuries with ease as shown below:
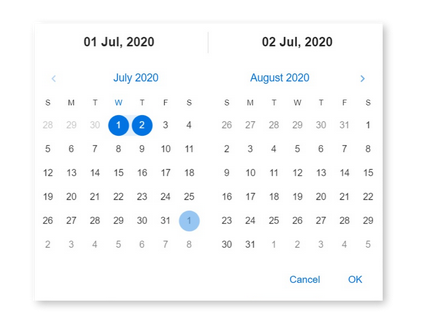
2. Multi Date Picker View:
It supports selecting single and multiple dates and also supports selecting a range between two dates as shown below:
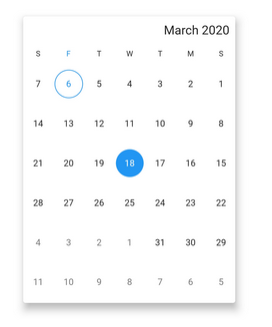
3. RLT support:
This feature is helpful for users who interact in a language that is written in Right to left manners like Arabic and Hebrew as shown below:
4. Globalization:
It also displays the current date-time according to global standards.
Now let’s look into its implementation in a flutter application by building a simple application. To build the app, follow the below steps:
- Add the dependency to the pubspec.yaml file
- Import the dependency to the main.dart file
- Structure an app with a StatefulWidget
- Set the state for the dates
- Call the SfDateRangePicker method in the body of the app
Now, let’s look into the steps in detail:
Adding the Dependency:
Add syncfusion_flutter_datepicker, in the dependencies section of the pubspec.yaml file as shown below:

Importing the dependency:
To import the dependency in the main.dart file, use the below line of code:
import 'package:syncfusion_flutter_datepicker/datepicker.dart';
Structuring the Application:
Use a StatefulWidget, and extend it to an appbar and a body for getting a simple app structure as shown below:
Dart
class MyApp extends StatefulWidget {
@override
MyAppState createState() => MyAppState();
}
@override
Widget build(BuildContext context) {
return MaterialApp(
home: Scaffold(
appBar: AppBar(
title: const Text('GeeksForGeeks'),
backgroundColor: Colors.green,
),
body:
));
}
}
|
Setting the State:
The set that we will set up in the app will be responsible for storing the selected date/dates and information regarding the range if two dates are selected. It can be done as shown below:
Dart
class MyAppState extends State<MyApp> {
String _dateCount;
String _range;
@override
void initState() {
_dateCount = '';
_range = '';
super.initState();
}
void _onSelectionChanged(DateRangePickerSelectionChangedArgs args) {
setState(() {
if (args.value is PickerDateRange) {
_range =
DateFormat('dd/MM/yyyy').format(args.value.startDate).toString() +
' - ' +
DateFormat('dd/MM/yyyy')
.format(args.value.endDate ?? args.value.startDate)
.toString();
} else if (args.value is DateTime) {
} else if (args.value is List<DateTime>) {
_dateCount = args.value.length.toString();
}
});
}
|
Calling the SFDateRangePicker method:
The SFDateRangePicker method is an inbuilt method provided by the syncfusion_flutter_datepicker library to get the range between two dates. This method will be called inside the body of the application as shown below:
Dart
child: SfDateRangePicker(
onSelectionChanged: _onSelectionChanged,
selectionMode: DateRangePickerSelectionMode.range,
initialSelectedRange: PickerDateRange(
DateTime.now().subtract(const Duration(days: 4)),
DateTime.now().add(const Duration(days: 3))),
),
|
Complete Source Code:
Dart
import 'package:flutter/material.dart';
import 'package:intl/intl.dart';
import 'package:syncfusion_flutter_datepicker/datepicker.dart';
void main() {
return runApp(MyApp());
}
class MyApp extends StatefulWidget {
@override
MyAppState createState() => MyAppState();
}
class MyAppState extends State<MyApp> {
String _dateCount;
String _range;
@override
void initState() {
_dateCount = '';
_range = '';
super.initState();
}
void _onSelectionChanged(DateRangePickerSelectionChangedArgs args) {
setState(() {
if (args.value is PickerDateRange) {
_range =
DateFormat('dd/MM/yyyy').format(args.value.startDate).toString() +
' - ' +
DateFormat('dd/MM/yyyy')
.format(args.value.endDate ?? args.value.startDate)
.toString();
} else if (args.value is DateTime) {
} else if (args.value is List<DateTime>) {
_dateCount = args.value.length.toString();
}
});
}
@override
Widget build(BuildContext context) {
return MaterialApp(
home: Scaffold(
appBar: AppBar(
title: const Text('GeeksForGeeks'),
backgroundColor: Colors.green,
),
body: Stack(
children: <Widget>[
Positioned(
left: 0,
top: 80,
right: 0,
bottom: 0,
child: SfDateRangePicker(
onSelectionChanged: _onSelectionChanged,
selectionMode: DateRangePickerSelectionMode.range,
initialSelectedRange: PickerDateRange(
DateTime.now().subtract(const Duration(days: 4)),
DateTime.now().add(const Duration(days: 3))),
),
)
],
)));
}
}
|
Output:
Like Article
Suggest improvement
Share your thoughts in the comments
Please Login to comment...