Expanded Class in Flutter
Last Updated :
20 Jun, 2022
When we create any child of a row or column we provide the size of the widget according to the screen size but sometimes when we provide more size of child as compared to screen size we get a warning and our widget goes out of the screen for resolving this we put a child of a row or column in an expanded widget so that the child occupies only the available space along the main axis. When we create multiple children then the available space between the children will divide according to the flex factor. An expanded widget contains only the stateful widget or stateless widget not other kinds of widgets like RenderObjectWidgets.
Syntax:
Expanded(
         {
          Key key,
          int flex: 1,
          @required Widget child,
         }
)
Properties of Expanded Class:
- child: This is the widget present below the expanded class
- Flex factor: Flex factor is the ratio in which available space is divided among the children to occupy the main axis. If the flex factor is zero or NULL the child will allocate its size on its own.
- Key: It manages how one widget is replaced by another widget
- FlexFit: It defines how flexible one widget to acquire available space.
Example:
Dart
import 'package:flutter/material.dart';
void main() {
return runApp(
MaterialApp(
home: Scaffold(
backgroundColor: Colors.green,
appBar: AppBar(
centerTitle: true,
title: const Text(
'GeeksforGeeks',
style: TextStyle(
color: Colors.green,
),
),
backgroundColor: Colors.white,
),
body: const DicePage(),
),
),
);
}
class DicePage extends StatefulWidget {
const DicePage({Key? key}) : super(key: key);
@override
_DicePageState createState() => _DicePageState();
}
class _DicePageState extends State<DicePage> {
@override
Widget build(BuildContext context) {
return Center(
child: Row(
children: <Widget>[
Expanded(
child: TextButton(
child: Container(
color: Colors.green,
padding: const EdgeInsets.all(14),
child: Image.asset('image/dicel.png'),
),
onPressed: () {},
),
),
],
),
);
}
}
|
Output:
In the below image the image of dice goes out of the screen because the required size for the image is more than the screen size.
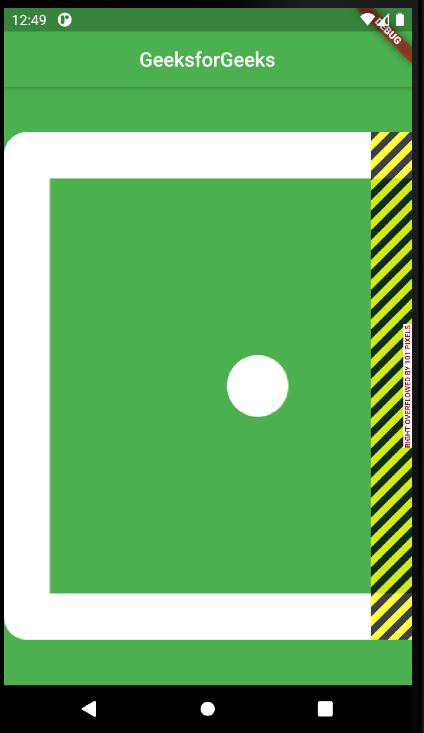
Without using Expanded class
We have used the Expanded class to make our image more flexible so that it can fit the screen size.
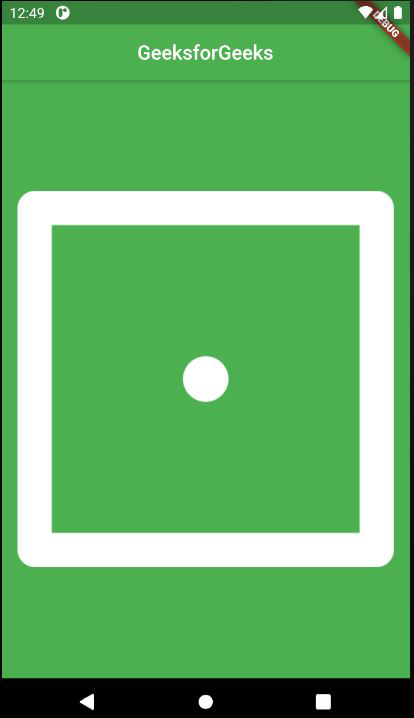
Image after using Expanded class
By using the Expanded class our image has fitted to available space only.
Example: For Inserting Multiple images
Dart
import 'package:flutter/material.dart';
void main() {
return runApp(
MaterialApp(
home: Scaffold(
backgroundColor: Colors.green,
appBar: AppBar(
centerTitle: true,
title: const Text(
'GeeksforGeeks',
style: TextStyle(
color: Colors.green,
),
),
backgroundColor: Colors.white,
),
body: const DicePage(),
),
),
);
}
class DicePage extends StatefulWidget {
const DicePage({Key? key}) : super(key: key);
@override
_DicePageState createState() => _DicePageState();
}
class _DicePageState extends State<DicePage> {
@override
Widget build(BuildContext context) {
return Center(
child: Row(
children: <Widget>[
Expanded(
flex: 2,
child: TextButton(
child: Container(
color: Colors.green,
padding: const EdgeInsets.all(14),
child: Image.asset('image/dicel1.png'),
),
onPressed: () {},
),
),
Expanded(
child: TextButton(
child: Container(
color: Colors.green,
padding: const EdgeInsets.all(14),
child: Image.asset('image/dicel2.png'),
),
onPressed: () {},
),
),
],
),
);
}
}
|
Output:
In this, we have inserted the multiple-image of dice. By default, the flex size is 1, but we can change it to our requirement.

Multiple Images
This Flex factor is set to 2 and image 1 is twice the size of image two.
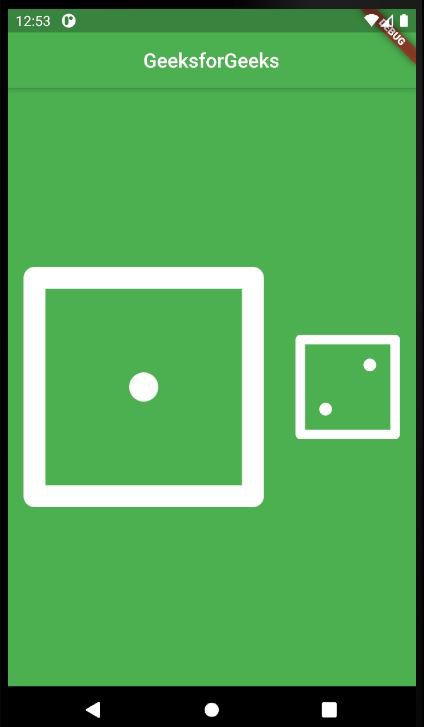
Multiple images with Flex factor
Like Article
Suggest improvement
Share your thoughts in the comments
Please Login to comment...