Expandable RecyclerView in Android with Kotlin
Last Updated :
21 Feb, 2023
In this article, we will get to know how to implement the expandable RecyclerView. In General, we will show the list of items in the listview but in some situations like if you want to show the sub-list items, then we have to use an expandable list. See the below image for a better understanding.
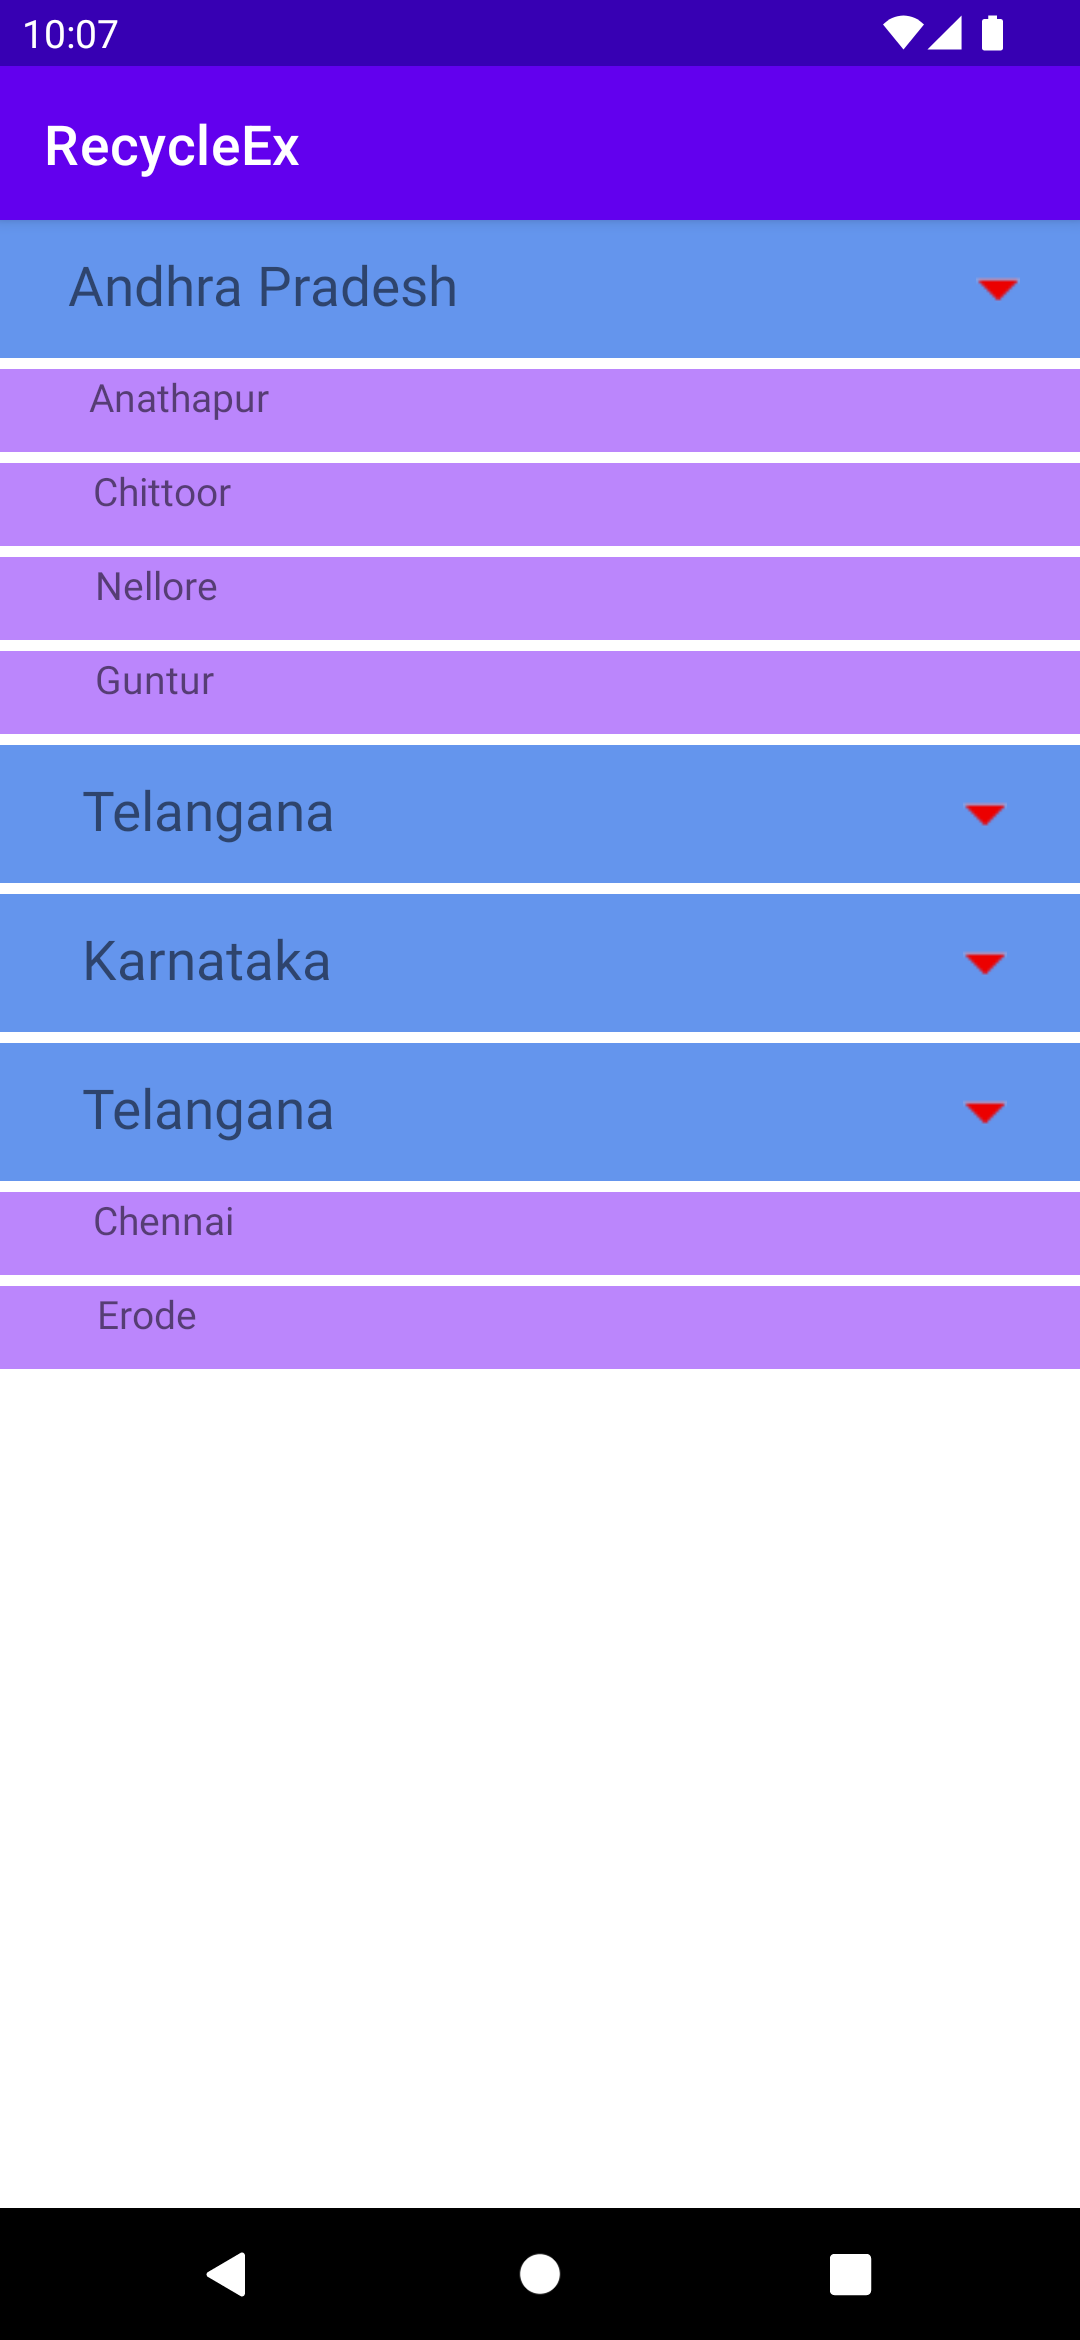
expandable recycler view
Step by Step Implementation
1. If you observe the above image, we have two types of list items – one is parent and child. But you can pass a list of similar objects to the recycler view. So, we have to create a common object/model for both(parent and child)
2. Creating Common Model Class
Kotlin
data class ParentData(
val parentTitle:String?=null,
var type:Int = Constants.PARENT,
var subList : MutableList<ChildData> = ArrayList(),
var isExpanded:Boolean = false
)
|
This is the model we use for parent and child. In the data class type – is by default parent, isExpanded – is by default false and empty sublist. Here we are using Constants from file like below.
Kotlin
object Constants {
const val PARENT = 0
const val CHILD = 1
}
|
3. Creating Child data class
In this step, we have to create one more data class for child items like below.
Kotlin
data class ChildData(val childTitle:String)
|
4. Setting up some data to show in the list
Now, we will add some data to the list, which is passed to the adapter like below
Kotlin
val listData : MutableList<ParentData> = ArrayList()
|
Here we are taking listData, which is used to store the ParentData objects. Now we create sample data of parent and child objects like below.
Kotlin
val parentData: Array<String> = arrayOf("Andhra Pradesh", "Telangana", "Karnataka", "TamilNadu")
val childDataData1: MutableList<ChildData> = mutableListOf(ChildData("Anathapur"),ChildData("Chittoor"),ChildData("Nellore"),ChildData("Guntur"))
val childDataData2: MutableList<ChildData> = mutableListOf(ChildData("Rajanna Sircilla"), ChildData("Karimnagar"), ChildData("Siddipet"))
val childDataData3: MutableList<ChildData> = mutableListOf(ChildData("Chennai"), ChildData("Erode"))
|
Now is the time to convert this data into a ParentData object because we will be adding this to the ListData.
Kotlin
val parentObj1 = ParentData(parentTitle = parentData[0], subList = childDataData1)
val parentObj2 = ParentData(parentTitle = parentData[1], subList = childDataData2)
val parentObj3 = ParentData(parentTitle = parentData[2])
val parentObj4 = ParentData(parentTitle = parentData[1], subList = childDataData3)
|
In the ParentData model by default- the type is the parent and expandable is false. Now we are adding title and sublist. Finally, we need to add all these objects to listData like below
Kotlin
listData.add(parentObj1)
listData.add(parentObj2)
listData.add(parentObj3)
listData.add(parentObj4)
|
5. Creating the Adapter for recycler view
We just added some dummy data, now we have to show this data into the recycler view, for that we need one adapter, which is used to show our data as per our requirement.
Kotlin
class RecycleAdapter(var mContext: Context, val list: MutableList<ParentData>) : RecyclerView.Adapter<RecyclerView.ViewHolder>() {
override fun onCreateViewHolder(parent: ViewGroup, viewType: Int): RecyclerView.ViewHolder {
return if(viewType== Constants.PARENT){
val rowView: View = LayoutInflater.from(parent.context).inflate(R.layout.parent_row, parent,false)
GroupViewHolder(rowView)
} else {
val rowView: View = LayoutInflater.from(parent.context).inflate(R.layout.child_row, parent,false)
ChildViewHolder(rowView)
}
}
override fun getItemCount(): Int = list.size
override fun onBindViewHolder(holder: RecyclerView.ViewHolder, position: Int) {
val dataList = list[position]
if (dataList.type == Constants.PARENT) {
holder as GroupViewHolder
holder.apply {
parentTV?.text = dataList.parentTitle
downIV?.setOnClickListener {
expandOrCollapseParentItem(dataList,position)
}
}
} else {
holder as ChildViewHolder
holder.apply {
val singleService = dataList.subList.first()
childTV?.text =singleService.childTitle
}
}
}
private fun expandOrCollapseParentItem(singleBoarding: ParentData,position: Int) {
if (singleBoarding.isExpanded) {
collapseParentRow(position)
} else {
expandParentRow(position)
}
}
private fun expandParentRow(position: Int){
val currentBoardingRow = list[position]
val services = currentBoardingRow.subList
currentBoardingRow.isExpanded = true
var nextPosition = position
if(currentBoardingRow.type==Constants.PARENT){
services.forEach { service ->
val parentModel = ParentData()
parentModel.type = Constants.CHILD
val subList : ArrayList<ChildData> = ArrayList()
subList.add(service)
parentModel.subList=subList
list.add(++nextPosition,parentModel)
}
notifyDataSetChanged()
}
}
private fun collapseParentRow(position: Int){
val currentBoardingRow = list[position]
val services = currentBoardingRow.subList
list[position].isExpanded = false
if(list[position].type==Constants.PARENT){
services.forEach { _ ->
list.removeAt(position + 1)
}
notifyDataSetChanged()
}
}
override fun getItemViewType(position: Int): Int = list[position].type
override fun getItemId(position: Int): Long {
return position.toLong()
}
class GroupViewHolder(row: View) : RecyclerView.ViewHolder(row) {
val parentTV = row.findViewById(R.id.parent_Title) as TextView?
val downIV = row.findViewById(R.id.down_iv) as ImageView?
}
class ChildViewHolder(row: View) : RecyclerView.ViewHolder(row) {
val childTV = row.findViewById(R.id.child_Title) as TextView?
}
}
|
6. Adding Logic in the Adapter class
In this step, we will discuss how the adapter shows our data.
Kotlin
override fun getItemViewType(position: Int): Int = list[position].type
|
This line is used to set the view type, by default ParentData object type is the parent so it shows the list of parent items. But why we are adding this type here. When you are binding the data to a view, to know which type of viewType is coming by the adapter method like below
Kotlin
override fun onCreateViewHolder(parent: ViewGroup, viewType: Int): RecyclerView.ViewHolder {
return if(viewType== Constants.PARENT){
val rowView: View = LayoutInflater.from(parent.context).inflate(R.layout.parent_row, parent,false)
GroupViewHolder(rowView)
} else{
val rowView: View = LayoutInflater.from(parent.context).inflate(R.layout.child_row, parent,false)
ChildViewHolder(rowView)
}
}
|
This method comes with viewType, which is already set before. Now we have the chance to check which type is coming. If it is a parent then we can inflate (converting layout to view) parent_row or child_row and return GroupViewHolder(rowView) or ChildViewHolder(rowView)
parent_row.xml
XML
<?xml version="1.0" encoding="utf-8"?>
<androidx.constraintlayout.widget.ConstraintLayout
android:layout_width="match_parent"
android:layout_marginBottom="4dp"
android:background="@color/lightblue"
android:layout_height="50dp">
<TextView
android:id="@+id/parent_Title"
android:layout_width="wrap_content"
android:layout_height="wrap_content"
android:textSize="20sp"
app:layout_constraintBottom_toBottomOf="parent"
app:layout_constraintEnd_toEndOf="parent"
app:layout_constraintHorizontal_bias="0.099"
app:layout_constraintStart_toStartOf="parent"
app:layout_constraintTop_toTopOf="parent"
app:layout_constraintVertical_bias="0.419" />
<ImageView
android:id="@+id/down_iv"
android:layout_width="wrap_content"
android:layout_height="wrap_content"
android:src="@drawable/ic_dropdown"
app:layout_constraintBottom_toBottomOf="parent"
app:layout_constraintEnd_toEndOf="parent"
app:layout_constraintHorizontal_bias="0.896"
app:layout_constraintStart_toEndOf="@+id/parent_Title"
app:layout_constraintTop_toTopOf="parent" />
</androidx.constraintlayout.widget.ConstraintLayout>
|
child_row.xml
XML
<?xml version="1.0" encoding="utf-8"?>
android:layout_width="match_parent"
android:layout_marginBottom="4dp"
android:background="@color/purple_200"
android:layout_height="30dp">
<TextView
android:id="@+id/child_Title"
android:layout_width="wrap_content"
android:layout_height="wrap_content"
android:textSize="14sp"
app:layout_constraintBottom_toBottomOf="parent"
app:layout_constraintEnd_toEndOf="parent"
app:layout_constraintHorizontal_bias="0.099"
app:layout_constraintStart_toStartOf="parent"
app:layout_constraintTop_toTopOf="parent"
app:layout_constraintVertical_bias="0.036" />
</androidx.constraintlayout.widget.ConstraintLayout>
|
7. How to bind the data to views
Kotlin
override fun onBindViewHolder(holder: RecyclerView.ViewHolder, position: Int) {
val dataList = list[position]
if (dataList.type == Constants.PARENT) {
holder as GroupViewHolder
holder.apply {
parentTV?.text = dataList.parentTitle
downIV?.setOnClickListener {
expandOrCollapseParentItem(dataList,position)
}
}
} else {
holder as ChildViewHolder
holder.apply {
val singleService = dataList.subList.first()
childTV?.text =singleService.childTitle
}
}
}
|
This method comes with a holder. Now we have to check by using the type if it is a parent then we can use as(instance of in java) keyword to bind the data view like holder as GroupViewHolder.
8. How Expand/Collapse Logic works
When the user clicks on the down arrow image we call the expandOrCollapseParentItem function. This function checks whether the parent is expanded or not like below.
Kotlin
private fun expandOrCollapseParentItem(singleBoarding: ParentData,position: Int) {
if (singleBoarding.isExpanded) {
collapseParentRow(position)
} else {
expandParentRow(position)
}
}
|
First, will see the expandParentRow functionality
Kotlin
private fun expandParentRow(position: Int){
val currentBoardingRow = list[position]
val services = currentBoardingRow.subList
currentBoardingRow.isExpanded = true
var nextPosition = position
if(currentBoardingRow.type==Constants.PARENT){
services.forEach { service ->
val parentModel = ParentData()
parentModel.type = Constants.CHILD
val subList : ArrayList<ChildData> = ArrayList()
subList.add(service)
parentModel.subList=subList
list.add(++nextPosition,parentModel)
}
notifyDataSetChanged()
}
}
|
Let’s see, how the expand logic works, when the expandParentRow function is called with the position. We get the data by position from that we get the sublist. Again we are adding sublist items by using for each and increasing the current position with +1 like below
Kotlin
list.add(++nextPosition,parentModel)
|
here, we are adding parentModel to the list and adding the type as Constants.CHILD, after adding the items we call notifyDataSetChanged(), so again recycler view will load with new data. While binding the data again it will check the type and the data to its view. The same logic works for collapse and there we will do the reverse operation. Finally, we need to add this adapter to the RecyclerView like below.
Kotlin
val exRecyclerView = findViewById<RecyclerView>(R.id.exRecycle)
exRecyclerView.layoutManager = LinearLayoutManager(this)
exRecyclerView.adapter = RecycleAdapter(this@MainActivity,listData)
|
and our main_layout.xml file where we added the recycler view.
XML
<?xml version="1.0" encoding="utf-8"?>
<androidx.constraintlayout.widget.ConstraintLayout
android:layout_width="match_parent"
android:layout_height="match_parent"
tools:context=".MainActivity">
<androidx.recyclerview.widget.RecyclerView
android:id="@+id/exRecycle"
android:layout_width="match_parent"
android:layout_height="match_parent"/>
</androidx.constraintlayout.widget.ConstraintLayout>
|
Output:

Like Article
Suggest improvement
Share your thoughts in the comments
Please Login to comment...