Excel Dynamic Chart Linked with a Drop-down List
Last Updated :
27 Dec, 2021
Dynamic Chart using drop-down list is very helpful when we deal with tons of grouped data and perform comparative analysis. For example, an E-commerce site sells different types of products. They can create a drop-down list for every product and in the chart, they can see the sales details in the last ten years.
In this article, we are going to see how to create a dynamic chart with a drop-down list using a suitable example shown below.
Example: Consider the table below which shows the details of the ratings provided by our mentors to different students in the courses they have enrolled in. The rating is on a scale of 0-5 based on their performance. The goal is to create a single drop-down list for the courses and associate a chart with it.

Implementation :
Follow the below steps to implement a dynamic chart linked with a drop-down menu in Excel:
Step 1: Insert the data set into an Excel sheet in the cells as shown above.
Step 2: Now select any cell where you want to create the drop-down list for the courses.
Step 3: Now click on the Data tab from the top of the Excel window and then click on Data Validation.

Step 4: In the Data Validation dialog box :
- In Allow: Select List.
- In Source: Select the cell range for the columns. You can enter manually or select the cell range by clicking the cell followed by dragging the AutoFill Options as shown below.

Step 5: The drop-down list is ready and now you can format it by changing the color, font size. This drop-down list will do nothing as we have not yet associated it with any Formulas. It will just show the list of courses available in the list.

Step 6: It is the most important step. Now we have to associate this drop-down list with the data of the original table using the Formulas. In our case, we have used the INDEX function and MATCH function for creating the Formula.
The syntax for the INDEX function is :
= INDEX(array,row_num,[col_num],[area_num])

array : range of cells
The syntax for the MATCH function is :
= MATCH(lookup_value, lookup_array, [match_type])

[match_type] : It denotes whether we need an exact match or appropriate match. The values can be 1,0,-1.
In our case, the [match_type] is “0” since we need an exact match with the original data set.
Step 7: Now copy and paste all the names in a random cell in Excel where we will create the formula.

8. Now copy the cell location of the drop-down where you have copied the names of the cell. It would be the column name for the dynamic set.
= Cell_Location
In our case the Cell_Location is B9.
Click Enter. It will show whatever is being shown in the cell where the drop-down list is created.

Step 9: Now write the Formula as shown below to create a dynamic data set.
In the Formula, we have used two MATCH functions. One is for matching the set of Rows for names and the second one is for matching the set of Columns.

Step 10: Click Enter. The first data will be inserted in the column. Now drag the AutoFill Options and all the data will be copied from the original table. Now, successfully we have created a dynamic list data set.

The drop-down list is now active. Currently, it is showing the ratings of students for the course “Python”. Now, if you select “DSA” from the drop-down the data will be automatically updated.
Step 11: Select the data set created in step 9 and go to Insert followed by Chart Groups and insert a suitable chart.

Step 12: The Dynamic Chart is now ready to use. You can change the courses using the drop-down list and the chart will be automatically updated as shown below. You can format the chart and add suitable titles, axes title, data labels, etc.
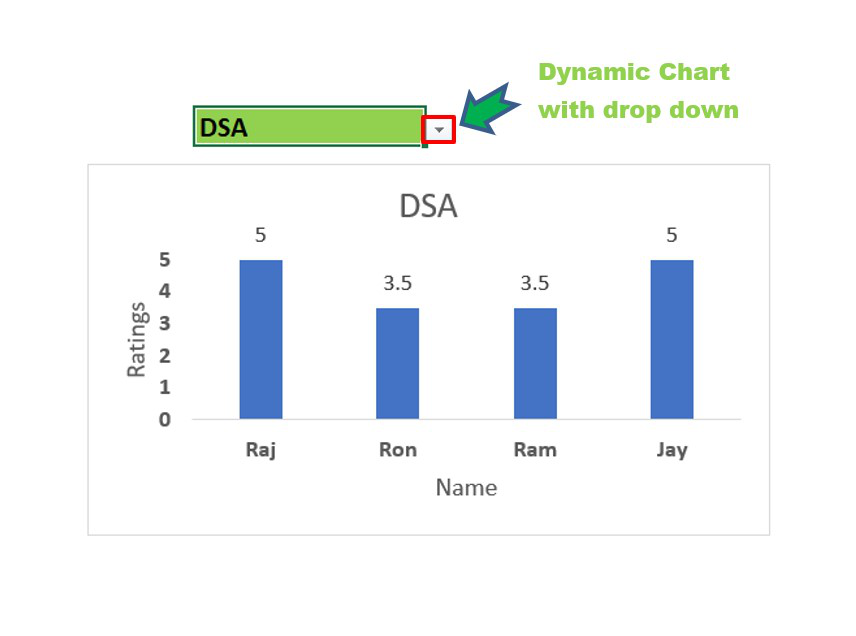
Dynamic Chart with drop-down list

Like Article
Suggest improvement
Share your thoughts in the comments
Please Login to comment...