Custom Notifications in ElectronJS
Last Updated :
01 Nov, 2023
ElectronJS
is an Open Source Framework used for building Cross-Platform native desktop applications using web technologies such as HTML, CSS, and JavaScript which are capable of running on Windows, macOS, and Linux operating systems. It combines the Chromium engine and NodeJS into a Single Runtime. Electron at its core is a
NodeJS
application having capabilities to interact with the native OS environment such as File System, System Tray etc. For creating interactive native OS applications Electron needs to integrate itself with OS functionalities. One such crucial functionality is Desktop Notifications. All three operating systems have provisions for sending Desktop Notifications. Electron provides the built-in
Notification
Module which allows the application to send Custom Notifications, using the operating systems native notification APIs to display it. This tutorial will demonstrate how to create Custom Desktop Notifications using the Notification Module.
We assume that you are familiar with the prerequisites as covered in the above-mentioned link. For Electron to work,
node
and
npm
need to be pre-installed in the system.
Notifications In Electron:
The Notification Module is a part of the
Main Process
. To import and use the Notification Module in the
Renderer Process
, we can use the
Remote
Module provided by Electron. In this tutorial, we will also be using Electron Remote. For more details on the Remote Module, Refer this
link
.
Project Structure: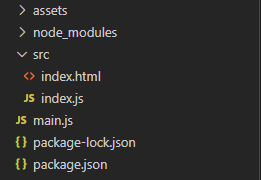
Example:
We will start by building the basic Electron Application by following the given steps.
- Step 1: Navigate to an Empty Directory to setup the project, and run the following command,
npm init
To generate the package.json file. Install Electron using npm if it is not installed.
npm install electron --save-dev
This command will also create the package-lock.json file and install the required node_modules dependencies. Once Electron has been successfully installed, Open the package.json file and perform the necessary changes under the “scripts” key. package.json:
{
  "name": "electron-notification",
  "version": "1.0.0",
  "description": "Custom notification in Electron",
  "main": "main.js",
  "scripts": {
    "start": "electron"
  },
  "keywords": [
    "electron"
  ],
  "author": "Radhesh Khanna",
  "license": "ISC",
  "dependencies": {
    "electron": "^8.2.5"
  }
}
- Step 2: Create a main.js file according to the project structure. This file is the Main Process and acts as an entry point into the application. Copy the Boilerplate code for the main.js file as given in the following link. We will modify the code to suit our project needs. main.js:
javascript
const { app, BrowserWindow } = require('electron')
function createWindow() {
const win = new BrowserWindow({
width: 800,
height: 600,
webPreferences: {
nodeIntegration: true
}
})
win.loadFile('src/index.html')
win.webContents.openDevTools()
}
app.whenReady().then(createWindow)
app.on('window-all-closed', () => {
if (process.platform !== 'darwin') {
app.quit()
}
})
app.on('activate', () => {
if (BrowserWindow.getAllWindows().length === 0) {
createWindow()
}
})
|
- Step 3: Create the index.html file within the src directory. We will also copy the boilerplate code for the index.html file from the above-mentioned link. We will modify the code to suit our project needs. index.html:
html
<!DOCTYPE html>
<html>
<head>
<meta charset="UTF-8">
<title>Hello World!</title>
<meta http-equiv="Content-Security-Policy"
content="script-src 'self' 'unsafe-inline';" />
</head>
<body>
<h1>Hello World!</h1> We are using node
<script>
document.write(process.versions.node)
</script>, Chrome
<script>
document.write(process.versions.chrome)
</script>, and Electron
<script>
document.write(process.versions.electron)
</script>.
<script src="index.js"></script>
</body>
</html>
|
- Output: At this point, our basic Electron Application is set up. To launch the Electron Application, run the Command:
npm start

Notification Options:
Now we will create a Custom Desktop Notification on a
Windows
Machine. The
Notification
Module provides certain Instance Events, Instance Methods, and Options which are Operating System specific. If a property that is incompatible with the native OS is used, it is Simple Ignored. A detailed list of the same is provided below.
- title: String Supported by all OS. The Title of the Notification shown at top of Notification Window
- subtitle: String (Optional) Supported by macOS only. A Subtitle of the Notification. Shown Below the Title
- body: String Supported by all OS. The Body of the Notification Window
- silent: Boolean (Optional) Supported by all OS. Whether or not to omit OS Notification Sound on displaying the notification
- icon: String (Optional) Supported by all OS. An Icon to display in the Notification Window. For the purpose of this tutorial, used a PNG image of the Electron logo saved in the ‘assets’ folder
- hasReply: Boolean (Optional) Supported by macOS only. To display an Inline Reply Option to the Notification window
- replyPlaceholder: String (Optional) Supported by macOS only. The Placeholder for the ‘hasReply’ input field
- urgency: String (Optional) Supported by Linux Only. The urgency of the Notification. Values can be ‘normal’, ‘critical’, or ‘low’.
- closeButtonText: String (Optional) Supported by macOS only. A Custom Title for the Close Button of the Notification
- timeoutType: String (Optional) Supported in Windows and Linux operating Systems. The Timeout Duration of the Notification. Values can be ‘default’ or ‘never’. As of Electron 8.0+, there is a bug associated with this property. Setting the value as ‘never’, the notification should only disappear on manual intervention by the user. However, This is not the case. Irrespective of the value, the notification will disappear on its own. You can follow the bug tracking here.
- actions: Object (Optional) Supported by macOS only. Actions to add to the Notification. It is an Array of Objects. Every Object consists of ‘type’ and ‘text’. There are certain limitations associated with using this property. In the case of multiple actions defined, only the first one is used. If multiple actions are provided then they will be listed as additional actions, i.e. displayed when the mouse is active over the first action button. This case is also incompatible with
hasReply property and will be ignored if hasReply: true. For a detailed explanation, Refer this link.
- sound: String (Optional) Supported by macOS only. Sound File to play when the Notification is displayed. Any of the default sounds present in macOS can also be used in addition to a custom sound file. The sound file needs to be present within the app bundle or any of the following locations that are mentioned in this link. In this tutorial the custom sound file is present within the assets folder as sound.mp3
The Notification Module also provides us with a
Static
Method,
Notification.isSupported()
. Returns a Boolean value stating whether Notifications are Supported in the Current System or not. In the
index.html
file, add the following code before the
script
tag.
- index.html:
html
<br><br>
<strong>
Trigger Custom Notifications in Electron
</strong>
<button id="trigger">
Trigger Custom Notification
</button>
|
- Output:

The
Trigger Custom Notification
Button does not have any functionality associated with it. We will add an
EventListener
to the button to trigger the Custom Notification. We will also add
EventListener
to the Notification object. Create the
index.js
file following the project Structure and perform the following changes.
- index.js:
javascript
const electron = require('electron');
const path = require('path')
const Notification = electron.remote.Notification;
var button = document.getElementById('trigger');
const options = {
title: 'Custom Notification',
subtitle: 'Subtitle of the Notification',
body: 'Body of Custom Notification',
silent: false,
icon: path.join(__dirname, '../assets/image.png'),
hasReply: true,
timeoutType: 'never',
replyPlaceholder: 'Reply Here',
sound: path.join(__dirname, '../assets/sound.mp3'),
urgency: 'critical'
closeButtonText: 'Close Button'
actions: [ {
type: 'button',
text: 'Show Button'
}]
}
const customNotification = new Notification(options);
button.addEventListener('click', function (event) {
console.log(Notification.isSupported());
customNotification.show();
});
customNotification.addListener('click', () => {
console.log('Notification is Clicked');
});
customNotification.addListener('show', () => {
console.log('Notification is shown');
});
customNotification.addListener('close', () => {
console.log('Notification is Automatically Closed')
});
|
- customNotification.show() Instance Method to immediately show the Notification to the user. In case the Notification has been shown, dismisses the previous one and creates a new Notification with identical Options.
- customNotification.close() Instance Method to dismiss the Notification.
- Event: ‘click’ Event is Emitted, when user clicks on the Notification.
- Event: ‘show’ Event is Emitted, when notification is shown to the user.
- Event: ‘close’ Event is Emitted, when Notification is Closed. Not guaranteed to be emitted every time. Notification will automatically close irrespective of ‘timeoutType’ property.
- Output:

Instance events:
Notification Module also provides two more Instance events which are supported by
macOS
only.
javascript
customNotification.addListener('reply', (event, reply) => {
console.log('Replied String is - ', reply);
});
customNotification.addListener('action', (event, index) => {
console.log('Index of the action clicked is - ', index);
});
|
Instance Properties:
Electron Notification Module also Supports Instance Properties which can be set to the Notification Object. They can be used instead of Options and can also change pre-defined options when triggering Custom Notifications. A detailed list is given below.
javascript
customNotification.title = 'Title has been Changed';
customNotification.subtitle = 'Subtitle of the Notification';
customNotification.body = 'Body has been changed';
customNotification.closeButtonText = 'Close Button'
customNotification.hasReply = true;
customNotification.replyPlaceholder = 'Reply Placeholder';
customNotification.silent = false;
customNotification.urgency = 'low';
customNotification.timeoutType= 'default';
|
Output: Upon adding these Instance properties to the index.js file, we should see the following. All non-compatible instance properties are ignored. 
Like Article
Suggest improvement
Share your thoughts in the comments
Please Login to comment...