CSS to put icon inside an input element in a form
Last Updated :
29 Jan, 2024
To add icons inside the input element the <i> tag and <span> tag are used widely to add icons on the webpages. To add any icons on the webpages or in some specific area, it needs the font awesome link inside the head tag. The font awesome icon can be placed by using the fa prefix before the icon’s name.
CDN Link:
https://cdnjs.cloudflare.com/ajax/libs/font-awesome/4.7.0/css/font-awesome.min.css
Example 1: This example shows how to put an icon inside an input element in a form.
html
<!DOCTYPE html>
<html>
<head>
<title>Put icon inside an input element</title>
<link rel="stylesheet" href=
<style>
body {
text-align: center;
}
h3 {
text-align: center;
}
div {
max-width: 400px;
margin: auto;
}
.input-icons {
width: 100%;
margin-bottom: 10px;
}
.input-icons i {
position: absolute;
}
.icon {
padding: 10px;
min-width: 40px;
}
.input-field {
width: 100%;
padding: 10px;
text-align: center;
}
</style>
</head>
<body>
<h3>
Icons inside the input element
</h3>
<div>
<div class="input-icons">
<i class="fa fa-user icon"></i>
<input class="input-field" type="text">
<i class="fa fa-instagram icon"></i>
<input class="input-field" type="text">
<i class="fa fa-envelope icon"></i>
<input class="input-field" type="text">
<i class="fa fa-youtube icon"></i>
<input class="input-field" type="text">
<i class="fa fa-facebook icon"></i>
<input class="input-field" type="text">
</div>
</div>
</body>
</html>
|
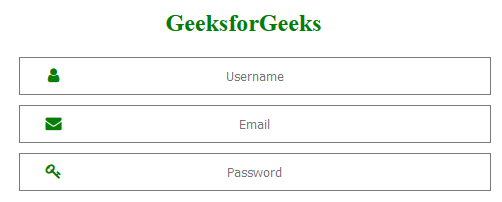
Output: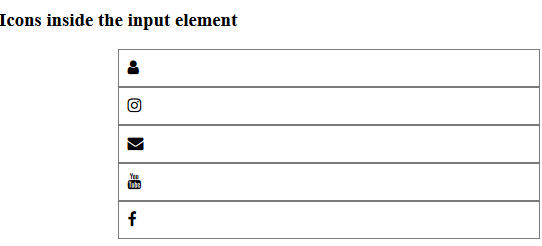 Example 2: This example shows how to put an icon inside an input element in a form with some CSS properties.
html
<!DOCTYPE html>
<html>
<head>
<title>Put icon inside an input element</title>
<link rel="stylesheet" href=
<style>
body {
text-align: center;
}
form {
max-width: 450px;
margin: auto;
}
h2 {
color: green;
}
.input-icons {
width: 100%;
margin-bottom: 10px;
}
.input-icons i {
position: absolute;
}
.icon {
padding: 10px;
color: green;
min-width: 50px;
text-align: center;
}
.input-field {
width: 100%;
padding: 10px;
text-align: center;
}
</style>
</head>
<body>
<form>
<h2>GeeksforGeeks</h2>
<div class="input-icons">
<i class="fa fa-user icon"></i>
<input class="input-field" type="text" placeholder="Username">
</div>
<div class="input-icons">
<i class="fa fa-envelope icon"></i>
<input class="input-field" type="text" placeholder="Email">
</div>
<div class="input-icons">
<i class="fa fa-key icon"></i>
<input class="input-field" type="password" placeholder="Password">
</div>
</form>
</body>
</html>
|
Output:
CSS is the foundation of webpages, is used for webpage development by styling websites and web apps. You can learn CSS from the ground up by following this CSS Tutorial and CSS Examples.
Share your thoughts in the comments
Please Login to comment...