Creating First Java Application in IntelliJ IDEA
Last Updated :
28 Jan, 2021
IntelliJ IDEA is a Java IDE that is one of the 3 biggest and most popular IDE’s in the world. It has two versions, namely the free open-source community edition and a paid Ultimate edition. Some features of IntelliJ IDEA are as follows:
- Both versions of IntelliJ IDEA support various programming languages like Java, Scala, Kotlin, Groovy, etc.
- There are many features in IntelliJ IDEA that make programming simpler such as debugging, code completion, code inspections, XML editing support, code refactoring, unit testing, TestNG, etc.
- Some other tools that are only offered in the paid Ultimate version duplicate detection, JavaScript and database tools, Perforce integration, etc.
- IntelliJ IDEA can be used on platforms like Linux, macOS, and Windows
Procedure:
- Start a project
- Create a package inside the project and corresponding classes to the package created
- Write the code to be executed in a text editor
- Package the above project in JAR
- Test the application
- Execute the above JAR file
Implementation:
Step 1: Start a project
- When you open IntelliJ for the first time you will get a welcome screen with three options. Out of those three options click on the new project to get started.
- In the next window, you have to give the name of your project
- “GeeksForGeeks” is a custom input used to illustrate here in the article.
- If you want to use an additional library or any kind of template then you have an option to choose from the dropdown menu that will ease your task.
- After clicking finish your IDE will create a virtual environment for your project.

- Name the project as ‘GeeksForGeeks’ (you can choose any name), and then clicks finish.

Step 2: Create a package inside the project and corresponding classes to the package created
- On the left-hand side of the project window, select ‘src → new → java class → write ‘GeeksForGeeks.gfg’ ‘
- It will create a project named ‘GeeksForGeeks’ and create a class of ‘GeeksforGeeks’.

Step 3: Write the code to be executed in a text editor
Writing a demo program in the text editor that should only print “This is my first project in java” after the program is successfully compiled and run.
Example
Java
import java.io.*;
public class Geeksforgeeks {
public static void main(String[] args)
{
System.out.println(
"This is my first project in java");
}
}
|

- After writing the above code you may check if it is finishing with exit code ‘0’ or not.
Step 4: Package the above project in JAR
- After you have finished with the writing part you can now package your application in a JAR file.
- Select file → project Structure → artifact

- Click on the addition sign(+) as you can see in the following image.

- Select the folder icon that is present in the left of the output directory field and define the path to the .jar file.
- Now go to build in the navigation bar and select ‘build artifacts‘ from the drop-down list.

Step 5 -NOW TEST YOUR APPLICATION
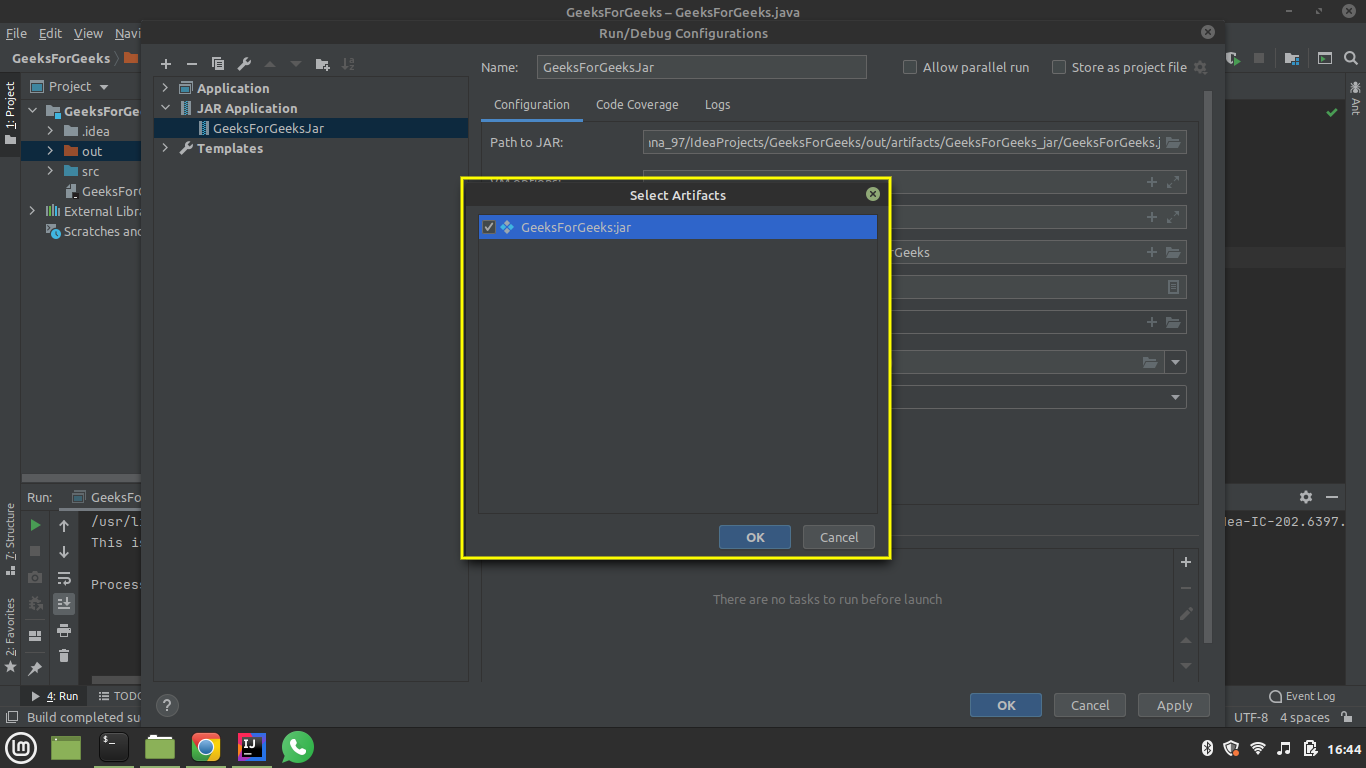
- Now select Edit configuration from the field present on the right-hand side as shown below, highlighted with a yellow box.

- Now click on the addition sign(+) and select the JAR application from the menu. In the name field write ‘GeeksForGeeksJar‘.
- Choose the ‘GeeksForGeeks.jar’ file from the directories.

- In the path to jar field, click the folder sign and specify the path of your .jar file.
- Click on the plus sign(+) in the before launch field and then select build artifacts from the given options.

- Select GeeksForGeeks: jar from the menu and press OK.
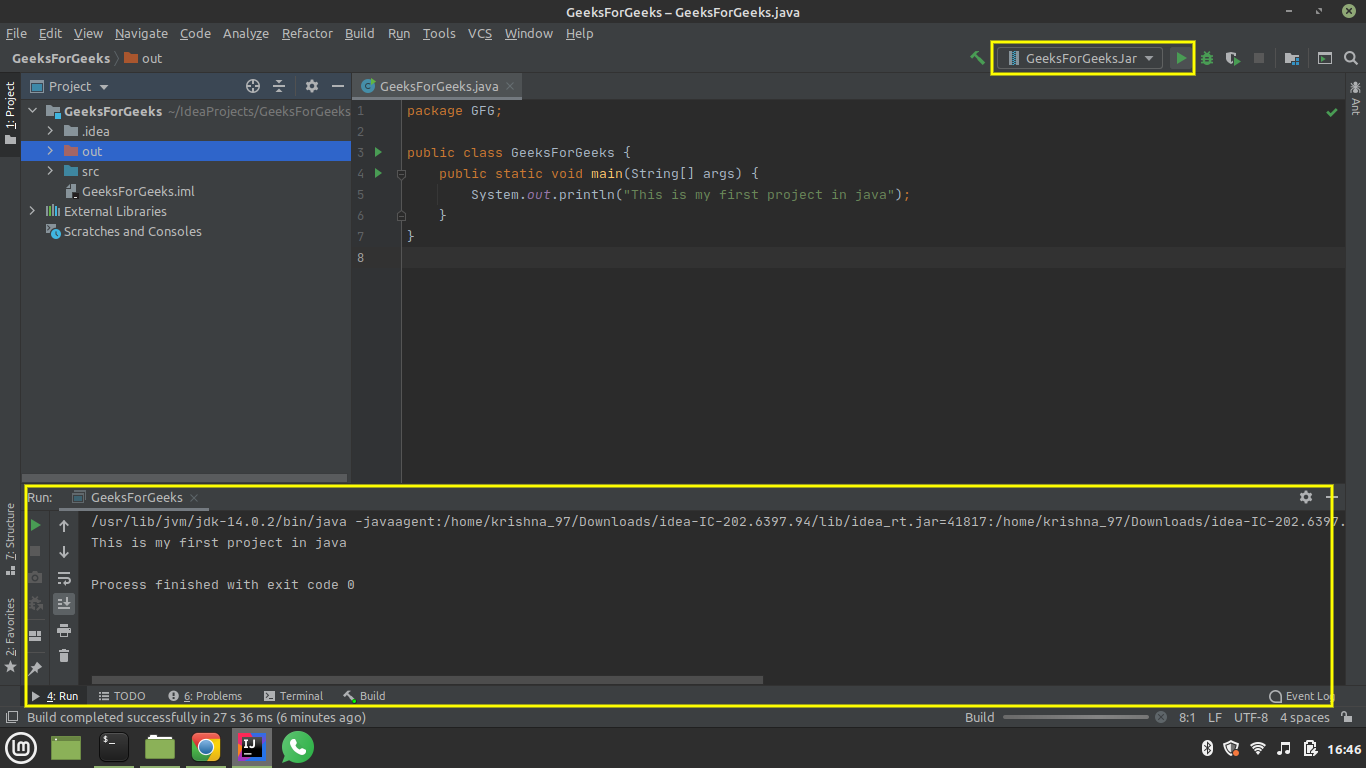
Step 6: Execute the above JAR file
- Select GeeksForGeeks.jar from the toolbar in the top right corner of your IDE and run.
- If the process executed successfully, it means that your application is packaged correctly and you are done with creating your first java application in IntelliJ IDEA.
Like Article
Suggest improvement
Share your thoughts in the comments
Please Login to comment...