Create a vignette filter using Python – OpenCV
Last Updated :
13 Feb, 2023
In general, Images in computers are stored in the form of a matrix. In case of color image, Image is represented in the form of 3-dimensional matrix or one can say that we use three 2d matrices for representing three color channels one 2d matrix for representing red channel, one for green and one for representing blue. In the case of grayscale image, there exist a single channel so we use a single 2d matrix to represent grayscale images.
Whenever we say kernel or mask, we generally refer to a small size matrix which can be used to apply effects on our image such as blurring, embossing, edge detection, sharpening etc and the process of applying these effect pixel by pixel is known as Convolution.
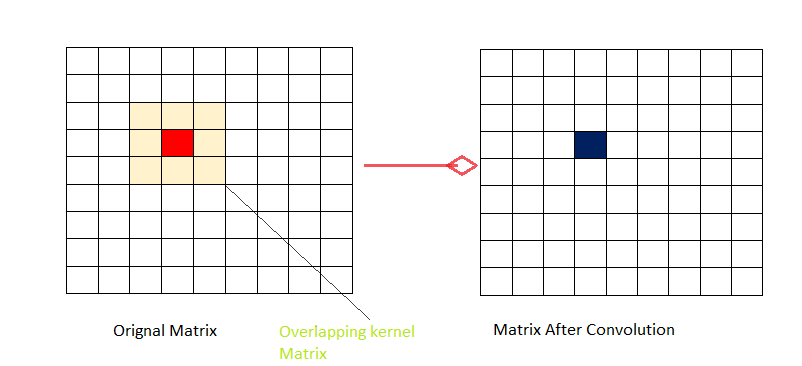
To imagine how convolution works let’s consider the kernel of size 3×3 and consider the image matrix of size 9×9 as shown. Now we select the 3×3(same size as of kernel) block of pixels in the image matrix and multiply the block selected in the image with our kernel and then take the sum. That sum obtained as a resultant becomes our new pixel value and the position of this pixel value is the central position as shown by the blue color in the diagram. For obtaining the complete filtered image we roll the kernel matrix pixel by pixel over image matrix and carry out this process in the cycle.
What is Vignette filter?
The Vignette filter is generally used to focus viewer attention on certain parts of the image without hiding other parts completely. Generally focused part has higher brightness and saturation and brightness and saturation decrease as we go radially out from center to periphery.
How to Create and Apply filter?
Since we wish to keep the image’s brightness and saturation normal at the center and try to reduce this as we go radially outward from the center of the image so we should use a distribution function that assigns more weights to the nearest pixel as compare to the pixel which is far. This is the main reason we will be using Gaussian distribution and since we know that in Gaussian distribution most of the values are effectively close to zero and none zero. So we will be creating a mask of sufficiently large size. For creating 2-d Gaussian function we will be creating two 1-d Gaussian functions and multiply these two. One belonging to X-direction and other to the Y-direction. Since our current kernel matrix large in size so we will be normalizing to reduce the kernel size otherwise cost of applying a filter will be too large.
OpenCV provides a function called getGaussianKernel which we will be using to build our 2D kernel whose size matches the size of the image.
getGaussianKernel function
The first parameter of the function i.e. ksize: decide the size of kernel and we generally prefer odd, positive value. The second parameter of the function i.e. sigma : is the standard deviation of the Gaussian and it controls the radius of the bright central image. The function computes and returns the matrix of the size assigned in the first parameter and contains Gaussian filter coefficients.
Mask = (scale size) * (Normalized kernel matrix )
After the Creation of the mask, we will iterate over all the color channels and apply the mask to each channel. Scaling is an important step otherwise all the pixel value be close to 0 after you superimpose the mask on image and the image will look black.
Below is the implementation.
Python3
import numpy as np
import cv2
input_image = cv2.imread('food.jpeg')
input_image = cv2.resize(input_image, (480, 480))
rows, cols = input_image.shape[:2]
X_resultant_kernel = cv2.getGaussianKernel(cols,200)
Y_resultant_kernel = cv2.getGaussianKernel(rows,200)
resultant_kernel = Y_resultant_kernel * X_resultant_kernel.T
mask = 255 * resultant_kernel / np.linalg.norm(resultant_kernel)
output = np.copy(input_image)
for i in range(3):
output[:,:,i] = output[:,:,i] * mask
cv2.imshow('Original', input_image)
cv2.imshow('VIGNETTE', output)
cv2.waitKey(0)
cv2.destroyAllWindows()
|
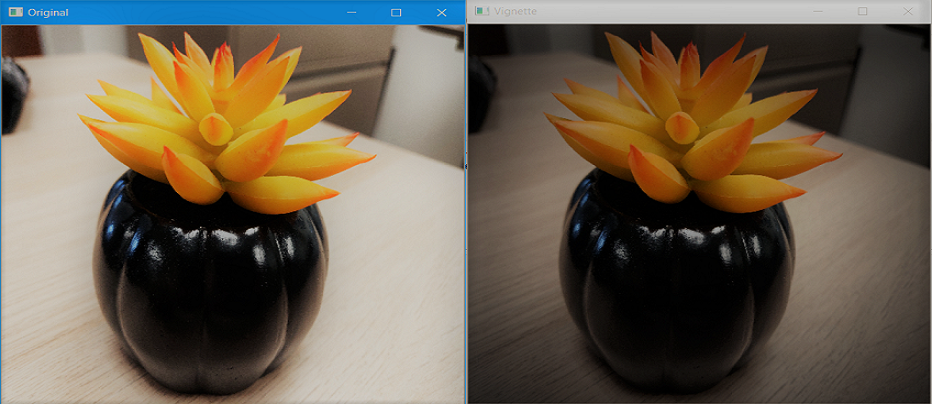
Output:
Like Article
Suggest improvement
Share your thoughts in the comments
Please Login to comment...