Converting WhatsApp chat data into a Word Cloud using Python
Last Updated :
02 Sep, 2020
Let us see how to create a word cloud using a WhatsApp chat file.
Convert the WhatsApp chat file from .txt format to .csv file. This can be done using Pandas. Create a DataFrame which read the .txt file. The .txt file had no columns like it is in an .csv file.
Then, split the data into columns by separating them and giving each column a name. The first line of the dataset in the chat file consists of encryption details which is not required here. Then, name the remaining 2 parts as Date and Convo, both parts of which are separated by a comma i.e. “,”.
Python3
df = df.drop(0)
df.columns = ['Date', 'Convo']
|
Now, separate the Convo data set into columns “Time” and “Content”, both of which are separated by a hyphen i.e. “-“. The data in Convo column is made into a data frame Chat.
Python3
Chat = df["Convo"].str.split("-", n = 1,
expand = True)
df['Time'] = Chat[0]
df['Content'] = Chat[1]
|
The Content column is created into another data set Chat1, to divide it further into 2 columns, ”User” and “Message”, both of which are separated by a colon i.e. “:”.
Python3
Chat1 = df["Content"].str.split(":", n = 1,
expand = True)
df['User'] = Chat1[0]
df['Message'] = Chat1[1]
|
Now, dropping the Convo column and converting the Message column into lower case. All column media omitted cells and deleted messages are replaced by the string “Media Shared” and “DeletedMsg”.
Python3
df = df.drop(columns = ['Convo'])
df[['Message'] = df['Message'].str.lower()
df['Message'] = df['Message'].str.replace('<media omitted>',
'Media Shared')
df['Message'] = df['Message'].str.replace('this message was deleted',
'DeletedMsg')
|
Finally, the data frame is converted to a .csv file named “new_csv.csv”.
Python3
df.to_csv("new_csv.csv", index = False)
|
Now we have to make a word cloud from this CSV file. For this, we need word cloud and matplotlib.plyplot packages. Use the new_csv.csv file to read data from it and create a data frame. Create a set of Stopwords and a variable to store all data generated from the WordCloud function. Extracte the data from the Message column containing all the chat texts and converted it into lowercased string.
Python3
import matplotlib.plyplot as mpl
from worcloud import WordCloud,STOPWORDS
df1 = pd.read_csv("new_csv.csv")
stopwords = set(STOPWORDS)
words=''.join(df1.Message.astype(str)).lower()
wordcloud = WordCloud(stopwords = stopwords,
min_font_size = 10,
background_color = 'white',
width = 800,
height = 800,
color_func = random_color_func).generate(words)
|
Here, function “random_color_func” which is used to render random orangish colors to the words. This is done by changing the values in the hsl (hue, saturation, luminance) values.
Python3
def random_color_func(word = None,
font_size = None,
position = None,
orientation = None,
font_path = None,
random_state = None):
h = int(360.0 * 21.0 / 255.0)
s = int(100.0 * 255.0 / 255.0)
l = int(100.0 * float(random_state.randint(60, 120)) / 255.0)
|
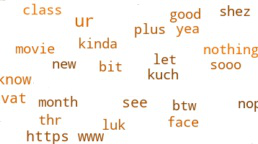
Then use mpl to plot and visualize the words in wordcloud variable.
Python3
mpl.figure(figsize = (8, 8), facecolor = None)
mpl.imshow(wordcloud, interpolation = "bilinear")
mpl.axis("off")
mpl.tight_layout(pad = 0)
mpl.show()
|
The complete code is below:
Python3
import pandas as pd
import matplotlib.plyplot as mpl
from worcloud import WordCloud, STOPWORDS
df = pd.read_csv(r"WhatsAppChat.txt",
header = None,
error_bad_lines = False,
encoding = 'utf8')
df = df.drop(0)
df.columns = ['Date', 'Convo']
Chat = df["Convo"].str.split("-", n = 1,
expand = True)
df['Time'] = Chat[0]
df['Content'] = Chat[1]
Chat1 = df["Content"].str.split(": ", n = 1,
expand=True)
df['User'] = Chat1[0]
df['Message'] = Chat1[1]
df = df.drop(columns = ['Convo'])
df['Message'] = df['Message'].str.lower()
df['Message'] = df['Message'].str.replace('< media omitted >', 'Media Shared')
df['Message'] = df['Message'].str.replace('this message was deleted', 'DeletedMsg')
df.to_csv("new_csv.csv", index = False)
def random_color_func(word = None,
font_size = None,
position = None,
orientation = None,
font_path = None,
random_state = None):
h = int(360.0 * 21.0 / 255.0)
s = int(100.0 * 255.0 / 255.0)
l = int(100.0 * float(random_state.randint(60, 120)) / 255.0)
df1 = pd.read_csv("new_csv.csv")
stopwords = set(STOPWORDS)
words = ''.join(df1.Message.astype(str)).lower()
wordcloud = WordCloud(stopwords = stopwords,
min_font_size = 10,
background_color = 'white',
width = 800,
height = 800,
color_func = random_color_func).generate(words)
mpl.figure(figsize = (8, 8), facecolor = None)
mpl.imshow(wordcloud, interpolation = "bilinear")
mpl.axis("off")
mpl.tight_layout(pad = 0)
mpl.show()
|
Like Article
Suggest improvement
Share your thoughts in the comments
Please Login to comment...