Converting Images to webp Open Source Format in Linux
Last Updated :
19 Feb, 2021
In this article, we are going to see how to convert images to webp open-source format in Linux. Before starting, we will see the webp and its working process.
What is WebP?
- It is a new image format for the web employing both loss and lossless compression.
- It is currently developed and supported by Google, based on technology acquired with the acquisition of On2 Technologies.
- Google acquired On2 Technologies & its video products & technologies in February 2010. Through WebP, web developers and software engineers can create smaller, richer images that make their web application faster, improve performance and google SEO ranking.
- Images in webp format are 26% smaller compared to PNGs and also are 25-34% smaller than respective equivalent JPEG images.
How Does WebP work?
It is loss compression process uses the same methodology as VP8 (created by On2 technologies, which is a royalty-free video compression format) for estimating (video) frames. VP8 is based on block prediction & like any block-based codec. VP8 divides the frame into smaller segments called macroblocks. You don’t have to remember every technical jargon associated with this technology.
- Within each macroblock, the encoder ( a process to convert data from one format to another, in this case, one image format like jpeg/png to webp) can predict redundant motion & color information based on previously processed macroblocks.
- The image frame is “key” in the sense that it only uses the pixels already decoded in the immediate spatial neighborhood of each of the macroblocks & tries to recover the unknown parts and uniquely identify the macroblock.
These macroblocks share the following 4 common intra-prediction modes :
- H_PRED (horizontal prediction): It fills every column with the macroblock with the generated copy of the left column of the same denoted by L.
- V_PRED (vertical prediction): It fills every row with the macroblock with the generated copy of the above row denoted by A.
- DC_PRED (DC prediction): It fills the macroblock with a single value based on the avg of the pixels in the row above A (V_PRED) & the column to the left of L (H_PRED)
- TM_PRED (TrueMotion prediction): It uses pixel P above & to the left of the block. Horizontal differences b/w pixels in A (starting from P) are generated using the pixels from L to start each row.
Browsers that Support WebP Image Format:
- Google Chrome and all Chromium-based browsers,
- Firefox
- GNOME Web
- Midori
- Falkon
- Versions of Microsoft Edge based on EdgeHTML support WebP via a platform extension that is installed by default.
- Safari also has added support for WebP format files and images with iOS 14 and macOS Big Sur.
Note: WebP can also be displayed in all major browsers using the WebPJS JavaScript library, although support in Internet Explorer 6 and above is achieved using Flash.
WebP: Getting started
Download the pre-compiled packages for different OS(s) :
All the WebP packages are available in Google’s official downloads repository. Precompiled WebP utilities and library for download are also available :
How to use cwebp and vwebp tools ?
cwebP compresses the image using WebP format.
The acceptable input format is:
- JPEG
- TIFF
- WebP
- Raw Y’CbCr samples
Note: Animated PNGs and WebP files are not supported.
Converting Images to the WebP Format using cwebp tool:
User can convert a PNG image file to a WebP image format with the quality range of 0 to 100 with the following command :
cwebp -q 80 image.png -o image.webp
In the above command, the quality compression factor is 80.
In the below example, using cwebp command without using -q option, so by default, it is 75.
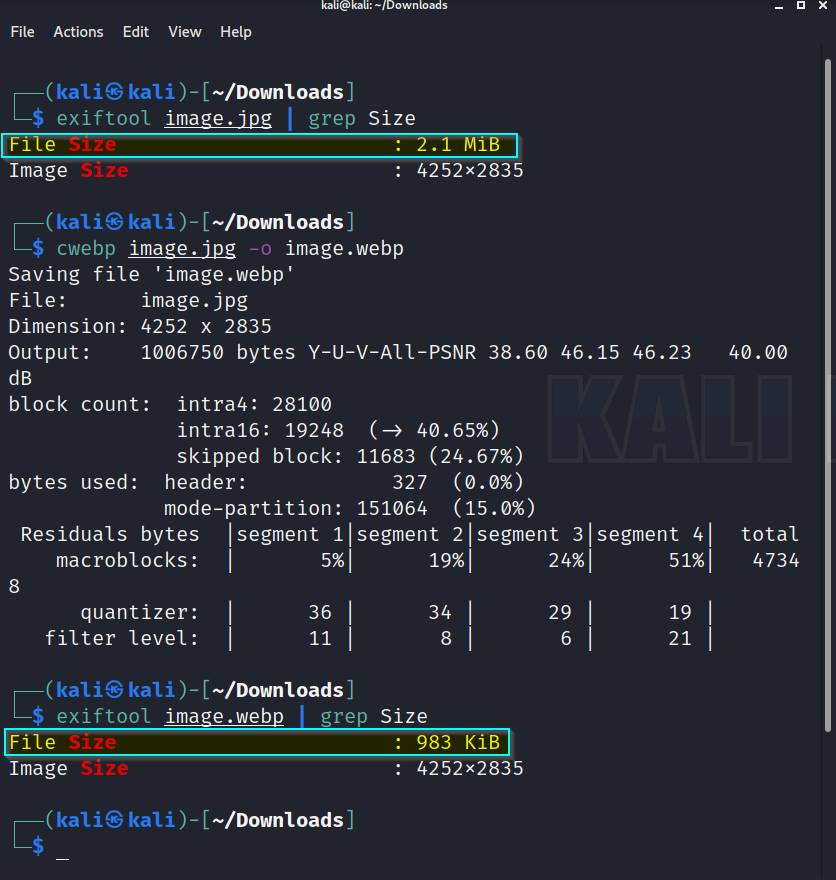
Using cwebp to compress a 2.1 MiB jpg image to 983 Kib webp image (52% lossless compression)
The basic options are:
-o string
To explicitly specify the name of the output webp file. If this option is omitted, cwebp will perform compression but will only report the statistics using “-” as the name of the output file/image name.
-- string
To explicitly specify the input file. This option is useful only if the input image/filename starts with an ‘-‘.
-h, -help
A short usage summary.
-q float
To specify the compression factor for RGB channels between 0 & 100. By default, it is 75.
-z int
To switch on lossless compression mode with the specified level b/w 0 and 9, such that level 0 being the fastest and level 9 being the slowest.
The point to remember is that fast mode produces larger sizes than slower ones.
vwebp decompresses a WebP file & displays it in a window using OpenGL.
Decompressing a WebP file using vwebp tool:
Use vwebP on the command line to decompress webP file.
Decompressing webP file using no options :
vwebp picture.webp
Decompressing webP file using mt & dither option:
- -mt: to use multi-threading for decoding, if possible.
- -dither: Specify a dithering strength b/w 0 and 100. It is a post-processing effect applied to chroma components in loss compression. By default, it is set to 50.
vwebp picture.webp -mt -dither 0
Decompressing webP file using — ( string ): Explicitly specify the input file if the input file starts with an ‘-‘ for instance. This option has to be used in last like any other options after this will be ignored.
Here filename is —picture.webp
vwebp -- ---picture.webp
Like Article
Suggest improvement
Share your thoughts in the comments
Please Login to comment...