Convert Image into Sketch
Last Updated :
24 Feb, 2022
In Python, an image is just a two-dimensional array of integers. So one can do a couple of matrix manipulations using various python modules in order to get some very interesting effects. In order to convert the normal image to a sketch, we will change its original RGB values and assign its RGB values similar to grey, in this way a sketch of the input image will be generated.
Approach 1:
- Import all required modules (numpy, imageio, scipy.ndimage, OpenCV)
- Take Image input
- Check RGB value of image and convert into according to RGB values
- Show finale image output using cv2.imwrite()
Python3
import numpy as np
import imageio
import scipy.ndimage
import cv2
img = "4.jpeg"
def rgb2gray(rgb):
return np.dot(rgb[..., :3], [0.2989, 0.5870, .1140])
def dodge(front, back):
final_sketch = front*255/(255-back)
final_sketch[final_sketch > 255] = 255
final_sketch[back == 255] = 255
return final_sketch.astype('uint8')
ss = imageio.imread(img)
gray = rgb2gray(ss)
i = 255-gray
blur = scipy.ndimage.filters.gaussian_filter(i, sigma=13)
r = dodge(blur, gray)
cv2.imwrite('4.png', r)
|
Approach 2:
Import cv2:
--> pip install cv2
Then we will import cv2 inside our code, after that, we will use some of the following functions:
1. imread()- This function will load the image i.e in the specified folder.
2. cvtColor()- This function takes color as an argument and then changes the source image color into that color.
3. bitwise_not()- This function will help the image to keep the properties as same by providing the masking to it.
4. GaussianBlur()- This function is used to modify the image by sharpening the edges of the image, smoothen the image, and will minimize the
blurring property.
5. divide()- This function is used for the normalization of the image as it doesn’t lose its previous properties.
Finally will save the image using imwrite() function.
Python3
import cv2
image = cv2.imread('Image.jpg')
grey_img = cv2.cvtColor(image, cv2.COLOR_BGR2GRAY)
invert = cv2.bitwise_not(grey_img)
blur = cv2.GaussianBlur(invert, (21, 21), 0)
invertedblur = cv2.bitwise_not(blur)
sketch = cv2.divide(grey_img, invertedblur, scale=256.0)
cv2.imwrite("sketch.png", sketch)
|
Example 1:
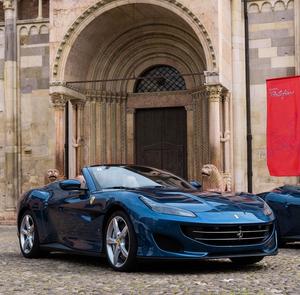
Input image:
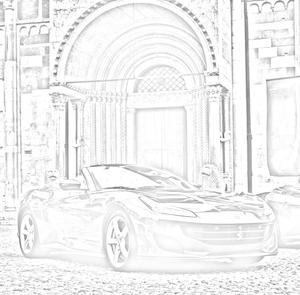
Output:
Example 2:
Input image:

Output:
Like Article
Suggest improvement
Share your thoughts in the comments
Please Login to comment...