Colorization Autoencoders using Keras
Last Updated :
01 Dec, 2022
This article gives a practical use-case of Autoencoders, that is, colorization of gray-scale images. We will use Keras to code the autoencoder. As we all know, that an AutoEncoder has two main operators:
Encoder This transforms the input into low-dimensional latent vector.As it reduces dimension, so it is forced to learn the most important features of the input. Decoder: This tries to reconstruct the input as much as possible from the latent vector.
During the design of Autoencoder, it is very essential to correctly choose a latent dimension. As if it is more than the input dimension, Autoencoder tends to memorize the input. We will implement the Encoder part using CNNs and will use Conv2DTranspose for the decoder section of the autoencoder. To keep things simple, we are going to use CIFAR100 dataset, which is readily available in Keras datasets The dataset contains 50k colour images of shape 32 * 32 * 3 for training, and 10k colour images of the same shape for testing purpose. Code: Import all the libraries
Python3
import numpy as np
import matplotlib.pyplot as plt
import os
from keras.layers import Dense, Input, Conv2D, Conv2DTranspose, Flatten, Reshape
from keras.models import Model
from keras.callbacks import ReduceLROnPlateau, ModelCheckpoint
from keras.datasets import cifar100
from keras import backend as K
|
As the dataset contain only coloured images, so for the purpose of our task we need to change it to grayscale. We hence define a function for that. Code: Function to convert RGB images to Grayscale
Python3
def rgb_2_gray(image):
return np.dot(image[..., :3], [0.299, 0.587, 0.114])
|
Code: Load the dataset
Python3
(x_train, _), (x_test, _) = cifar100.load_data()
|
For the model to learn efficiently, it is better to convert the images into float. We also need to normalize the values so that they lie between 0 and 1. This is done so that during back-propagation, the gradients don’t go out of control. Code: Normalize the data
Python3
x_train = x_train.astype('float32') / 255.
x_test = x_test.astype('float32') / 255.
x_train_gray = x_train_gray.astype('float32') / 255.
x_test_gray = x_test_gray.astype('float32') / 255.
|
Performance of Deep Learning models very much rely on the set of hyper-parameters (including no. of layer, no. of filters in each layer, batch size etc.). So a good choice of the hyper-parameters is an essential skill. For the best results, we need to try and experiment with a different set of them. Here, we are using these sets of hyper-parameters, Code: Hyper-parameters
Python3
input_shape = (rows, cols, 1)
batch_size = 32
kernel_size = 3
latent_dim = 256
layer_filters = [64, 128, 256]
|
For the task of colourizing, the input is a grayscale image. Gray-scale image has only 1 channel as compared to colour images which have 3 namely Red, Green, Blue. We use Input from Keras library to take an input of the shape of (rows, cols, 1). The Encoder is a stack of 3 Convolutional Layers with an increasing number of filters, followed by a Dense layer with 256 units for generating latent vectors. Code: Encoder
Python3
inputs = Input(shape = input_shape)
x = inputs
for filters in layer_filters:
x = Conv2D(filters = filters,
kernel_size = kernel_size,
strides = 2,
activation ='relu',
padding ='same')(x)
shape = K.int_shape(x)
x = Flatten()(x)
latent = Dense(latent_dim, name ='latent_vector')(x)
encoder = Model(inputs, latent, name ='encoder')
|
The decoder section of the Autoencoder tries to decompress the latent vector in order to the input. In our case, the input to the Decoder is a layer of shape (None, 256). It follows a stack of three DeConvolutional layers with decreasing filter numbers in each layer. We make sure that the last layer, in this case, should be of shape (None, 32, 32, 3). The number of channels should be 3 so as to compare the reconstruction with the ground truth of the images during the back-propagation. It is not mandatory, that the Encoder and Decoder should be a mirror image of the two. Code: Decoder
Python3
latent_inputs = Input(shape =(latent_dim, ), name ='decoder_input')
x = Dense(shape[1]*shape[2]*shape[3])(latent_inputs)
x = Reshape((shape[1], shape[2], shape[3]))(x)
for filters in layer_filters[::-1]:
x = Conv2DTranspose(filters = filters,
kernel_size = kernel_size,
strides = 2,
activation ='relu',
padding ='same')(x)
outputs = Conv2DTranspose(filters = channels,
kernel_size = kernel_size,
activation ='sigmoid',
padding ='same',
name ='decoder_output')(x)
decoder = Model(latent_inputs, outputs, name ='decoder')
|
Finally, we define the model, named autoencoder which takes an input and then passes it to the encoder followed by passing it through the decoder.
Python3
autoencoder = Model(inputs, decoder(encoder(inputs)),
name ='autoencoder')
|
We now train the autoencoder model by slicing the entire data into batches of batch size = batch_size, for 30 epochs. The important point to note here is that, if we check out the of fit function, we find that, the input to the model is the dataset of grayscale images and the corresponding colour image is serving as the label. A similar thing happens for the validation set as well. Generally, for the classification task, we feed the images to the model as inputs, and their respective classes are given as labels. and during training, we compare the performance of the model by measuring how well it classifies the images into their respective classes given as labels. But, for this task, we provide the colour images as the labels as we want the model to provide the RGB images as outputs when w provide a grayscale image to it. We have also used callbacks to reduce the learning rate if the validation loss is not decreasing much.
Python3
autoencoder.fit(x_train_gray,
x_train,
validation_data =(x_test_gray, x_test),
epochs = 30,
batch_size = batch_size,
callbacks = callbacks)
|
Code: Results and analysis
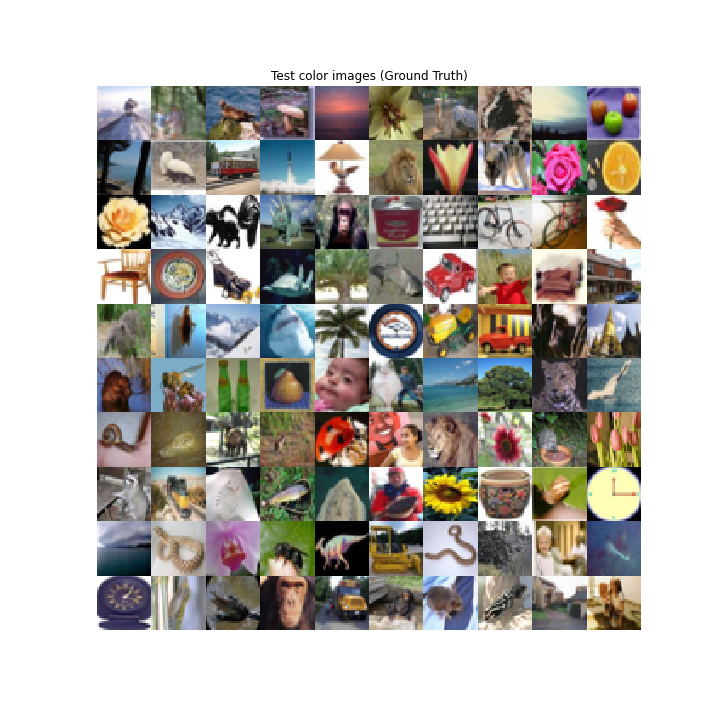
Ground truth of the first 100 test images

Grayscale input to the autoencoder
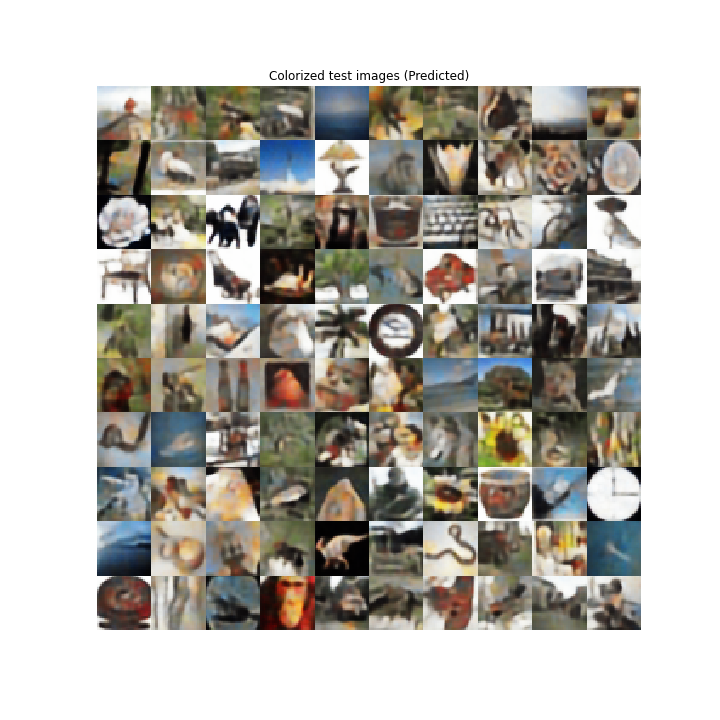
Colourized output from the Autoencoder
The autoencoder has an acceptable performance in the colourization job. It predicted correctly that the sky is blue, chimps have varying shades of brown, leaves are green etc. But also, it does some wrong predictions as well, like Sunflower has some shades of gray in it, orange has no colour predicted, the mushroom is dark and not reddish etc.
Like Article
Suggest improvement
Share your thoughts in the comments
Please Login to comment...