Classical NOT logic gates with quantum circuit using Qiskit in Python
Last Updated :
14 Sep, 2021
In this article, we are going to see how to apply NOT gate on a given input ( 0 or 1 ) using quantum gates, we have to convert 0 to 1 and 1 to 0. This can be done easily in classical computers, but how can we do this in quantum computers. We have to represent the input in qubits and then we apply the X (representation of NOT gate in the quantum computer) operation in that qubit after that return the resultant qubit
QISKIT is the package that sits between quantum algorithms from one side, and the physical quantum device from the other side. It translates the common programming languages like Python into quantum machine language. This means anyone outside of the IBM Q lab can program a quantum computer.
To install this module run these commands into terminal:
pip3 install qiskit
Approach:
- Create a quantum circuit qc with a single classical qubit and bit using the build-in function QuantumCircuit which takes the first parameter “no. of qubits in integer” and second parameter “no. of bits in integer” and return the quantum circuit. ( QuantumCircuit(1, 1) returns quantum circuit with one qubit q[0] and one-bit c[0] )
- Represent input in qubits ( ‘0’ as the qubit state |0> and for ‘1’ as |1> ):
- Reset qc qubit using qiskit function reset().
- Since the qubit is initially |0⟩, so for the input of ‘0’, we don’t need to do anything.
- For an input of ‘1’, we do an X to rotate the |0⟩ to |1⟩. The x() function is to apply NOT gate on a given parameter.
- Put a barrier between input state and gate operation using barrier().
- Apply NOT on qubit 0, we can do a NOT on it using x
- put a barrier between gate operation and measurement
- Finally, we extract the |0⟩/|1⟩ output of the qubit q[0] and encode it in the bit c[0] using qiskit measure() function.
- To visualize and see the circuit diagram use qiskit draw() function.
Below is the implementation:
Python3
from qiskit import *
from qiskit.visualization import plot_histogram
import numpy as np
def NOT(inp):
qc = QuantumCircuit(1, 1)
qc.reset(0)
if inp == '1':
qc.x(0)
qc.barrier()
qc.x(0)
qc.barrier()
qc.measure(0, 0)
qc.draw('mpl')
backend = Aer.get_backend('qasm_simulator')
job = execute(qc, backend, shots=1, memory=True)
output = job.result().get_memory()[0]
return qc, output
for inp in ['0', '1']:
qc, out = NOT(inp)
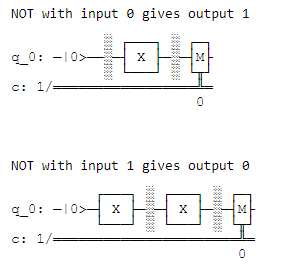
print('NOT with input', inp, 'gives output', out)
display(qc.draw())
print('\n')
|
Output:
Like Article
Suggest improvement
Share your thoughts in the comments
Please Login to comment...