Change the Default DNS Server of Your Router and Windows Computer
Last Updated :
12 Mar, 2021
Switching to the best DNS server not only increases your internet speed and also reduces the specific page loading errors. Now few questions may start coming to your mind, and we are going to answer a few of your questions like:
- What are DNS servers?
- How do DNS servers work?
- How to choose the best DNS server?
- How to change the default DNS server of your router?
- How to change to the default DNS server of your computer (Windows)?
What are DNS Servers and How its work?
DNS (Domain Name Servers) are like a phone book for the internet. When you type a web address in your browser like www.geeksforgeeks.org (also known as a hostname), a DNS server will use it to look up the actual IP address of the website. The DNS then converts this to the website’s numerical (IP) address on the internet. Your request is then passed on to that server and the page is retrieved.
The speed at which this complex process completes is determined in part by the speed of your service provider’s DNS. Switching to a different service like Cloudflare or Google can help make your connection quicker. By default, you’ll probably use your (Internet Service Provider) ISP’s default DNS server in this process.
How To Choose the Best DNS server?
Changing the ISP’s default DNS server to an alternative such as OpenDNS (which has DNS servers of ‘208.67.222.222’ and ‘208.67.220.220’) or Google Public DNS (‘8.8.8.8’ and ‘8.8.4.4’) can not only reduce errors but also speed up your browsing. You can change your DNS server on each of your routers means all devices on your home network using a DNS server.
How To Change the DNS server on your router.
Not all routers let you change your DNS server but, if you can find this option, and you want a switch, make a note of the current settings, so you can switch back if you need to. Otherwise, you can try changing your DNS to either 1.1.1.1 and 1.0.0.1 (Cloudflare) or 8.8.8.8 and 8.8.4.4 (Google). However, most other routers provide this option. For example, here we are using a TP-Link router:
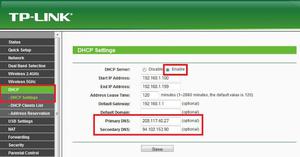
On TP-Link routers, click Network, WAN, tick ‘Use these DNS servers, then enter the new DNS servers such as those for Google Public DNS (8.8.8.8 and 8.8.4.4). See the below image for more detail.
You can also visit the official website of OpenDNS for a complete setup guide and more information. They provide detailed setup instructions for a wide of supported routers.
How To Change the DNS server in Windows 10.
If your router doesn’t let you make this change, you can change your computer’s DNS setting in Windows so that it bypasses the router’s configuration and uses Cloudflare or Google instead. To do so, follow the below steps:
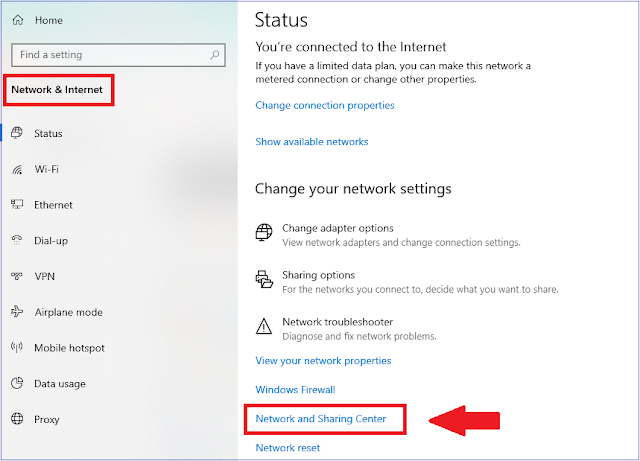
- Step 1: Open Setting, click ‘Network & Internet’, then ‘Network and Sharing Center’.
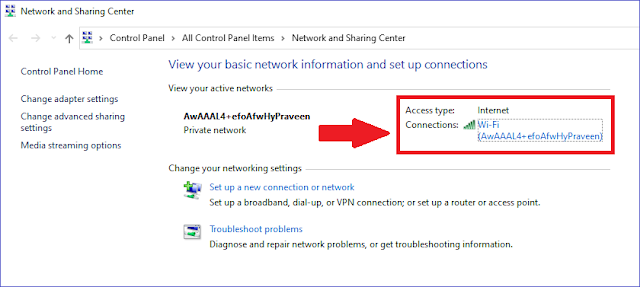
- Step 2: Select the name besides ‘Connection’ at the top of the panel that appears, followed by Properties. (See Image Below).
- Step 3: This opens the Wi-Fi Status box. Click on Properties and then on ‘Internet Protocol Version 4 (TCP/IPv4)’.
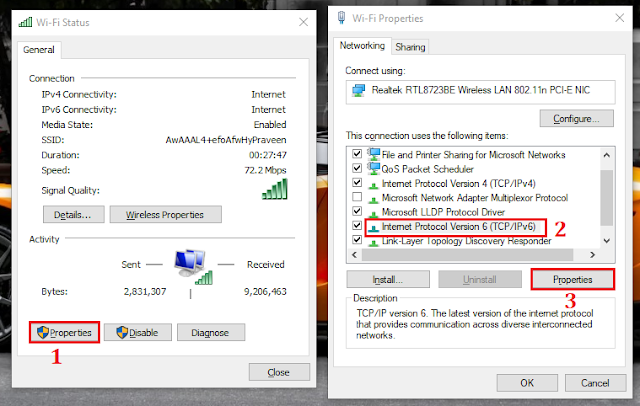
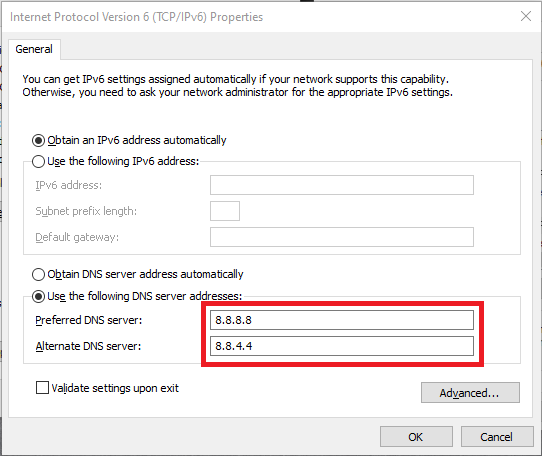
- Step 4: In the next step click on Properties, and click the button beside ‘Use the following DNS server addresses’.
- Step 5: Enter both numerical sequences for either Cloudflare or Google in the ‘Preferred DNS server’ and ‘Alternate DNS server boxes, then click OK.
You are done. You have successfully changed the default DNS server of your PC. If you find any problem while executing the above steps please let me know in the comment section below.
Like Article
Suggest improvement
Share your thoughts in the comments
Please Login to comment...