CentOS Network Configuration without NetworkManager
Last Updated :
04 Dec, 2022
As we know, to set up communication between the two systems we have to configure the network which means we have to define system IP, DNS, and gateway the communication can be through either Ethernet, Wi-Fi, or Bluetooth. Therefore a Linux user must know about the Network Configuration of any Linux Operating system so that the user can resolve some internal or external connectivity issues
NetworkManager is a daemon that sits on top of “libudev” and other Linux kernel interfaces and provides a high-level interface for the configuration of the network interfaces. The network manager can be used to configure Ethernet, Wi-Fi, Mobile, DSL, and PPPoE connections. It can also be used to create, edit, and remove interfaces.
Network Configuration without Network Manager
In spite of the benefits of the Network Manager, one should not use it on servers because it does not provide advanced configuration options, and also does not support some device types like ISDN, IPSec, etc.
1. Displaying Network Interfaces
To list and manipulate devices, routing, and tunnels the ip command is used. It is a tool used for configuring network interfaces. With the help of ip command, we can see the link-layer information of all available devices. Type the command below to see the information on all available devices.
ip link show

The output of ip link show
The above screenshot displays the following interfaces:
- Loopback(lo): It is used to check for internal connections, not for outgoing connections.
- Ethernet(enp0s3): It is the network interface name in which “en” stands for ethernet, “p0” is the bus number of the ethernet card, and “s3” is the slot number.
- Virtual Bridge-0(virbr0): It is an interface used for NAT (Network Address Translation). It is provided by the “libvirt” library. Virtual environments use it to connect to the outside network.
- Virtual Bridge-0 NIC(virbr0-nic): It acts as a bridge between the physical Network Card and the Virtual Machine’s virtual Network Card.
The following are the functions of ip command:
- Manage and display network interfaces
- Monitor and manage IP addresses
- Manage and display the IP routing table
- Display and modify IP neighbor entries
2. Configure DHCP on an Interface
To configure a network for DHCP via the terminal follow the steps below:
Step 1: First of all list all the available network devices by typing the following command.
nmcli d
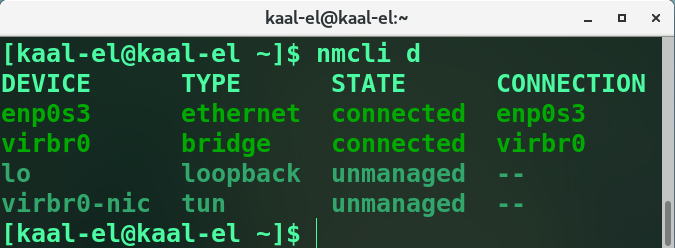
Listing all Network Devices
Step 2: Copy the name of the network that we want to configure for DHCP.
Step 3: Now open the network configuration file of the selected network interface in the nano text editor. Type the command below and just paste the name of the network at the end.
nano /etc/sysconfig/network-scripts/ifcfg-[name-of-the-network]

Network Configuration File in Nano Editor
Step 4: Make sure that the value of BOOTPROTO is set to “dhcp” and ONBOOT is set to “yes” to enable the network when starting the system.
Step 5: Now add the network details such as IPADDR, NETMASK, GATEWAY, and DNS.

Network Configuration File in Nano Editor
The above screenshot displays the complete network configuration for DHCP.
Step 6: Now press Ctrl+O to save and Ctrl+X to exit.
Step 7: Now just restart the network by typing the following command.
systemctl restart
3. Configuring a Static IP
By modifying the network script, we can set up a static IP for the interface. The following are the steps for modification.
Step 1: First of all list all the available network devices by typing the following command.
nmcli d
Step 2: Copy the name of the network that we want to configure for DHCP.
Step 3: Now open the network configuration file of the selected network interface in the nano text editor. Type the command below and just paste the name of the network at the end.
nano /etc/sysconfig/network-scripts/ifcfg-[name-of-the-network]
Step 4: Make sure that the value of BOOTPROTO is set to “static” to set a static IP for your network, and ONBOOT is set to “yes” to enable the network when starting the system.
Step 5: Now add the network details such as IPADDR, NETMASK, GATEWAY, and DNS. Multiple DNS can be added as well.

Network Configuration File in Nano Editor
The above screenshot displays the complete network configuration for setting up a static IP.
Step 6: Now press Ctrl+O to save and Ctrl+X to exit.
Step 7: Now just restart the network by typing the following command.
systemctl restart
Checking the Network Settings
After applying the changes to the network configuration file of a network interface we need to verify whether our network is working with the new settings or not. Type the command below to validate the network setting.
ip a show [name-of-the-network]
The above screenshot displays network interface information based on which we can verify that the applied changes are working.
Share your thoughts in the comments
Please Login to comment...