C# is an object-oriented, modern programming language that was created by Microsoft. It runs on the .NET Framework. C# is very close to C/C++ and Java programming languages. It was developed by Anders Hejlsberg and his team within the .NET initiative that approved by the European Computer Manufacturers Association (ECMA) and International Standards Organization (ISO).The first version of C# was released in 2002 and the latest version is 11 released in November 2022. Before we start, we must learn about the .NET Framework and Visual Studio.  Topics:
.NET Framework & Its Components
.NET is a software framework that is designed and developed by Microsoft. It is a virtual machine for compiling and executing programs written in different languages like C#, VB.Net, etc. It is used to develop Form-based applications, Web-based applications, and Web services. The first version of the .NET framework was 1.0 which came in the year 2002 and the current version is 6.0.1. .NET Framework supports more than 60 programming languages in which C# and VB.Net are main programming languages. Below are the main components of .NET Framework 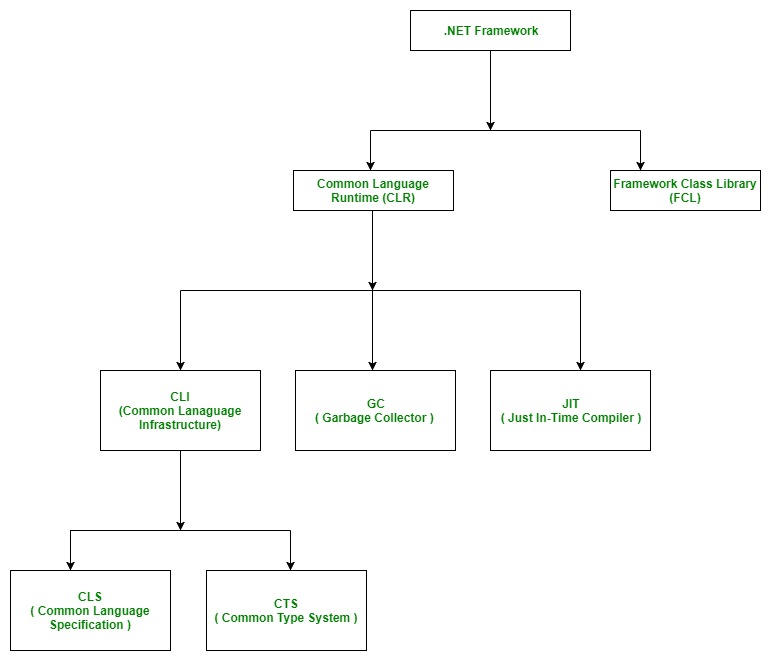
1. Common Language Runtime(CLR): CLR is the basic and Virtual Machine component of the .NET Framework. It is the run-time environment in the .NET Framework that runs the codes and helps in making the development process easier. It is responsible for managing the execution of .NET programs regardless of any .NET programming language. It also helps in the management of code, as code that targets the runtime is known as the Managed Code and code doesn’t target to runtime is known as Unmanaged code. To read more about CLR, you can read the article Common Language Runtime(CLR)
2. Framework Class Library(FCL): It is the collection of reusable, object-oriented class libraries and methods, etc that can be integrated with CLR. Also called the Assemblies. It is just like the header files in C/C++ and packages in the java. Installing .NET framework basically is the installation of CLR and FCL into the system. To read more about this, you can read the article .NET Framework Class Library (FCL)
3. Common Intermediate Language: It is a set of instructions that are platform-independent and are generated by the language-specific compiler from the source code. It is also known as the Microsoft Intermediate Language (MSIL). To read more about this, you can read the article Common Intermediate Language(CLI)
4. Garbage Collector(GC): Automatic memory management is made possible by Garbage Collection in .NET Framework. When a class object is created at runtime, certain memory space is allocated to it in the heap memory. However, after all the actions related to the object are completed in the program, the memory space allocated to it is a waste as it cannot be used. In this case, garbage collection is very useful as it automatically releases the memory space after it is no longer required. Garbage collection will always work on Managed Heap and internally it has an Engine which is known as the Optimization Engine. To read more about this, you can refer to the article Garbage Collection in .NET Framework.
5. Just-In-Time(JIT) Compiler: Just-In-Time compiler(JIT) is a part of Common Language Runtime (CLR) in .NET which is responsible for managing the execution of .NET programs regardless of any .NET programming language. A language-specific compiler converts the source code to the intermediate language. This intermediate language is then converted into the machine code by the Just-In-Time (JIT) compiler. This machine code is specific to the computer environment that the JIT compiler runs on. To read more about this, you can read the article What is Just-In-Time(JIT) Compiler in .NET?
6. Managed Code: A code that is written to aimed to get the services of the managed runtime environment execution like CLR(Common Language Runtime) in .NET Framework is known as Managed Code. It always implemented by the managed runtime environment instead of directly executed by the operating system. To read more about this, you can refer to the article Managed code and Unmanaged code in .NET. 7. Unmanaged Code: A code that is directly executed by the operating system is known as Unmanaged code. It always aimed at the processor architecture and depends upon computer architecture. When this code is compiled it always tends to get a specific architecture and always runs on that platform. To read more about this, you can refer to the article Managed code and Unmanaged code in .NET.
Visual Studio
Visual Studio is an Integrated Development Environment(IDE) developed by Microsoft to develop GUI(Graphical User Interface), console, Web applications, web apps, mobile apps, cloud, and web services, etc. With the help of this IDE, you can create managed code as well as native code. It uses the various platforms of Microsoft software development software like Windows store, Microsoft Silverlight, and Windows API, etc. It is not a language-specific IDE as you can use this to write code in C#, C++, VB(Visual Basic), Python, JavaScript, and many more languages. It provides support for 36 different programming languages. It is available for Windows as well as for macOS. To know more about this, you can refer to the article Getting Familiar With Visual Studio.
Why C#?
C# has many other reasons for being popular and in demand. Few of the reasons are mentioned below:
- Easy to Start: C# is a high-level language so it is closer to other popular programming languages like C, C++, and Java and thus becomes easy to learn for anyone.
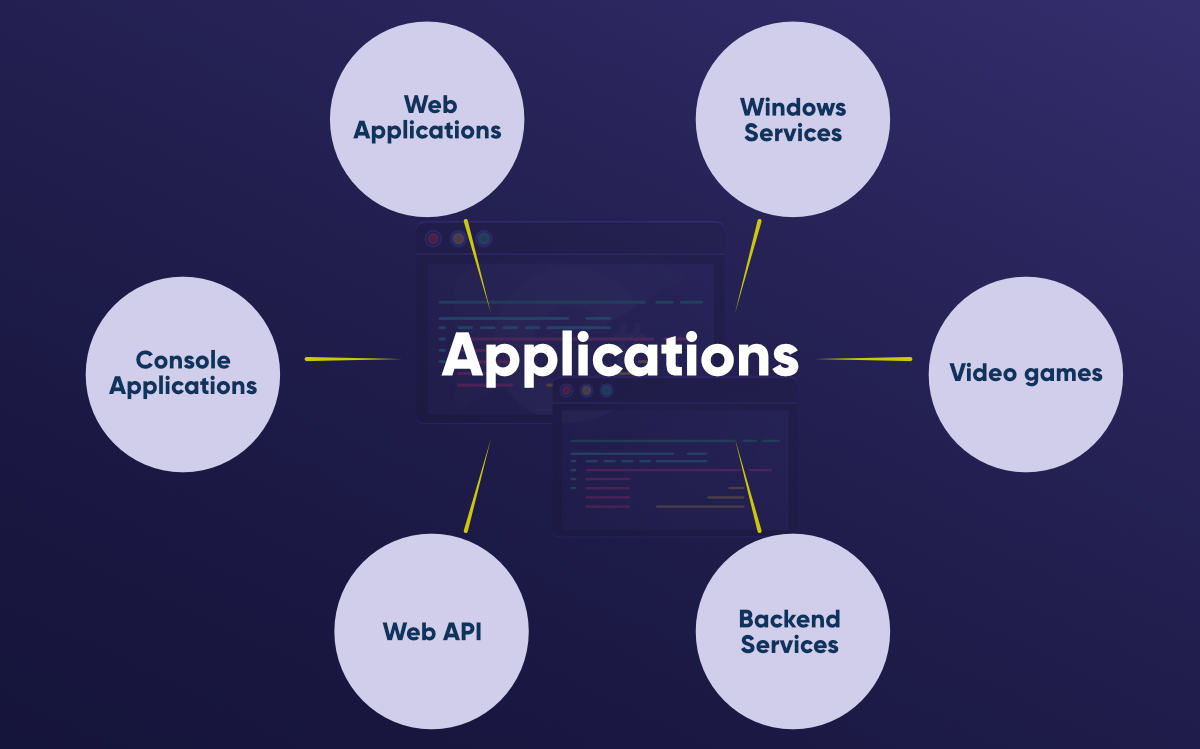
- Widely used for developing Desktop and Web Application: C# is widely used for developing web applications and Desktop applications. It is one of the most popular languages that is used in professional desktop. If anyone wants to create Microsoft apps, C# is their first choice.
- Community:The larger the community the better it is as new tools and software will be developing to make it better. C# has a large community so the developments are done to make it exist in the system and not become extinct.
- Game Development: C# is widely used in game development and will continue to dominate. C# integrates with Microsoft and thus has a large target audience. The C# features such as Automatic Garbage Collection, interfaces, object-oriented, etc. make C# a popular game developing language.
Applications
How to Download and Install C# on Windows?
Step 1: Download the Visual Studio Community Version 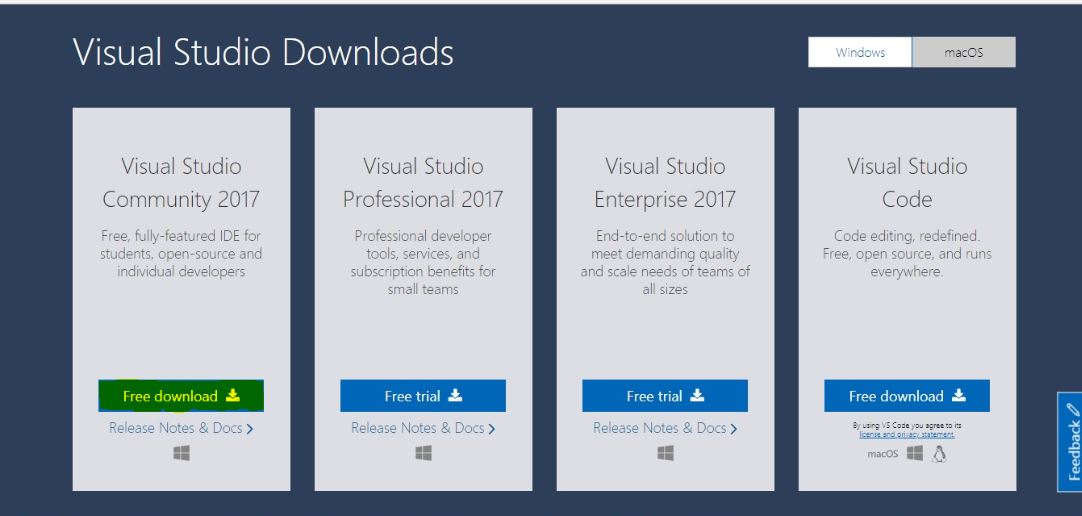 Step 2: Run the .exe file and follow the instructions to install Visual Studio Community Version on the system.
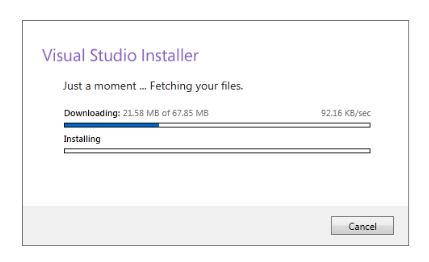
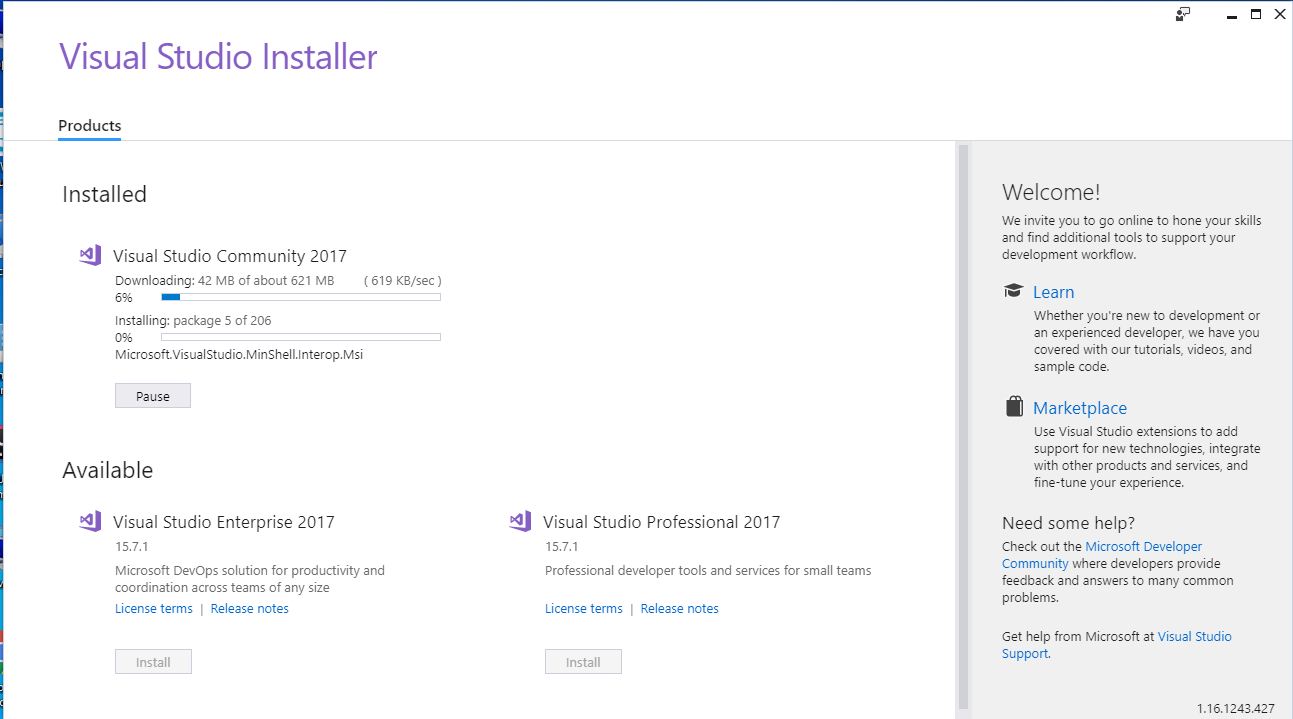
Step 3: Select .Net Desktop Development from the options and click to install in bottom right corner as shown below : 
 Step 4: Open it and it will be prompted to sign in for the first time. The sign-in step is optional so it can be skipped.
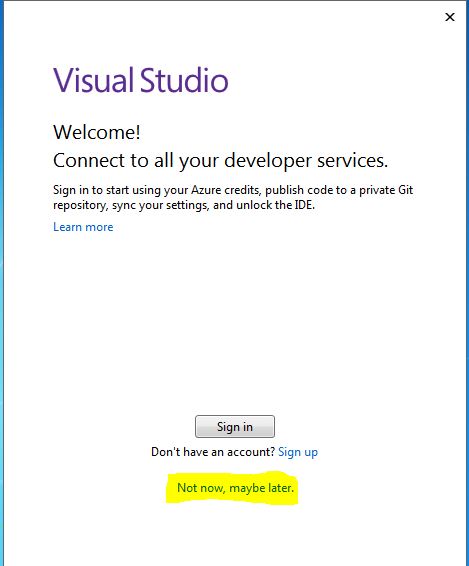
Step 5: The dialog box will appear for first time only and ask to choose Development Settings and color theme. Once select required options, click on Start Visual Studio option like as shown below  .
.
Step 6: To create a new console application using C#, Go to File –> New –>Project like as shown below 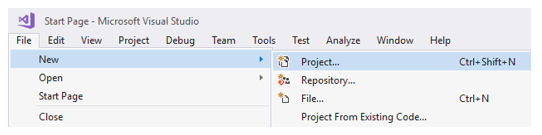
Step 7: Choose Console App, write the name of the project and select location path to save project files and then click OK like as shown below. 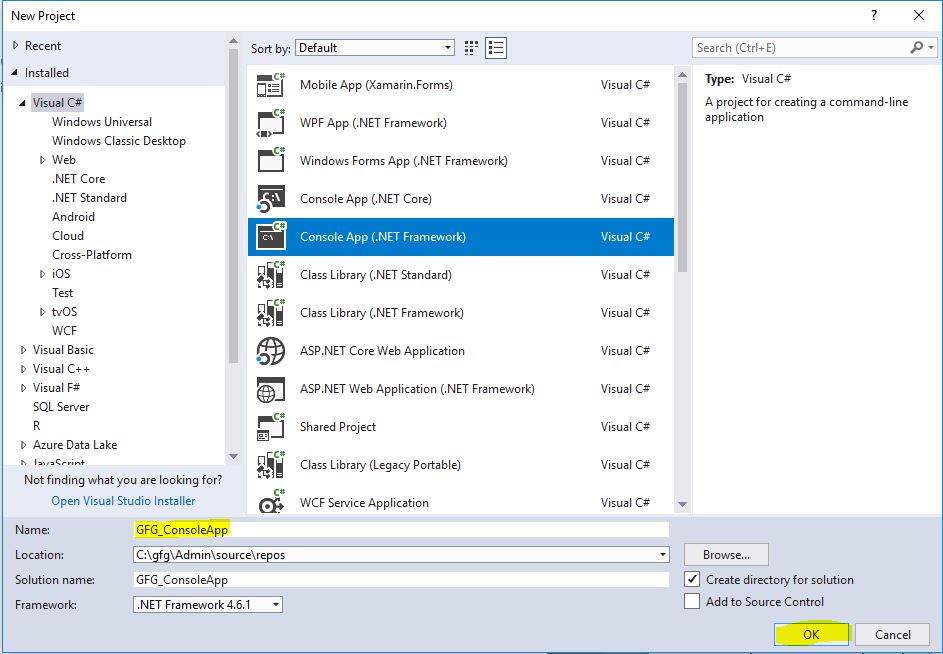 Step 8: After clicking OK a predefined template will come and start writing C# code.
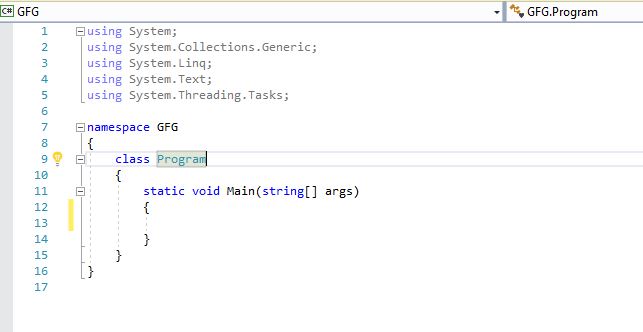
Hello World! Program
Hello World! program is the most basic and first program when you dive into a new programming language. This simply prints the Hello World! on the output screen. In C#, a basic program consists of the following:Example:
CSharp
using System;
namespace HelloWorldApp {
class Geeks {
static void Main(string[] args)
{
Console.WriteLine("Hello World!");
Console.ReadKey();
}
}
}
|
Generally, There are 3 ways to compile and execute a C# program as follows:
- To use an online C# compiler: You can use various online IDE. which can be used to run C# programs without installing.
- Using Visual Studio IDE: Microsoft has provided an IDE(Integrated Development Environment) tool named Visual Studio to develop applications using different programming languages such as C#, VB(Visual Basic) etc. To install and use Visual Studio for the commercial purpose it must buy a license from the Microsoft. For learning (non-commercial) purpose, Microsoft provided a free Visual Studio Community Version. To learn how to run a program in Visual Studio you can refer to this.
- Using Command-Line: You can also use command-line options to run a C# program. Below steps demonstrate how to run a C# program on Command line in Windows Operating System:
- First, open a text editor like Notepad or Notepad++.
- Write the code in the text editor and save the file with .cs extension.
- Open the cmd(Command Prompt) and run the command csc to check for the compiler version. It specifies whether you have installed a valid compiler or not. You can avoid this step if you confirmed that compiler is installed.

- To compile the code type csc filename.cs on cmd. If your program has no error then it will create a filename.exe file in the same directory where you have saved your program. Suppose you saved the above program as hello.cs. So you will write csc hello.cs on cmd. This will create a hello.exe.

- Now you have two ways to execute the hello.exe. First, you have to simply type the filename i.e hello on the cmd and it will give the output. Second, you can go to the directory where you saved your program and there you find filename.exe. You have to simply double-click that file and it will give the output.

Identifiers
In programming languages, identifiers are used for identification purpose. Or in other words, identifiers are the user-defined name of the program components. In C#, an identifier can be a class name, method name, variable name or a label. Example:
public class GFG {
    static public void Main ()
    {
          int x;
    }
}
Here the total number of identifiers present in the above example is 3 and the names of these identifiers are:
- GFG: Name of the class
- Main: Method name
- x: Variable name
Rules for defining identifiers in C#: There are certain valid rules for defining a valid C# identifier. These rules should be followed, otherwise, we will get a compile-time error.
- The only allowed characters for identifiers are all alphanumeric characters([A-Z], [a-z], [0-9]), ‘_‘ (underscore). For example “geek@” is not a valid C# identifier as it contain ‘@’ – special character.
- Identifiers should not start with digits([0-9]). For example “123geeks” is a not a valid in C# identifier.
- Identifiers should not contain white spaces.
- Identifiers are not allowed to use as keyword unless they include @ as a prefix. For example, @as is a valid identifier, but “as” is not because it is a keyword.
- C# identifiers allow Unicode Characters.
- C# identifiers are case-sensitive.
- C# identifiers cannot contain more than 512 characters.
- Identifiers does not contain two consecutive underscores in its name because such types of identifiers are used for the implementation.
Example:
CSharp
using System;
class GFG {
static public void Main()
{
int a = 10;
int b = 39;
int c;
c = a + b;
Console.WriteLine("The sum of two number is: {0}", c);
}
}
|
Output:
The sum of two number is: 49
Below table shows the identifiers and keywords present in the above example:
| Keywords |
Identifiers |
| using |
GFG |
| public |
Main |
| static |
a |
| void |
b |
| int |
c |
Keywords
Keywords or Reserved words are the words in a language that are used for some internal process or represent some predefined actions. These words are therefore not allowed to use as variable names or objects. Doing this will result in a compile-time error. Example:
CSharp
using System;
class GFG {
static public void Main()
{
int a = 10;
Console.WriteLine("The value of a is: {0}", a);
}
}
|
Output:
The value of a is: 10
There are a total of 78 keywords in C# as shown below. To read more this, you can refer to the article Keywords in C#. 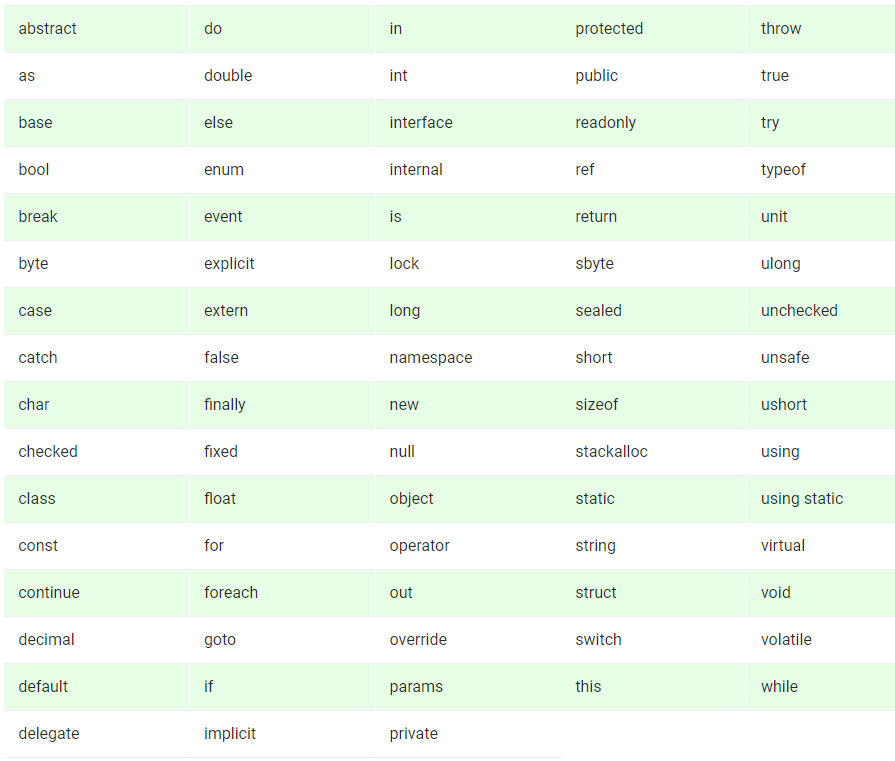
Variables
A Variable is a placeholder of the information which can be changed at runtime. And variables allows to Retrieve and Manipulate the stored information. Syntax:
type variable_name = value;
or
type variable_names;
Example:
char var = 'h'; // Declaring and Initializing character variable
int a, b, c; // Declaring variables a, b and c of int type
Characteristics of Variables:
- name : It must be a valid identifier. In above example, var is a valid identifier.
- type : It defines the types of information which is to be stored into the variable. In above example char is a type.
- value : It is the actual data which is to be stored in the variable. In above example ‘h’ is the value.
Rules for Naming Variables
- Variable names can contain the letters ‘a-z’ or ’A-Z’ or digits 0-9 as well as the character ‘_’.
- The name of the variables cannot be started with a digit.
- The name of the variable cannot be any C# keyword say int, float, null, String, etc.
Examples:
int age;

float _studentname;
int if; // "if" is a keyword

float 12studentname; // Cannot start with digit
Defining or Declaring a Variable
There are some rules that must be followed while declaring variables :
- specify its type (such as int)
- specify its name (such as age)
- Can provide initial value(such as 17)
Example :
int geeks;
float interest;
Initializing Variables
The term initializing means to assign some value to the variable. Basically, the actual use of variables comes under the initialization part. In C# each data type has some default value which is used when there is no explicitly set value for a given variable. Initialization can be done separately or may be with declaration. Example :
int y = 7; // Declaring and initializing the variable at same time
int x; // Declaring variable x
x = 5; // initializing x with value 5
Two Ways for Initialization:
- Compile time initialization
- Run time initialization
To read about these, you can refer to the article Variables in C#
Literals
The fixed values are called as Literal. Literal is a value which is used by the variables. Values can be either an integer, float or string etc.
// Here 100 is a constant/literal.
int x = 100;
Literals can be of following types:
- Integer Literals
- Floating-point Literals
- Character Literals
- String Literals
- Null Literals
- Boolean Literals
Example:
csharp
using System;
class Geeks {
public static void Main(String[] args)
{
int a = 101;
double b = 101.230;
Console.WriteLine(a);
Console.WriteLine(b);
char ch = 'a';
char c = '\u0061';
Console.WriteLine(ch);
Console.WriteLine(c);
Console.WriteLine("Hello\n\nGeeks\t!");
}
}
|
Output:
101
101.23
a
a
Hello

Geeks    !
To know more about literals, you can refer to the article Literals in C#
Data Types
Data types specify the type of data that a valid C# variable can hold. C# is a strongly typed programming language because in C#, each type of data (such as integer, character, float, and so forth) is predefined as part of the programming language and all constants or variables defined for a given program must be described with one of the data types. In C#, data types are divided into 3 categories as shown below: 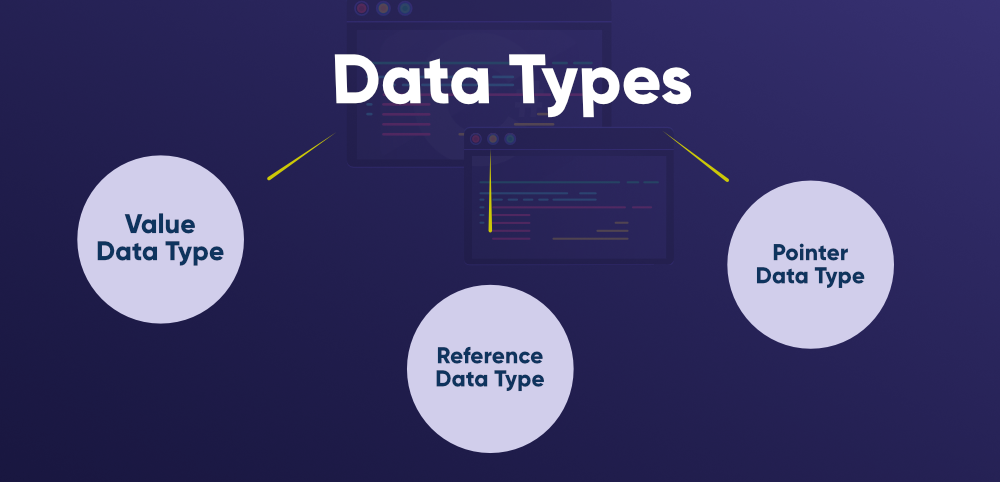 1. Value Data Types : In C#, the Value Data Types will directly store the variable value in memory and it will also accept both signed and unsigned literals. The derived class for these data types are System.ValueType. Following are different Value Data Types in C# programming language
- Signed & Unsigned Integral Types
- Floating Point Types
- Decimal Types
- Character Types
- Boolean Types
Example 1:
csharp
using System;
namespace ValueTypeTest {
class GeeksforGeeks {
static void Main()
{
char a = 'G';
int i = 89;
short s = 56;
long l = 4564;
uint ui = 95;
ushort us = 76;
ulong ul = 3624573;
double d = 8.358674532;
float f = 3.7330645f;
decimal dec = 389.5m;
Console.WriteLine("char: " + a);
Console.WriteLine("integer: " + i);
Console.WriteLine("short: " + s);
Console.WriteLine("long: " + l);
Console.WriteLine("float: " + f);
Console.WriteLine("double: " + d);
Console.WriteLine("decimal: " + dec);
Console.WriteLine("Unsigned integer: " + ui);
Console.WriteLine("Unsigned short: " + us);
Console.WriteLine("Unsigned long: " + ul);
}
}
}
|
Output :
char: G
integer: 89
short: 56
long: 4564
float: 3.733064
double: 8.358674532
decimal: 389.5
Unsigned integer: 95
Unsigned short: 76
Unsigned long: 3624573
Example 2:
CSHARP
using System;
namespace ValueTypeTest {
class GeeksforGeeks {
static void Main()
{
bool b = true;
if (b == true)
Console.WriteLine("Hi Geek");
}
}
}
|
Output :
Hi Geek
2. Reference Data Types: The Reference Data Types will contain a memory address of variable value because the reference types won’t store the variable value directly in memory. The built-in reference types are string, object. Example:
CSHARP
using System;
namespace ValueTypeTest {
class GeeksforGeeks {
static void Main()
{
string a = "Geeks";
a += "for";
a = a + "Geeks";
Console.WriteLine(a);
object obj;
obj = 20;
Console.WriteLine(obj);
Console.WriteLine(obj.GetType());
}
}
}
|
Output :
GeeksforGeeks
20
System.Int32
3. Pointer Data Type : The Pointer Data Types will contain a memory address of the variable value. To get the pointer details we have a two symbols ampersand (&) and asterisk (*).
- ampersand (&): It is Known as Address Operator. It is used to determine the address of a variable.
- asterisk (*): It also known as Indirection Operator. It is used to access the value of an address.
Syntax:
type* identifier;
Example :
int* p1, p;   // Valid syntax
int *p1, *p;   // Invalid
Example:
csharp
using System;
namespace Pointerprogram {
class GFG {
static void Main()
{
unsafe
{
int n = 10;
int* p = &n;
Console.WriteLine("Value :{0}", n);
Console.WriteLine("Address :{0}", (int)p);
}
}
}
}
|
To gain in-depth knowledge about data types, you can read the article Data Types in C#
Operators
Operators are the foundation of any programming language. Thus the functionality of C# language is incomplete without the use of operators. Operators allow us to perform different kinds of operations on operands. In C#, operators Can be categorized based upon their different functionality :In C#, Operators can also categorized based upon Number of Operands :
- Unary Operator : Operator that takes one operand to perform the operation.
- Binary Operator : Operator that takes two operands to perform the operation.
- Ternary Operator : Operator that takes three operands to perform the operation.
Example:
csharp
using System;
class GFG {
static void Main(string[] args)
{
int result1, result4, result5;
bool result2, result3;
int x = 10, y = 5;
result1 = (x + y);
Console.WriteLine("Addition Operator: " + result1);
result2 = (x == y);
Console.WriteLine("Equal to Operator: " + result2);
bool a = true, b = false;
result3 = a && b;
Console.WriteLine("AND Operator: " + result3);
result4 = x & y;
Console.WriteLine("Bitwise AND: " + result4);
int m = 15;
m += 10;
Console.WriteLine("Add Assignment Operator: " + m);
result5 = x < y ? x : y;
Console.WriteLine("Result: " + result5);
}
}
|
Output:
Addition Operator: 15
Equal to Operator: False
AND Operator: False
Bitwise AND: 0
Add Assignment Operator: 25
Result: 5
To know more about operators, you can read the article Operators in C#
Enumeration
Enumeration (or enum) is a value data type in C#. It is mainly used to assign the names or string values to integral constants, that make a program easy to read and maintain. For example, the 4 suits in a deck of playing cards may be 4 enumerators named Club, Diamond, Heart, and Spade, belonging to an enumerated type named Suit. Other examples include natural enumerated types (like the planets, days of the week, colors, directions, etc.). The main objective of enum is to define our own data types(Enumerated Data Types). Enumeration is declared using enum keyword directly inside a namespace, class, or structure. Syntax:
enum Enum_variable
{
     string_1...;
     string_2...;
     .
     .
}
In the above syntax, Enum_variable is the name of the enumerator, and string_1 is attached with value 0, string_2 is attached value 1 and so on. Because by default, the first member of an enum has the value 0 and the value of each successive enum member is increased by 1. We can change this default value. Example: Consider the below code for the enum. Here enum with name month is created and its data members are the name of months like jan, feb, mar, apr, may. Now let’s try to print the default integer values of these enums. An explicit cast is required to convert from enum type to an integral type.
CSHARP
using System;
namespace ConsoleApplication1 {
enum month {
jan,
feb,
mar,
apr,
may
}
class Program {
static void Main(string[] args)
{
Console.WriteLine("The value of jan in month "
+ "enum is " + (int)month.jan);
Console.WriteLine("The value of feb in month "
+ "enum is " + (int)month.feb);
Console.WriteLine("The value of mar in month "
+ "enum is " + (int)month.mar);
Console.WriteLine("The value of apr in month "
+ "enum is " + (int)month.apr);
Console.WriteLine("The value of may in month "
+ "enum is " + (int)month.may);
}
}
}
|
Output:
The value of jan in month enum is 0
The value of feb in month enum is 1
The value of mar in month enum is 2
The value of apr in month enum is 3
The value of may in month enum is 4
To read more about this, you can refer to the article Enum in C#.
Decision Making in programming is similar to decision making in real life. In programming too, a certain block of code needs to be executed when some condition is fulfilled. A programming language uses control statements to control the flow of execution of the program based on certain conditions. These are used to cause the flow of execution to advance and branch based on changes to the state of a program. The main conditional statements of C#:
Example 1:
Csharp
using System;
public class GFG {
public static void Main(string[] args)
{
string name = "Geek";
if (name == "Geek") {
Console.WriteLine("GeeksForGeeks");
}
}
}
|
Output:
GeeksForGeeks
Example 2:
Csharp
using System;
class GFG {
public static void Main(String[] args)
{
int i = 20;
if (i == 10)
Console.WriteLine("i is 10");
else if (i == 15)
Console.WriteLine("i is 15");
else if (i == 20)
Console.WriteLine("i is 20");
else
Console.WriteLine("i is not present");
}
}
|
Output:
i is 20
Switch Statement
In C#, Switch statement is a multiway branch statement. It provides an efficient way to transfer the execution to different parts of a code based on the value of the expression. The switch expression is of integer type such as int, char, byte, or short, or of an enumeration type, or of string type. The expression is checked for different cases and the one match is executed. Syntax:
switch (expression) {

case value1: // statement sequence
     break;

case value2: // statement sequence
     break;
.
.
.
case valueN: // statement sequence
     break;

default:    // default statement sequence
}
Flow Chart: 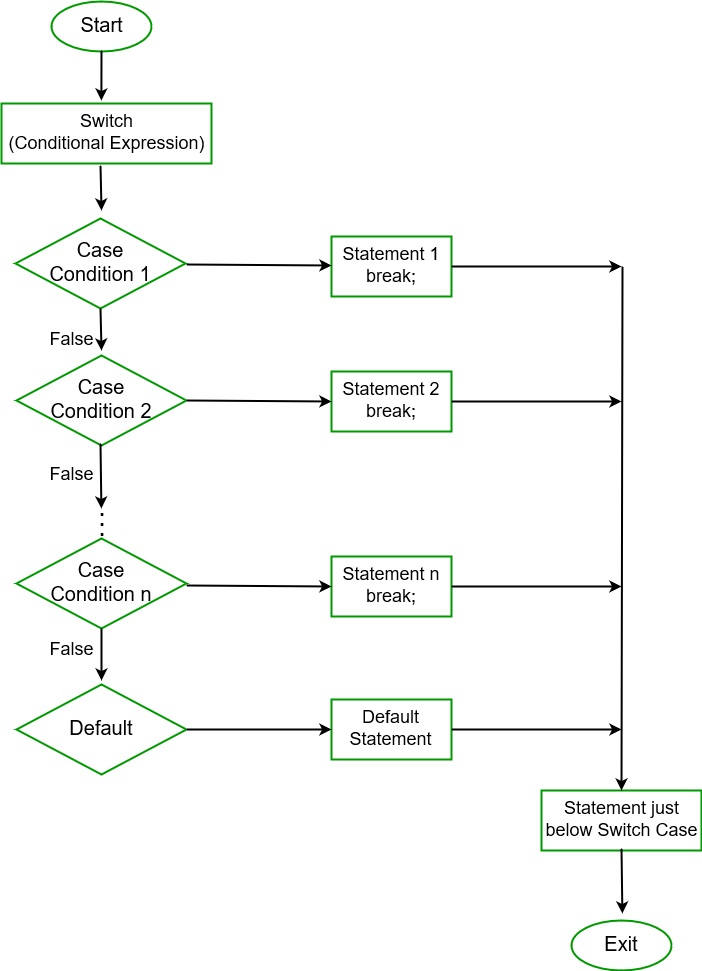 Important points to remember:
- In C#, duplicate case values are not allowed.
- The data type of the variable in the switch and value of a case must be of the same type.
- The value of a case must be a constant or a literal. Variables are not allowed.
- The break in switch statement is used to terminate the current sequence.
- The default statement is optional and it can be used anywhere inside the switch statement.
- Multiple default statements are not allowed.
Example:
CSharp
using System;
public class GFG {
public static void Main(String[] args)
{
int nitem = 5;
switch (nitem) {
case 1:
Console.WriteLine("case 1");
break;
case 5:
Console.WriteLine("case 5");
break;
case 9:
Console.WriteLine("case 9");
break;
default:
Console.WriteLine("No match found");
break;
}
}
}
|
To read more about this, you can refer to the article Switch Statement in C#.
Loops
Looping in a programming language is a way to execute a statement or a set of statements multiple times depending on the result of the condition to be evaluated to execute statements. The result condition should be true to execute statements within loops. Loops are mainly divided into two categories:
- Entry Controlled Loops: The loops in which condition to be tested is present at the beginning of the loop body are known as Entry Controlled Loops. while loop and for loop are entry controlled loops.
- Exit Controlled Loops: The loops in which the testing condition is present at the end of the loop body are termed as Exit Controlled Loops. do-while is an exit controlled loop. In Exit Controlled Loops, the loop body will be evaluated for at least one time as the testing condition is present at the end of the loop body.
while Loop
The test condition is given in the beginning of the loop and all statements are executed till the given boolean condition satisfies when the condition becomes false, the control will be out from the while loop. Syntax:
while (boolean condition)
{
   loop statements...
}
Flowchart: 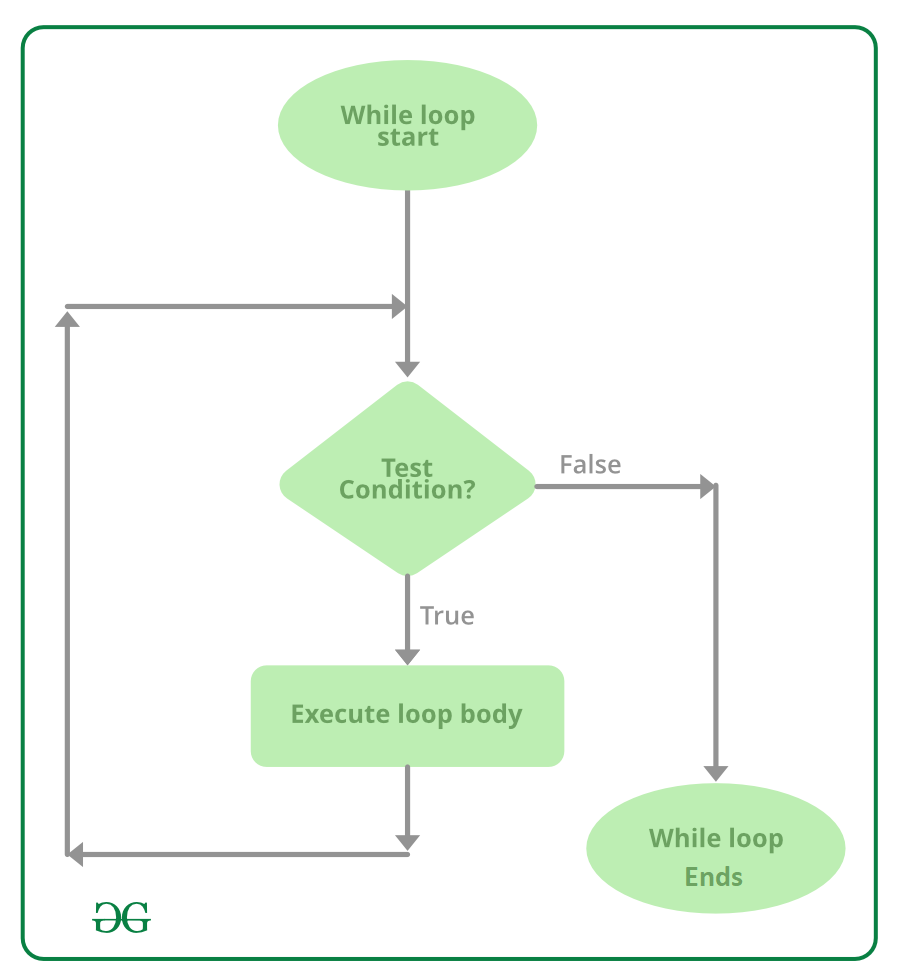 Example:
csharp
using System;
class whileLoopDemo {
public static void Main()
{
int x = 1;
while (x <= 4) {
Console.WriteLine("GeeksforGeeks");
x++;
}
}
}
|
Output:
GeeksforGeeks
GeeksforGeeks
GeeksforGeeks
GeeksforGeeks
do while Loop
do while loop is similar to while loop with the only difference that it checks the condition after executing the statements, i.e it will execute the loop body one time for sure because it checks the condition after executing the statements. Syntax :
do
{
    statements..
}while (condition);
Flowchart: 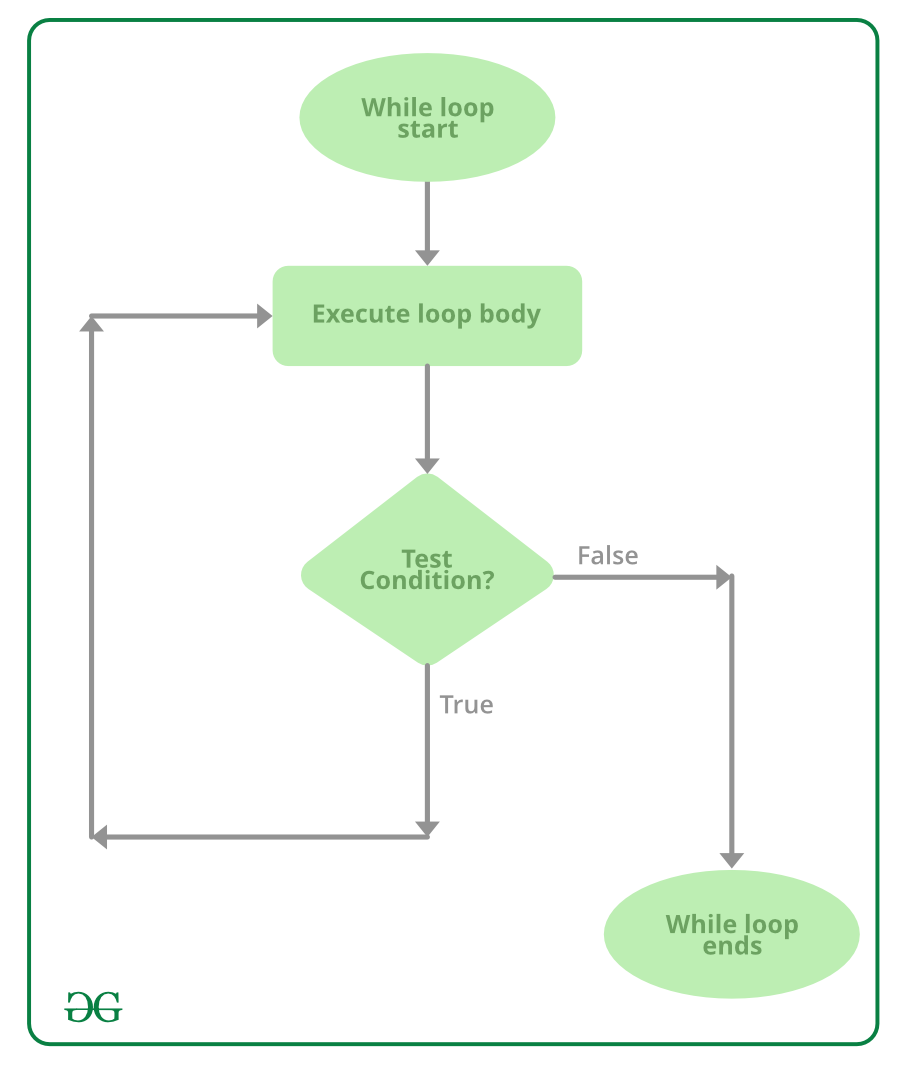 Example:
csharp
using System;
class dowhileloopDemo {
public static void Main()
{
int x = 21;
do {
Console.WriteLine("GeeksforGeeks");
x++;
} while (x < 20);
}
}
|
Output:
GeeksforGeeks
for Loop
for loop has similar functionality as while loop but with different syntax. for loops are preferred when the number of times loop statements are to be executed is known beforehand. The loop variable initialization, condition to be tested, and increment/decrement of the loop variable is done in one line in for loop thereby providing a shorter, easy to debug structure of looping.
for (loop variable initialization ; testing condition;
                              increment / decrement)
{
    // statements to be executed
}
Flowchart: 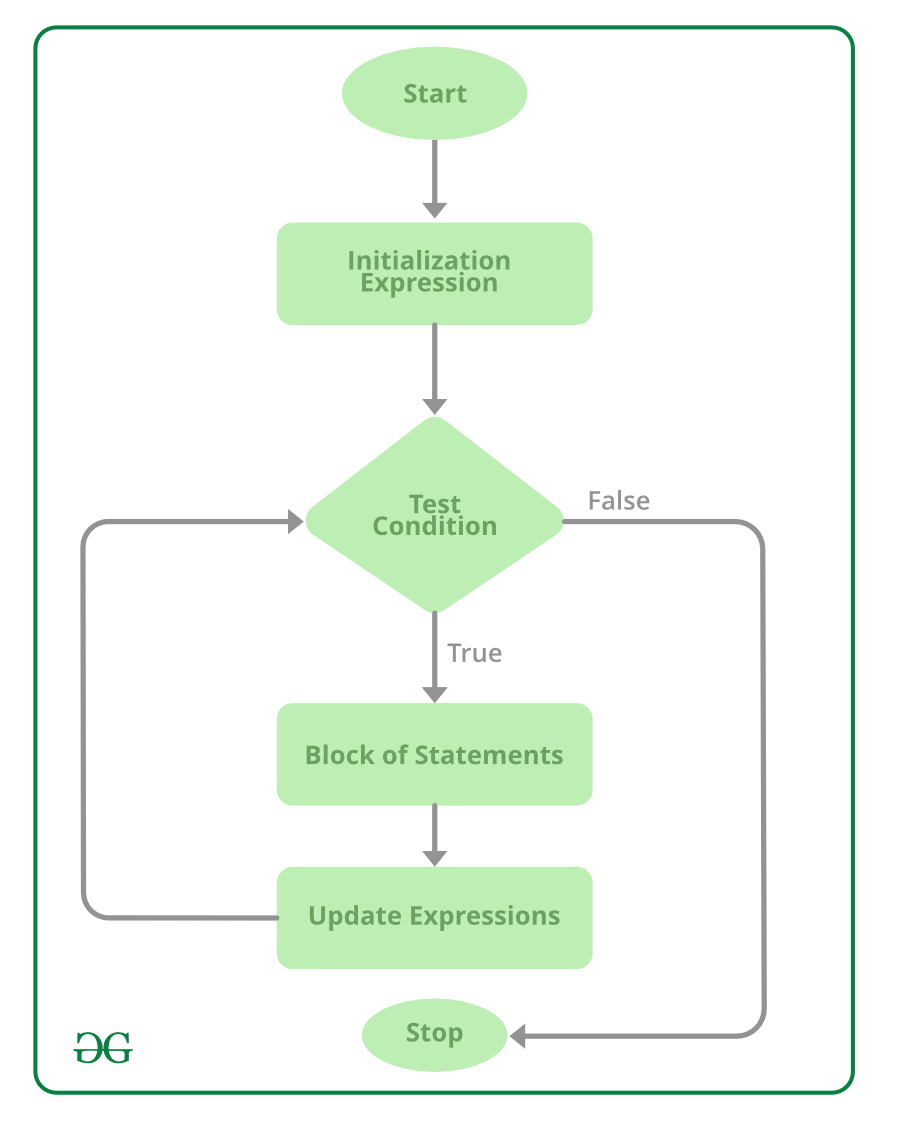 1. Initialization of loop variable: Th expression / variable controlling the loop is initialized here. It is the starting point of for loop. An already declared variable can be used or a variable can be declared, local to loop only. 2. Testing Condition: The testing condition to execute statements of loop. It is used for testing the exit condition for a loop. It must return a boolean value true or false. When the condition became false the control will be out from the loop and for loop ends. 3. Increment / Decrement: The loop variable is incremented/decremented according to the requirement and the control then shifts to the testing condition again. Note: Initialization part is evaluated only once when the for loop starts. Example:
csharp
using System;
class forLoopDemo {
public static void Main()
{
for (int x = 1; x <= 4; x++)
Console.WriteLine("GeeksforGeeks");
}
}
|
Output:
GeeksforGeeks
GeeksforGeeks
GeeksforGeeks
GeeksforGeeks
for each Loop
The foreach loop is used to iterate over the elements of the collection. The collection may be an array or a list. It executes for each element present in the array.
- It is necessary to enclose the statements of foreach loop in curly braces {}.
- Instead of declaring and initializing a loop counter variable, you declare a variable that is the same type as the base type of the array, followed by a colon, which is then followed by the array name.
- In the loop body, you can use the loop variable you created rather than using an indexed array element.
Syntax:
foreach(data_type var_name in collection_variable)
{
     // statements to be executed
}
Flowchart: 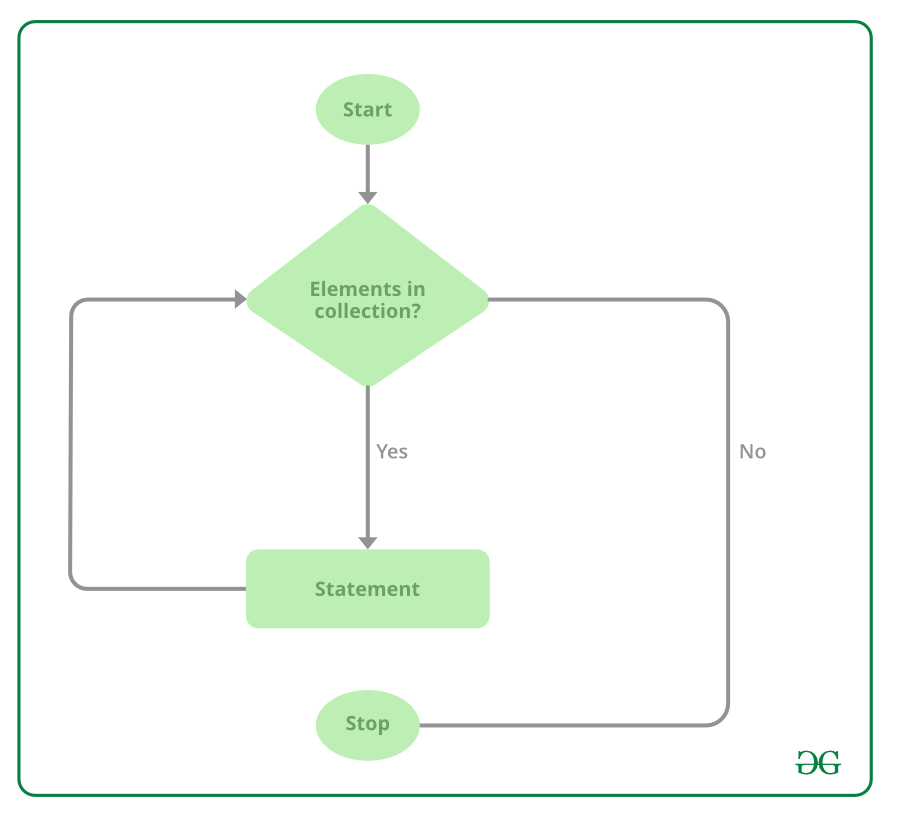 Example:
CSharp
using System;
class GFG {
static public void Main()
{
Console.WriteLine("Print array:");
int[] a_array = new int[] { 1, 2, 3, 4, 5, 6, 7 };
foreach(int items in a_array)
{
Console.WriteLine(items);
}
}
}
|
Output:
Print array:
1
2
3
4
5
6
7
Explanation: foreach loop in above program is equivalent to:
for(int items = 0; items < a_array.Length; items++)
{
    Console.WriteLine(a_array[items]);
}
To know more about Loops you can refer to the articles
Jump Statements
In C#, Jump statements are used to transfer control from one point to another point in the program due to some specified code while executing the program. There are mainly 4 keywords in the Jump Statements:
break statement
The break statement is used to terminate the loop or statement in which it present. After that, the control will pass to the statements that present after the break statement, if available. If the break statement present in the nested loop, then it terminates only those loops which contains break statement. Flowchart: 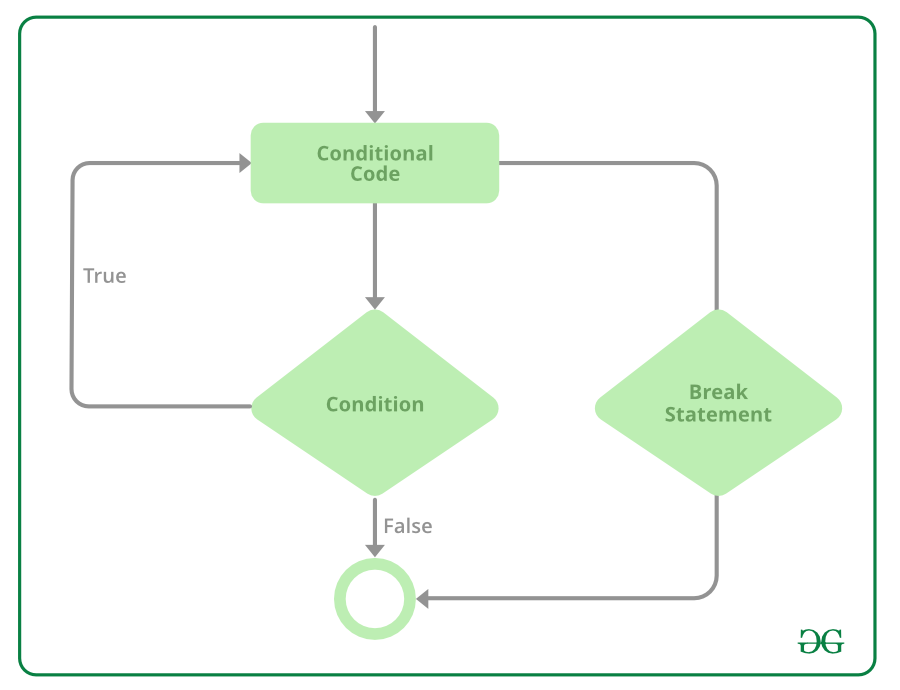 Example:
CSharp
using System;
class Geeks {
static public void Main()
{
for (int i = 1; i < 4; i++) {
if (i == 3)
break;
Console.WriteLine("GeeksforGeeks");
}
}
}
|
Output:
GeeksforGeeks
GeeksforGeeks
continue statement
This statement is used to skip over the execution part of the loop on a certain condition. After that, it transfers the control to the beginning of the loop. Basically, it skips its following statements and continues with the next iteration of the loop. 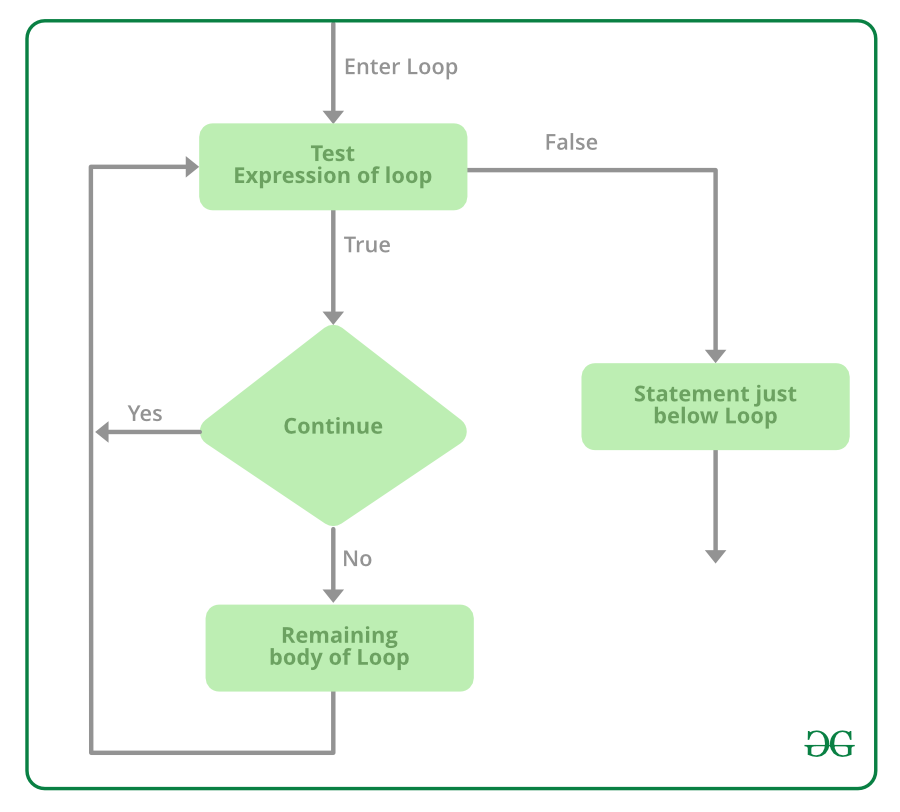 Example:
CSharp
using System;
class Geeks {
public static void Main()
{
for (int i = 1; i <= 10; i++) {
if (i == 4)
continue;
Console.WriteLine(i);
}
}
}
|
Output:
1
2
3
5
6
7
8
9
10
goto statement
This statement is used to transfer control to the labeled statement in the program. The label is the valid identifier and placed just before the statement from where the control is transferred. 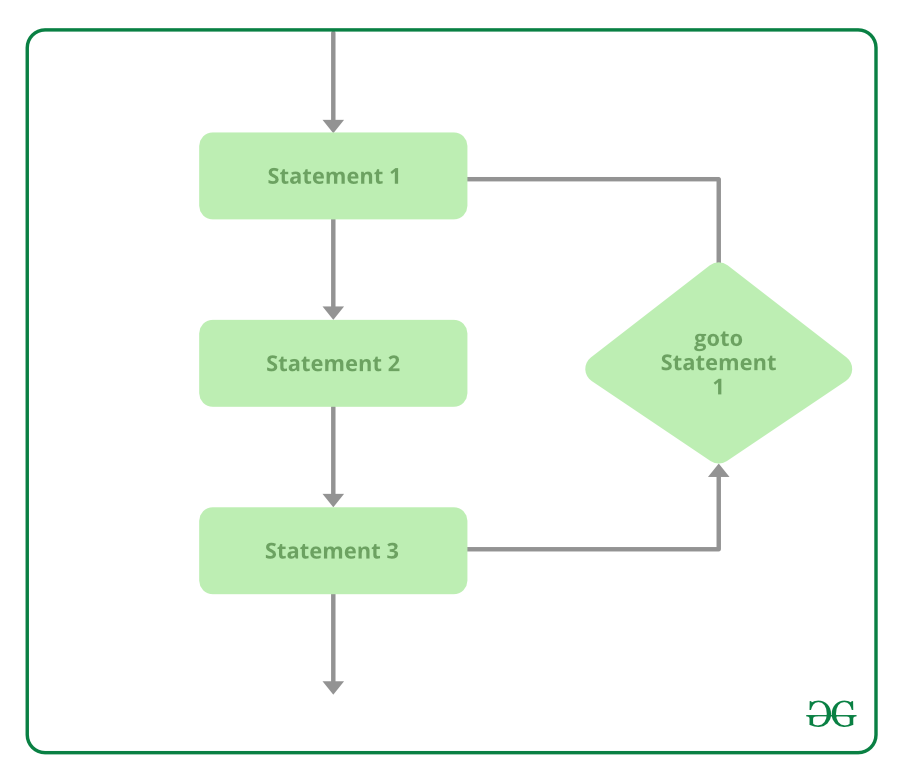 Example:
CSharp
using System;
class Geeks {
static public void Main()
{
int number = 20;
switch (number) {
case 5:
Console.WriteLine("case 5");
break;
case 10:
Console.WriteLine("case 10");
break;
case 20:
Console.WriteLine("case 20");
goto case 5;
default:
Console.WriteLine("No match found");
break;
}
}
}
|
return statement
This statement terminates the execution of the method and returns the control to the calling method. It returns an optional value. If the type of method is void, then the return statement can be excluded. Example:
CSharp
using System;
class Geeks {
static int Addition(int a)
{
int add = a + a;
return add;
}
static public void Main()
{
int number = 2;
int result = Addition(number);
Console.WriteLine("The addition is {0}", result);
}
}
|
Output:
The addition is 4
To read more about this, you can refer to the article Jump Statements in C#
Arrays
An array is a group of like-typed variables that are referred to by a common name. And each data item is called an element of the array. The data types of the elements may be any valid data type like char, int, float, etc. and the elements are stored in a contiguous location. Length of the array specifies the number of elements present in the array. In C# the allocation of memory for the arrays is done dynamically. And arrays are kind of objects, therefore it is easy to find their size using the predefined functions. The variables in the array are ordered and each has an index beginning from 0. Arrays in C# work differently than they do in C/C++. The following figure shows how array stores values sequentially : 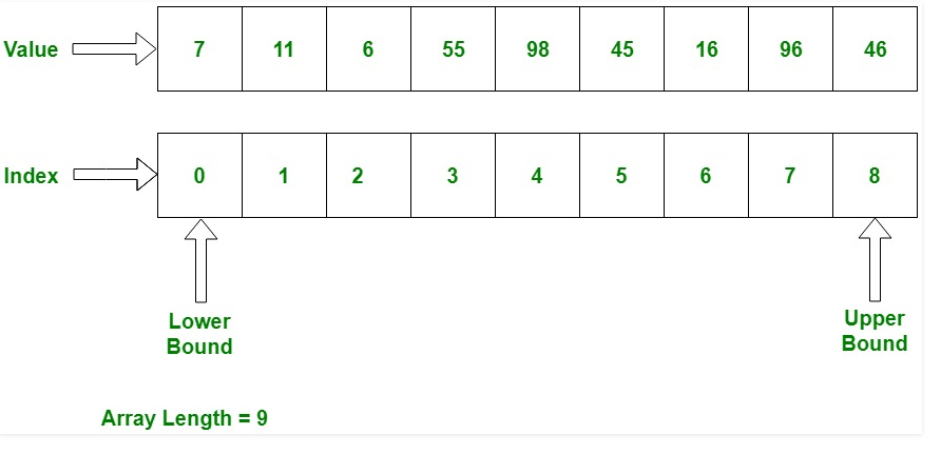 Explanation: The index is starting from 0, which stores value. we can also store a fixed number of values in an array. Array index is to be increased by 1 in sequence whenever its not reach the array size. Example:
csharp
using System;
namespace geeksforgeeks {
class GFG {
public static void Main()
{
string[] weekDays;
weekDays = new string[] { "Sun", "Mon", "Tue", "Wed",
"Thu", "Fri", "Sat" };
foreach(string day in weekDays)
Console.Write(day + " ");
}
}
}
|
Output :
Sun Mon Tue Wed Thu Fri Sat
To know more about this, you can refer to the article Arrays in C#
String
In C#, string is a sequence of Unicode characters or an array of characters. The range of Unicode characters will be U+0000 to U+FFFF. The array of characters is also termed as the text. So the string is the representation of the text. A string is an important concept and people get confused about whether the string is a keyword or an object or a class. So let’s clear out this concept. A string is represented by the class System.String. The “string” keyword is an alias for System.String class and instead of writing System.String one can use String which is a shorthand for System.String class. So we can say string and String both can be used as an alias of System.String class. So string is an object of System.String class. Example:
string s1 = “GeeksforGeeks”; // creating the string using string keyword String s2 = “GFG”; // creating the string using String class System.String s3 = “Pro Geek”; // creating the string using String class
The String class is defined in the .NET base class library. In other words a String object is a sequential collection of System.Char objects which represents a string. The maximum size of String object in memory is 2GB or about 1 billion characters. System.String class is immutable, i.e once created its state cannot be altered. Program: To illustrate how to declare the string and initialize the string. Also, below program show the declaration and initialization of a string in a single line.
csharp
using System;
class Geeks {
static void Main(string[] args)
{
System.String Name;
Name = "Geek";
String id;
id = "33";
string mrk;
mrk = "97";
string rank = "1";
Console.WriteLine("Name: {0}", Name);
Console.WriteLine("Id: {0}", id);
Console.WriteLine("Marks: {0}", mrk);
Console.WriteLine("Rank: {0}", rank);
}
}
|
Output:
Name: Geek
Id: 33
Marks: 97
Rank: 1
To know more about this, you can refer to the article, String in C#
Access Modifiers
Access Modifiers are keywords that define the accessibility of a member, class or datatype in a program. These are mainly used to restrict unwanted data manipulation by external programs or classes. There are 4 access modifiers (public, protected, internal, private) which defines the 6 accessibility levels as follows:The Accessibility table of these modifiers is given below:
| |
public |
protected |
internal |
protected internal |
private |
private protected |
| Entire program |
Yes |
No |
No |
No |
No |
No |
| Containing class |
Yes |
Yes |
Yes |
Yes |
Yes |
Yes |
| Current assembly |
Yes |
No |
Yes |
Yes |
No |
No |
| Derived types |
Yes |
Yes |
No |
Yes |
No |
No |
| Derived types within current assembly |
Yes |
Yes |
No |
Yes |
No |
Yes |
To know more about this, you can refer to the article Access Modifiers in C#
Object-Oriented Programming
Object-oriented programming aims to implement real-world entities like inheritance, hiding, polymorphism, etc in programming. The main aim of OOP is to bind together the data and the functions that operate on them so that no other part of the code can access this data except that function. 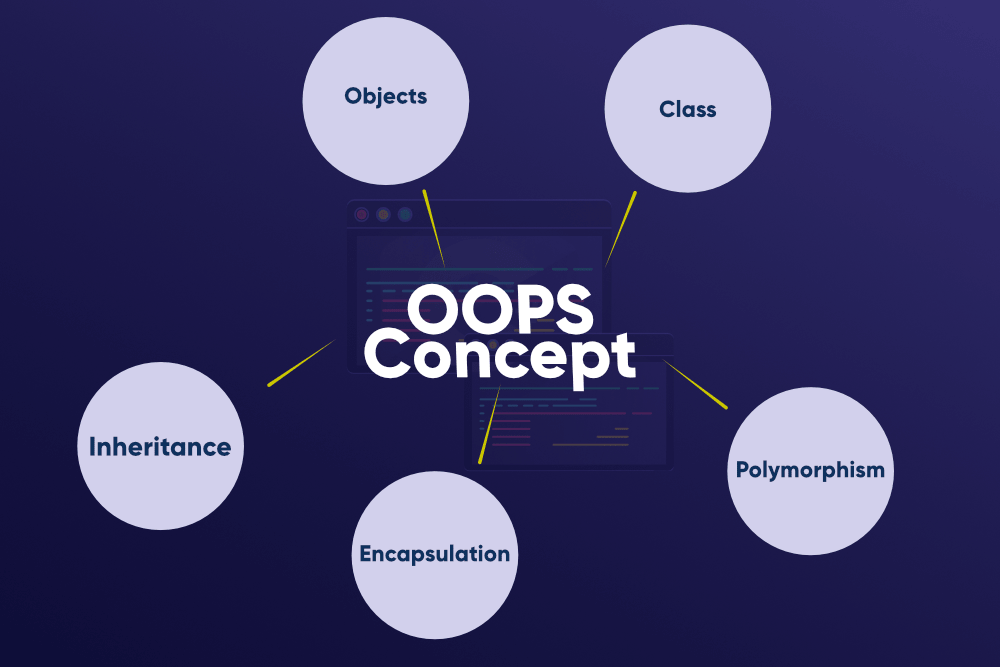
Class and Object
Class and Object are the basic concepts of Object-Oriented Programming which revolve around the real-life entities. A class is a user-defined blueprint or prototype from which objects are created. Basically, a class combines the fields and methods(member function which defines actions) into a single unit. In C#, classes support polymorphism, inheritance and also provide the concept of derived classes and base classes. Object is a basic unit of Object-Oriented Programming and represents the real-life entities. A typical C# program creates many objects, which as you know, interact by invoking methods. Example:
csharp
using System;
public class Dog {
String name;
String breed;
int age;
String color;
public Dog(String name, String breed,
int age, String color)
{
this.name = name;
this.breed = breed;
this.age = age;
this.color = color;
}
public String getName()
{
return name;
}
public String getBreed()
{
return breed;
}
public int getAge()
{
return age;
}
public String getColor()
{
return color;
}
public String toString()
{
return ("Hi my name is " + this.getName()
+ ".\nMy breed, age and color are " + this.getBreed()
+ ", " + this.getAge() + ", " + this.getColor());
}
public static void Main(String[] args)
{
Dog tuffy = new Dog("tuffy", "papillon", 5, "white");
Console.WriteLine(tuffy.toString());
}
}
|
Output:
Hi my name is tuffy.
My breed, age, and color are papillon, 5, white
To know more about this, you can go through the article Class and Object in C#.
Constructors
A constructor is a special method of the class that gets automatically invoked whenever an instance of the class is created. Like methods, a constructor also contains the collection of instructions that are executed at the time of Object creation. It is used to assign initial values to the data members of the same class. Example:
csharp
using System;
namespace ParameterizedConstructorExample {
class Geek {
String name;
int id;
Geek(String name, int id)
{
this.name = name;
this.id = id;
}
public static void Main()
{
Geek geek1 = new Geek("GFG", 1);
Console.WriteLine("GeekName = " + geek1.name + " and GeekId = " + geek1.id);
}
}
}
|
Output:
GeekName = GFG and GeekId = 1
To know more about constructors, you can refer to the article Constructors in C#.
Destructors
Destructors in C# are methods inside the class used to destroy instances of that class when they are no longer needed. The Destructor is called implicitly by the .NET Framework’s Garbage collector and therefore programmer has no control when to invoke the destructor. An instance variable or an object is eligible for destruction when it is no longer reachable. Example:
csharp
using System;
namespace GeeksforGeeks {
class Complex {
int real, img;
public Complex()
{
real = 0;
img = 0;
}
public void SetValue(int r, int i)
{
real = r;
img = i;
}
public void DisplayValue()
{
Console.WriteLine("Real = " + real);
Console.WriteLine("Imaginary = " + img);
}
~Complex()
{
Console.WriteLine("Destructor was called");
}
}
class Program {
static void Main(string[] args)
{
Complex C = new Complex();
C.SetValue(2, 3);
C.DisplayValue();
}
}
}
|
Output:
Real = 2
Imaginary = 3
Destructor was called
Explanation: In the above example, the class consists of a constructor Complex(), a SetValue method to set the value of the complex class’ instance, a DisplayValue method to display the value of the instance and a Destructor ~Complex() to destroy the object when the instance is no longer required, it prints the message “Destructor was called”, which depends on the programmer what message he/she wants to display or it can also be left blank. To know more about destructors, you can refer to the article Destructors in C#.
Inheritance
Inheritance is an important pillar of OOP(Object Oriented Programming). It is the mechanism in C# by which one class is allowed to inherit the features(fields and methods) of another class. Important terminology:
- Super Class: The class whose features are inherited is known as superclass(or a base class or a parent class).
- Sub Class: The class that inherits the other class is known as subclass(or a derived class, extended class, or child class). The subclass can add its own fields and methods in addition to the superclass fields and methods.
- Reusability: Inheritance supports the concept of “reusability”, i.e. when we want to create a new class and there is already a class that includes some of the code that we want, we can derive our new class from the existing class. By doing this, we are reusing the fields and methods of the existing class.
Example:
csharp
using System;
namespace ConsoleApplication1 {
class GFG {
public string name;
public string subject;
public void readers(string name, string subject)
{
this.name = name;
this.subject = subject;
Console.WriteLine("Myself: " + name);
Console.WriteLine("My Favorite Subject is: " + subject);
}
}
class GeeksforGeeks : GFG {
public GeeksforGeeks()
{
Console.WriteLine("GeeksforGeeks");
}
}
class Sudo {
static void Main(string[] args)
{
GeeksforGeeks g = new GeeksforGeeks();
g.readers("Kirti", "C#");
}
}
}
|
Output:
GeeksforGeeks
Myself: Kirti
My Favorite Subject is: C#
To know more about this, you can refer to the article Inheritance in C#.
Encapsulation
Encapsulation is defined as the wrapping up of data under a single unit. It is the mechanism that binds together code and the data it manipulates. In a different way, encapsulation is a protective shield that prevents the data from being accessed by the code outside this shield. Encapsulation can be achieved by declaring all the variables in the class as private and using C# Properties in the class to set and get the values of variables. Example:
csharp
using System;
public class DemoEncap {
private String studentName;
private int studentAge;
public String Name
{
get
{
return studentName;
}
set
{
studentName = value;
}
}
public int Age
{
get
{
return studentAge;
}
set
{
studentAge = value;
}
}
}
class GFG {
static public void Main()
{
DemoEncap obj = new DemoEncap();
obj.Name = "Ankita";
obj.Age = 21;
Console.WriteLine("Name: " + obj.Name);
Console.WriteLine("Age: " + obj.Age);
}
}
|
Output:
Name: Ankita
Age: 21
Explanation: In the above program the class DemoEncap is encapsulated as the variables are declared as private. To access these private variables we are using the Name and Age accessors which contains the get and set method to retrieve and set the values of private fields. Accessors are defined as public so that they can access in other classes. To know more about this, you can refer to the article Encapsulation in C#.
Polymorphism
Polymorphism refers to the ability of OOPs programming languages to differentiate between entities with the same name efficiently. This is done by Perl with the help of the signature and declaration of these entities. Example:
class base_class
{
    public void gfg();
}

class derived_class : base_class
{
    public void gfg();
}

class Main_Method
{
 static void Main()
 {
    derived_class d = new derived_class();
    d.gfg();
 }
}
Methods
Methods are generally the block of codes or statements in a program that gives the user the ability to reuse the same code which ultimately saves the excessive use of memory, acts as a time saver and more importantly, it provides a better readability of code. So basically, a method is a collection of statements that perform some specific task and return the result to the caller. A method can also perform some specific task without returning anything. Example :
// Method Name --> GetCircleArea()
// Return Type ---> double
static double GetCircleArea(double radius)
{
    const float pi = 3.14F;
    double area = pi * radius * radius;
    return area;
}
Method Declaration
Method declaration means the way to construct method including its naming. Syntax :
<Access_Modifier> <return_type> <method_name>([<param_list>])
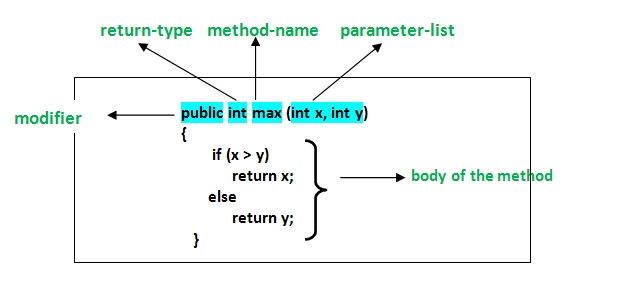 In C# a method declaration consists of the following components as follows :
- Modifier : It defines access type of the method i.e. from where it can be accessed in your application. In C# there are Public, Protected, Private access modifiers.
- Name of the Method : It describes the name of the user defined method by which the user calls it or refer it. Eg. GetName()
- Return type: It defines the data type returned by the method. It depends upon user as it may also return void value i.e return nothing
- Body of the Method : It refers to the line of code of tasks to be performed by the method during its execution. It is enclosed between braces.
- Parameter list : Comma separated list of the input parameters are defined, preceded with their data type, within the enclosed parenthesis. If there are no parameters, then empty parentheses () have to use out.
Method Signature : Method Signature is defined by mainly two parameters(number of parameters, type of the parameters and order of the parameters), One of them is Method Name and second one is its Parameter list. Method Naming : Name of a method or a function in any programming language whether in C++ or Java or C# holds great importance and is mainly used in order to call that method for its execution. For example, findSum, computeMax, setX and getX etc. There are certain pre-defined rules for naming methods which a user should follow :
- The method name must be some kind of Noun or a verb.
- It’s naming should be done in such a way that it must describe the purpose of that method.
- The first letter of the method name can be either a small letter or a Capital letter, however, it is recommended to use the capital one.
These rules are not mandatory, but recommendable. Generally, a method has a unique name within the class in which it is defined but sometime a method might have the same name as other method names within the same class as method overloading is allowed in C#. The Method Body : As discussed above the body of the method consists of statements of code which a user wants to perform. After the method has been declared, it is dependent on the user whether to define its implementation or not. Not writing any implementation, makes the method not to perform any task. However, when the user wants to perform certain tasks using method then it must write the statements for execution in the body of the method. The below syntax describes the basic structure of the method body : Syntax :
<return_type> <method_name>(<parameter_list>)
{

     // Implementation of the method code goes here.....

}
Method Calling
Method Invocation or Method Calling is done when the user wants to execute the method. The method needs to be called for using its functionality. A method returns to the code that invoked it when:
- It completes all the statements in the method
- It reaches a return statement
- Throws an exception
Example : In the code below, a method named Sum() is called.
CSHARP
using System;
namespace ConsoleApplication1 {
class Geeks {
static int Sum(int x, int y)
{
int a = x;
int b = y;
int result = a + b;
return result;
}
static void Main(string[] args)
{
int a = 12;
int b = 23;
int c = Sum(a, b);
Console.WriteLine("The Value of the sum is " + c);
}
}
}
|
Output :
The Value of the sum is 35
Refer to the below articles to know more about methods
Method Overloading
Method Overloading is a common way of implementing polymorphism. It is the ability to redefine a function in more than one form. A user can implement function overloading by defining two or more functions in a class sharing the same name. C# can distinguish the methods with different method signatures. i.e. the methods can have the same name but with different parameters list (i.e. the number of the parameters, order of the parameters, and data types of the parameters) within the same class. Different ways of doing overloading methods- Method overloading can be done by changing:
- The number of parameters in two methods.
- The data types of the parameters of methods.
- The Order of the parameters of methods.
Example:
Csharp
using System;
class GFG {
public int Add(int a, int b)
{
int sum = a + b;
return sum;
}
public int Add(int a, int b, int c)
{
int sum = a + b + c;
return sum;
}
public static void Main(String[] args)
{
GFG ob = new GFG();
int sum1 = ob.Add(1, 2);
Console.WriteLine("sum of the two "
+ "integer value : " + sum1);
int sum2 = ob.Add(1, 2, 3);
Console.WriteLine("sum of the three "
+ "integer value : " + sum2);
}
}
|
Output:
sum of the two integer value : 3
sum of the three integer value : 6
To know more about this, you can refer to the article C# Method Overloading.
Method Overriding
Method Overriding in C# is similar to the virtual function in C++. Method Overriding is a technique that allows the invoking of functions from another class (base class) in the derived class. Creating a method in the derived class with the same signature as a method in the base class is called method overriding. In simple words, Overriding is a feature that allows a subclass or child class to provide a specific implementation of a method that is already provided by one of its super-classes or parent classes. When a method in a subclass has the same name, same parameters or signature and same return type(or sub-type) as a method in its super-class, then the method in the subclass is said to override the method in the super-class. Method overriding is one of the ways by which C# achieves Run Time Polymorphism(Dynamic Polymorphism). The method that is overridden by an override declaration is called the overridden base method. An override method is a new implementation of a member that is inherited from a base class. The overridden base method must be virtual, abstract, or override. 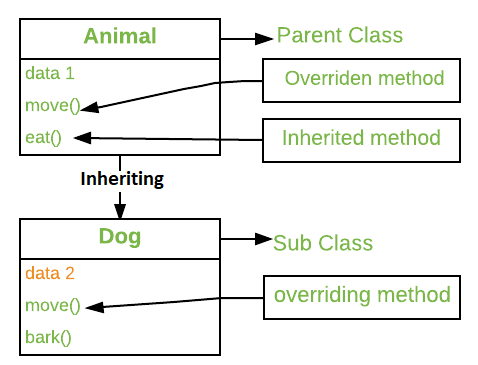 Example:
CSharp
using System;
class baseClass
{
public void show()
{
Console.WriteLine("Base class");
}
}
class derived : baseClass {
new public void show() {
Console.WriteLine("Derived class");
}
}
class GFG {
public static void Main()
{
baseClass obj = new baseClass();
obj.show();
obj = new derived();
obj.show();
}
}
|
Output:
Base class
Base class
Explanation: In this program the object obj invokes class baseClass two times and call the method show() of class baseClass. To avoid this problem we use virtual and override keyword. To know more about this, you can refer to the article C# Method Overriding.
Method Hiding
As we already know about polymorphism and method overriding in C#. C# also provides a concept to hide the methods of the base class from derived class, this concept is known as Method Hiding. It is also known as Method Shadowing. In method hiding, you can hide the implementation of the methods of a base class from the derived class using the new keyword. Or in other words, in method hiding, you can redefine the method of the base class in the derived class by using the new keyword. Example:
CSharp
using System;
public class My_Family {
public void member()
{
Console.WriteLine("Total number of family members: 3");
}
}
public class My_Member : My_Family {
public new void member() {
Console.WriteLine("Name: Rakesh, Age: 40 \nName: Somya, "
+ "Age: 39 \nName: Rohan, Age: 20 ");
}
}
class GFG {
static public void Main()
{
My_Member obj = new My_Member();
obj.member();
}
}
|
Output:
Name: Rakesh, Age: 40
Name: Somya, Age: 39
Name: Rohan, Age: 20
Explanation: In the above example, My_Family is the base class and My_Member is a derived class. In both the classes we have the same name method, i.e. member() method. But in the derived class, the member() method is declared with the new keyword. When this method is called, it prints the name and the age of the family members not the total number of family members. This means when we call the member() method with the help of the derived class object, it hides the same name method present in the base class due to the presence of the new keyword. To know more about this, you can refer to the article C# Method Hiding.
Collections
Collections standardize the way in which the objects are handled by your program. In other words, it contains a set of classes to contain elements in a generalized manner. With the help of collections, the user can perform several operations on objects like the store, update, delete, retrieve, search, sort, etc. C# divide collection in several classes, some of the common classes are shown below: 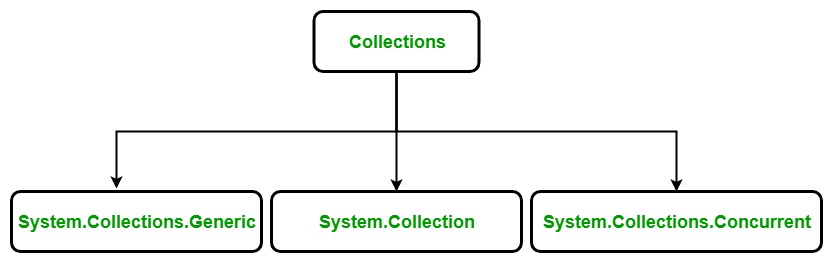 Non-Generic collection in C# is defined in System.Collections namespace. It is a general-purpose data structure that works on object references, so it can handle any type of object, but not in a safe-type manner. Non-generic collections are defined by the set of interfaces and classes. To know more about this, you can refer to the article Collections in C# The below table contains the frequently used classes of the System.Collections namespace:
.collections-table { border-collapse: collapse; width: 100%; } .collections-table td { border: 1px solid #5fb962; text-align: left !important; padding: 8px; } .collections-table th { border: 1px solid #5fb962; padding: 8px; } .collections-table tr>th{ background-color: #c6ebd9; vertical-align: middle; } .collections-table tr:nth-child(odd) { background-color: #ffffff; }
| Class name |
Description |
| ArrayList |
It is a dynamic array means the size of the array is not fixed, it can increase and decrease at runtime. |
| Hashtable |
It represents a collection of key-and-value pairs that are organized based on the hash code of the key. |
| Queue |
It represents a first-in, first out collection of objects. It is used when you need a first-in, first-out access of items. |
| Stack |
It is a linear data structure. It follows LIFO(Last In, First Out) pattern for Input/output. |
ArrayList represents an ordered collection of an object that can be indexed individually. It is basically an alternative to an array. It also allows dynamic memory allocation, adding, searching and sorting items in the list. Properties of ArrayList Class:
- Elements can be added or removed from the Array List collection at any point in time.
- The ArrayList is not guaranteed to be sorted.
- The capacity of an ArrayList is the number of elements the ArrayList can hold.
- Elements in this collection can be accessed using an integer index. Indexes in this collection are zero-based.
- It also allows duplicate elements.
- Using multidimensional arrays as elements in an ArrayList collection is not supported.
Example:
CSHARP
using System;
using System.Collections;
using System.Collections.Generic;
class GFG {
public static void Main()
{
ArrayList myList = new ArrayList();
myList.Add("Hello");
myList.Add("World");
Console.WriteLine("Count : " + myList.Count);
Console.WriteLine("Capacity : " + myList.Capacity);
}
}
|
Output:
Count : 2
Capacity : 4
The Hashtable class represents a collection of key/value pairs that are organized based on the hash code of the key. This class comes under the System.Collections namespace. The Hashtable class provides various types of methods that are used to perform different types of operation on the hashtables. In Hashtable, keys are used to access the elements present in the collection. For very large Hashtable objects, you can increase the maximum capacity to 2 billion elements on a 64-bit system. Characteristics of Hashtable Class:
- In Hashtable, key cannot be null but value can be.
- In Hashtable, key objects must be immutable as long as they are used as keys in the Hashtable.
- The capacity of a Hashtable is the number of elements that Hashtable can hold.
- A hash function is provided by each key object in the Hashtable.
Example:
CSharp
using System;
using System.Collections;
class GFG {
static void Main(string[] args)
{
Hashtable g = new Hashtable();
g.Add(1, "welcome");
g.Add(2, "to");
g.Add(3, "tutorials");
g.Add(4, "of");
g.Add(5, "C#");
ICollection key = g.Keys;
Console.WriteLine("Hashtable:");
Console.WriteLine();
foreach(var val in key)
{
Console.WriteLine(val + "-" + g[val]);
}
}
}
|
Output:
Hashtable:

5-C#
4-of
3-tutorials
2-to
1-welcome
Stack represents a last-in, first out collection of object. It is used when you need a last-in, first-out access to items. When you add an item in the list, it is called pushing the item and when you remove it, it is called popping the item. This class comes under System.Collections namespace. Characteristics of Stack Class:
- The capacity of a Stack is the number of elements the Stack can hold. As elements are added to a Stack, the capacity is automatically increased as required through reallocation.
- If Count is less than the capacity of the stack, Push is an O(1) operation. If the capacity needs to be increased to accommodate the new element, Push becomes an O(n) operation, where n is Count. Pop is an O(1) operation.
- Stack accepts null as a valid value and allows duplicate elements.
Example:
CSHARP
using System;
using System.Collections;
class GFG {
public static void Main()
{
Stack myStack = new Stack();
myStack.Push("1st Element");
myStack.Push("2nd Element");
myStack.Push("3rd Element");
myStack.Push("4th Element");
myStack.Push("5th Element");
myStack.Push("6th Element");
Console.Write("Total number of elements in the Stack are : ");
Console.WriteLine(myStack.Count);
Console.WriteLine("Element at the top is : " + myStack.Peek());
Console.WriteLine("Element at the top is : " + myStack.Peek());
Console.Write("Total number of elements in the Stack are : ");
Console.WriteLine(myStack.Count);
}
}
|
Output:
Total number of elements in the Stack are : 6
Element at the top is : 6th Element
Element at the top is : 6th Element
Total number of elements in the Stack are : 6
Queue represents a first-in, first out collection of object. It is used when you need a first-in, first-out access of items. When you add an item in the list, it is called enqueue, and when you remove an item, it is called dequeue . This class comes under System.Collections namespace and implements ICollection, IEnumerable, and ICloneable interfaces. Characteristics of Queue Class:
- Enqueue adds an element to the end of the Queue.
- Dequeue removes the oldest element from the start of the Queue.
- Peek returns the oldest element that is at the start of the Queue but does not remove it from the Queue.
- The capacity of a Queue is the number of elements the Queue can hold.
- As elements are added to a Queue, the capacity is automatically increased as required by reallocating the internal array.
- Queue accepts null as a valid value for reference types and allows duplicate elements.
Example:
CSHARP
using System;
using System.Collections;
class GFG {
public static void Main()
{
Queue myQueue = new Queue();
myQueue.Enqueue("one");
Console.Write("Total number of elements in the Queue are : ");
Console.WriteLine(myQueue.Count);
myQueue.Enqueue("two");
Console.Write("Total number of elements in the Queue are : ");
Console.WriteLine(myQueue.Count);
myQueue.Enqueue("three");
Console.Write("Total number of elements in the Queue are : ");
Console.WriteLine(myQueue.Count);
myQueue.Enqueue("four");
Console.Write("Total number of elements in the Queue are : ");
Console.WriteLine(myQueue.Count);
myQueue.Enqueue("five");
Console.Write("Total number of elements in the Queue are : ");
Console.WriteLine(myQueue.Count);
myQueue.Enqueue("six");
Console.Write("Total number of elements in the Queue are : ");
Console.WriteLine(myQueue.Count);
}
}
|
Output:
Total number of elements in the Queue are : 1
Total number of elements in the Queue are : 2
Total number of elements in the Queue are : 3
Total number of elements in the Queue are : 4
Total number of elements in the Queue are : 5
Total number of elements in the Queue are : 6
Properties
Before going on properties lets have a look at why the concept of properties came into C#? This is because of two reasons:
- If the members of a class are private then how another class in C# will be able to read, write, or compute the value that field.
- If the members of the class are public then another class may misuse that member.
Properties are the special type of class members that provides a flexible mechanism to read, write, or compute the value of a private field. Properties can be used as if they are public data members, but they are actually special methods called accessors. This enables data to be accessed easily and helps to promote the flexibility and safety of methods. Encapsulation and hiding of information can also be achieved using properties. It uses pre-defined methods which are “get” and “set” methods which help to access and modify the properties. Accessors: The block of “set” and “get” is known as “Accessors”. It is very essential to restrict the accessibility of property. There are two type of accessors i.e. get accessors and set accessors. There are different types of properties based on the “get” and set accessors:
- Read and Write Properties: When property contains both get and set methods.
- Read-Only Properties: When property contains only get method.
- Write Only Properties: When property contains only set method.
- Auto Implemented Properties: When there is no additional logic in the property accessors and it introduce in C# 3.0.
The syntax for Defining Properties:
<access_modifier> <return_type> <property_name>
{
        get { // body }
        set { // body }
}
Where, <access_modifier> can be public, private, protected or internal. <return_type> can be any valid C# type. <property_name> can be user-defined.Properties can be different access modifiers like public, private, protected, internal. Access modifiers define how users of the class can access the property. The get and set accessors for the same property may have different access modifiers. A property may be declared as a static property by using the static keyword or may be marked as a virtual property by using the virtual keyword.
- Get Accessor: It specifies that the value of a field can access publicly. It returns a single value and it specifies the read-only property.
- Set Accessor: It will specify the assignment of a value to a private field in a property. It returns a single value and it specifies the write-only property.
Example:
CSharp
using System;
public class Student {
private string name = "GeeksforGeeks";
public string Name
{
get
{
return name;
}
set
{
name = value;
}
}
}
class TestStudent {
public static void Main(string[] args)
{
Student s = new Student();
s.Name = "GFG";
Console.WriteLine("Name: " + s.Name);
}
}
|
Output:
Name: GFG
To read more about this, you can refer to the article Properties in C#
Indexers
An indexer allows an instance of a class or struct to be indexed as an array. If the user will define an indexer for a class, then the class will behave like a virtual array. Array access operator i.e ([ ]) is used to access the instance of the class which uses an indexer. A user can retrieve or set the indexed value without pointing an instance or a type member. Indexers are almost similar to the Properties. The main difference between Indexers and Properties is that the accessors of the Indexers will take parameters. Syntax:
[access_modifier] [return_type] this [argument_list]
{
  get
  {
     // get block code
  }
  set
  {
    // set block code
  }

}
In the above syntax:
- access_modifier: It can be public, private, protected or internal.
- return_type: It can be any valid C# type.
- this: It is the keyword which points to the object of the current class.
- argument_list: This specifies the parameter list of the indexer.
- get{ } and set { }: These are the accessors.
Example:
CSharp
using System;
class IndexerCreation {
private string[] val = new string[3];
public string this[int index]
{
get
{
return val[index];
}
set
{
val[index] = value;
}
}
}
class main {
public static void Main()
{
IndexerCreation ic = new IndexerCreation();
ic[0] = "C";
ic[1] = "CPP";
ic[2] = "CSHARP";
Console.Write("Printing values stored in objects used as arrays\n");
Console.WriteLine("First value = {0}", ic[0]);
Console.WriteLine("Second value = {0}", ic[1]);
Console.WriteLine("Third value = {0}", ic[2]);
}
}
|
Output:
Printing values stored in objects used as arrays
First value = C
Second value = CPP
Third value = CSHARP
To read more about this, you can refer to the article Indexers in C#
Interface
To read more about this, you can refer to the article Interface in C# Like a class, Interface can have methods, properties, events, and indexers as its members. But interfaces will contain only the declaration of the members. The implementation of the interface’s members will be given by class who implements the interface implicitly or explicitly.
- Interfaces specify what a class must do and not how.
- Interfaces can’t have private members.
- By default all the members of Interface are public and abstract.
- The interface will always defined with the help of keyword ‘interface‘.
- Interface cannot contain fields because they represent a particular implementation of data.
- Multiple inheritance is possible with the help of Interfaces but not with classes.
Syntax for Interface Declaration:
interface  <interface_name >
{
    // declare Events
    // declare indexers
    // declare methods
    // declare properties
}
Syntax for Implementing Interface:
class class_name : interface_name
To declare an interface, use interface keyword. It is used to provide total abstraction. That means all the members in the interface are declared with the empty body and are public and abstract by default. A class that implements an interface must implement all the methods declared in the interface. Example:
CSharp
using System;
interface inter1 {
void display();
}
class testClass : inter1 {
public void display()
{
Console.WriteLine("Sudo Placement GeeksforGeeks");
}
public static void Main(String[] args)
{
testClass t = new testClass();
t.display();
}
}
|
Output:
Sudo Placement GeeksforGeeks
Multithreading
Multi-threading is a process that contains multiple threads within a single process. Here each thread performs different activities. For example, we have a class and this call contains two different methods, now using multithreading each method is executed by a separate thread. So the major advantage of multithreading is it works simultaneously, which means multiple tasks execute at the same time. And also maximizing the utilization of the CPU because multithreading works on time-sharing concept mean each thread takes its own time for execution and does not affect the execution of another thread, this time interval is given by the operating system.  Example:
CSharp
using System;
using System.Threading;
public class GFG {
public static void method1()
{
for (int I = 0; I <= 10; I++) {
Console.WriteLine("Method1 is : {0}", I);
if (I == 5) {
Thread.Sleep(6000);
}
}
}
public static void method2()
{
for (int J = 0; J <= 10; J++) {
Console.WriteLine("Method2 is : {0}", J);
}
}
static public void Main()
{
Thread thr1 = new Thread(method1);
Thread thr2 = new Thread(method2);
thr1.Start();
thr2.Start();
}
}
|
Output :
Method1 is : 0
Method1 is : 1
Method1 is : 2
Method1 is : 3
Method2 is : 0
Method2 is : 1
Method2 is : 2
Method2 is : 3
Method2 is : 4
Method2 is : 5
Method2 is : 6
Method2 is : 7
Method2 is : 8
Method2 is : 9
Method2 is : 10
Method1 is : 4
Method1 is : 5
Method1 is : 6
Method1 is : 7
Method1 is : 8
Method1 is : 9
Method1 is : 10
Explanation: Here, we create and initialize two threads, i.e thr1 and thr2 using Thread class. Now using thr1.Start(); and thr2.Start(); we start the execution of both the threads. Now both thread runs simultaneously and the processing of thr2 does not depend upon the processing of thr1 like in the single threaded model. Note: Output may vary due to context switching. To read more about this, you can refer to the article C# Multithreading.
Regular Expression
In C#, Regular Expression is a pattern which is used to parse and check whether the given input text is matching with the given pattern or not. In C#, Regular Expressions are generally termed as C# Regex. The .Net Framework provides a regular expression engine that allows the pattern matching. Patterns may consist of any character literals, operators or constructors. C# provides a class termed as Regex which can be found in System.Text.RegularExpression namespace. This class will perform two things:
- Parsing the inputting text for the regular expression pattern.
- Identify the regular expression pattern in the given text.
Example: Below example demonstrate the use of regex in Mobile Number Verification. Suppose you are making a form where you need to verify the user-entered mobile number then you can use regex.
csharp
using System;
using System.Text.RegularExpressions;
class GFG {
static void Main(string[] args)
{
string[] str = { "9925612824",
"8238783138", "02812451830" };
foreach(string s in str)
{
Console.WriteLine("{0} {1} a valid mobile number.", s,
isValidMobileNumber(s) ? "is" : "is not");
}
Console.ReadKey();
}
public static bool isValidMobileNumber(string inputMobileNumber)
{
string strRegex = @"(^[0-9]{10}$)|(^\+[0-9]{2}\s+[0-9]
{ 2 }[0 - 9]
{
8
}$)|(^[0-9]{3}-[0-9]{4}-[0-9]{
4}$)";
Regex re = new Regex(strRegex);
if (re.IsMatch(inputMobileNumber))
return (true);
else
return (false);
}
}
|
Output:
9925612824 is a valid mobile number.
8238783138 is a valid mobile number.
02812451830 is not a valid mobile number.
To read more about this, you can refer to the article Regular Expressions.
Exception Handling
An exception is defined as an event that occurs during the execution of a program that is unexpected by the program code. The actions to be performed in case of occurrence of an exception is not known to the program. In such a case, we create an exception object and call the exception handler code. The execution of an exception handler so that the program code does not crash is called exception handling. Exception handling is important because it gracefully handles an unwanted event, an exception so that the program code still makes sense to the user.
| Keyword |
Definition |
| try |
Used to define a try block. This block holds the code that may throw an exception. |
| catch |
Used to define a catch block. This block catches the exception thrown by the try block. |
| finally |
Used to define the finally block. This block holds the default code. |
| throw |
Used to throw an exception manually. |
Let us take a simple example to understand what an exception is:
csharp
using System;
class GFG {
static void Main(string[] args)
{
int[] arr = { 1, 2, 3, 4, 5 };
for (int i = 0; i < arr.Length; i++) {
Console.WriteLine(arr[i]);
}
Console.WriteLine(arr[7]);
}
}
|
Runtime Error:
Unhandled Exception: System.IndexOutOfRangeException: Index was outside the bounds of the array. at GFG.Main (System.String[] args) [0x0002e] in <9fa39b3b4dec49eb8af89dc70d5a0618>:0 [ERROR] FATAL UNHANDLED EXCEPTION: System.IndexOutOfRangeException: Index was outside the bounds of the array. at GFG.Main (System.String[] args) [0x0002e] in <9fa39b3b4dec49eb8af89dc70d5a0618>:0
Output:
1
2
3
4
5
In the code given above, the array named ‘arr’ is defined for 5 elements, indices 0 to 4. When we try to access the 7th element of the array, that is non-existent, program code throws an exception and the above message is displayed. The exception can be handled using the System.Exception class of C#. This will be depicted in the code given below. Exception Handling Using try-catch block The code given below shows how we can handle exceptions using the try-catch block. The code that may generate an exception is placed inside the try block. In this case, the access to the 7th element is put inside the try block. When that statement is executed an exception is generated, which is caught by the catch block. The object of the type IndexOutOfRangeException is used to display a message to the user about the exception that has occurred. Syntax:
try
{
  // statements that may cause an exception
}
catch( Exception obj)
{
  // handler code
}
csharp
using System;
class Program : System.Exception {
static void Main(string[] args)
{
int[] arr = { 1, 2, 3, 4, 5 };
for (int i = 0; i < arr.Length; i++) {
Console.WriteLine(arr[i]);
}
try {
Console.WriteLine(arr[7]);
}
catch (IndexOutOfRangeException e) {
Console.WriteLine("An Exception has occurred : {0}", e.Message);
}
}
}
|
Output:
1
2
3
4
5
An Exception has occurred : Index was outside the bounds of the array.
Using Multiple try-catch blocks In the code given below, we attempt to generate an exception in the try block and catch it in one of the multiple catch blocks. Multiple catch blocks are used when we are not sure about the exception type that may be generated, so we write different blocks to tackle any type of exception that is encountered. The finally block is the part of the code that has to be executed irrespective of if the exception was generated or not. In the program given below the elements of the array are displayed in the finally block. Syntax:
try
{
  // statements that may cause an exception
}
catch(Specific_Exception_type obj)
{
  // handler code
}
catch(Specific_Exception_type obj)
{
  // handler code
}
.
.
.
finally
{
  //default code
}
csharp
using System;
class Program {
static void Main(string[] args)
{
int[] arr = { 19, 0, 75, 52 };
try {
for (int i = 0; i < arr.Length; i++) {
Console.WriteLine(arr[i] / arr[i + 1]);
}
}
catch (IndexOutOfRangeException e) {
Console.WriteLine("An Exception has occurred : {0}", e.Message);
}
catch (DivideByZeroException e) {
Console.WriteLine("An Exception has occurred : {0}", e.Message);
}
catch (ArgumentOutOfRangeException e) {
Console.WriteLine("An Exception has occurred : {0}", e.Message);
}
finally {
for (int i = 0; i < arr.Length; i++) {
Console.Write(" {0}", arr[i]);
}
}
}
}
|
Output:
An Exception has occurred : Attempted to divide by zero.
 19 0 75 52
To read more about this, you can refer to the article Exception Handling in C#
Like Article
Suggest improvement
Share your thoughts in the comments
Please Login to comment...