Builder Design Pattern
Last Updated :
06 Feb, 2024
The Builder Design Pattern is a creational pattern used in software design to construct a complex object step by step. It allows the construction of a product in a step-by-step fashion, where the construction process can vary based on the type of product being built. The pattern separates the construction of a complex object from its representation, allowing the same construction process to create different representations.
Important Topics for the Builder Design Pattern
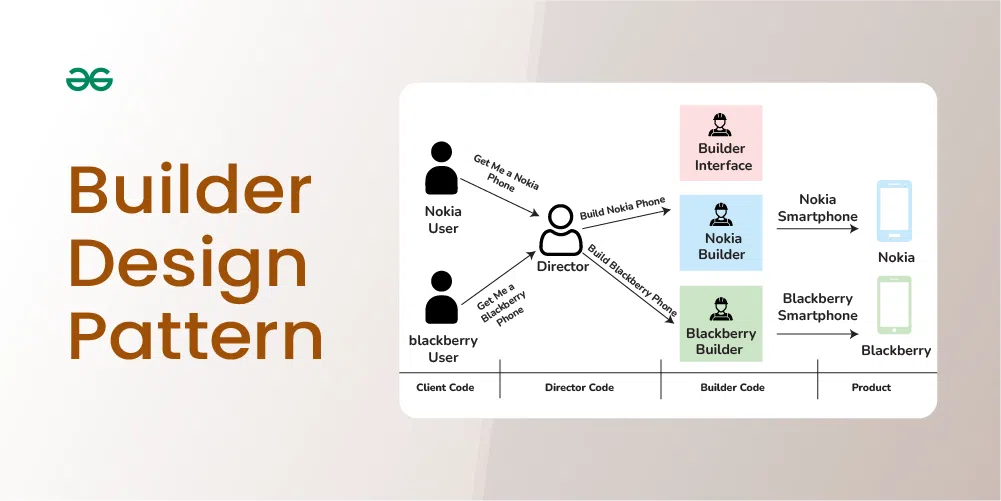
Components of the Builder Design Pattern
1. Product
The Product is the complex object that the Builder pattern is responsible for constructing.
- It may consist of multiple components or parts, and its structure can vary based on the implementation.
- The Product is typically a class with attributes representing the different parts that the Builder constructs.
2. Builder
The Builder is an interface or an abstract class that declares the construction steps for building a complex object.
- It typically includes methods for constructing individual parts of the product.
- By defining an interface, the Builder allows for the creation of different concrete builders that can produce variations of the product.
3. ConcreteBuilder
ConcreteBuilder classes implement the Builder interface, providing specific implementations for building each part of the product.
- Each ConcreteBuilder is tailored to create a specific variation of the product.
- It keeps track of the product being constructed and provides methods for setting or constructing each part.
4. Director
The Director is responsible for managing the construction process of the complex object.
- It collaborates with a Builder, but it doesn’t know the specific details about how each part of the object is constructed.
- It provides a high-level interface for constructing the product and managing the steps needed to create the complex object.
5. Client
The Client is the code that initiates the construction of the complex object.
- It creates a Builder object and passes it to the Director to initiate the construction process.
- The Client may retrieve the final product from the Builder after construction is complete.
Builder Design Pattern Example
Problem Statement
You are tasked with implementing a system for building custom computers. Each computer can have different configurations based on user preferences. The goal is to provide flexibility in creating computers with varying CPUs, RAM, and storage options.
Implement the Builder design pattern to achieve this, allowing the construction of computers through a step-by-step process. Use the provided components – Product (Computer), Builder interface, ConcreteBuilder (GamingComputerBuilder), Director, and Client

1. Product (Computer)
C++
class Computer {
private:
string cpu_;
string ram_;
string storage_;
public:
void setCPU(const std::string& cpu) {
cpu_ = cpu;
}
void setRAM(const std::string& ram) {
ram_ = ram;
}
void setStorage(const std::string& storage) {
storage_ = storage;
}
void displayInfo() const {
std::cout << "Computer Configuration:"
<< "\nCPU: " << cpu_
<< "\nRAM: " << ram_
<< "\nStorage: " << storage_ << "\n\n";
}
};
|
2. Builder
C++
class Builder {
public:
virtual void buildCPU() = 0;
virtual void buildRAM() = 0;
virtual void buildStorage() = 0;
virtual Computer getResult() = 0;
};
|
3. ConcreteBuilder
C++
class GamingComputerBuilder : public Builder {
private:
Computer computer_;
public:
void buildCPU() override {
computer_.setCPU("Gaming CPU");
}
void buildRAM() override {
computer_.setRAM("16GB DDR4");
}
void buildStorage() override {
computer_.setStorage("1TB SSD");
}
Computer getResult() override {
return computer_;
}
};
|
4. Director
C++
class ComputerDirector {
public:
void construct(Builder& builder) {
builder.buildCPU();
builder.buildRAM();
builder.buildStorage();
}
};
|
5. Client
C++
int main() {
GamingComputerBuilder gamingBuilder;
ComputerDirector director;
director.construct(gamingBuilder);
Computer gamingComputer = gamingBuilder.getResult();
gamingComputer.displayInfo();
return 0;
}
|
Complete Combined code for the above example
Below is the full combined code for the above example:
C++
#include <iostream>
#include <string>
using namespace std;
class Computer {
public:
void setCPU(const std::string& cpu) {
cpu_ = cpu;
}
void setRAM(const std::string& ram) {
ram_ = ram;
}
void setStorage(const std::string& storage) {
storage_ = storage;
}
void displayInfo() const {
std::cout << "Computer Configuration:"
<< "\nCPU: " << cpu_
<< "\nRAM: " << ram_
<< "\nStorage: " << storage_ << "\n\n";
}
private:
string cpu_;
string ram_;
string storage_;
};
class Builder {
public:
virtual void buildCPU() = 0;
virtual void buildRAM() = 0;
virtual void buildStorage() = 0;
virtual Computer getResult() = 0;
};
class GamingComputerBuilder : public Builder {
private:
Computer computer_;
public:
void buildCPU() override {
computer_.setCPU("Gaming CPU");
}
void buildRAM() override {
computer_.setRAM("16GB DDR4");
}
void buildStorage() override {
computer_.setStorage("1TB SSD");
}
Computer getResult() override {
return computer_;
}
};
class ComputerDirector {
public:
void construct(Builder& builder) {
builder.buildCPU();
builder.buildRAM();
builder.buildStorage();
}
};
int main() {
GamingComputerBuilder gamingBuilder;
ComputerDirector director;
director.construct(gamingBuilder);
Computer gamingComputer = gamingBuilder.getResult();
gamingComputer.displayInfo();
return 0;
}
|
Output
Computer Configuration:
CPU: Gaming CPU
RAM: 16GB DDR4
Storage: 1TB SSD
This code demonstrates the Builder design pattern where the Computer class is the product, Builder is the interface, GamingComputerBuilder is the concrete builder, ComputerDirector is the director, and the Client assembles the product using the builder and director.
When to use Builder Design Pattern?
The Builder design pattern is used when you need to create complex objects with a large number of optional components or configuration parameters. This pattern is particularly useful when an object needs to be constructed step by step, some of the scenarios where the Builder design pattern is beneficial are:
- Complex Object Construction: When you have an object with many optional components or configurations and you want to provide a clear separation between the construction process and the actual representation of the object.
- Step-by-Step Construction: When the construction of an object involves a step-by-step process where different configurations or options need to be set at different stages.
- Avoiding constructors with multiple parameters: When the number of parameters in a constructor becomes too large, and using telescoping constructors (constructors with multiple parameters) becomes unwieldy and error-prone.
- Immutable Objects: When you want to create immutable objects, and the Builder pattern allows you to construct the object gradually before making it immutable.
- Configurable Object Creation: When you need to create objects with different configurations or variations, and you want a more flexible and readable way to specify these configurations.
- Common Interface for Multiple Representations: When you want to provide a common interface for constructing different representations of an object.
When not to use Builder Design Pattern?
While the Builder design pattern is beneficial in many scenarios, there are situations where it might be unnecessary. Here are some cases when you might want to reconsider using the Builder pattern:
- Simple Object Construction:
- If the object you are constructing has only a few simple parameters or configurations, and the construction process is straightforward, using a builder might be overkill. In such cases, a simple constructor or static factory method might be more appropriate.
- Performance Concerns:
- In performance-critical applications, the additional overhead introduced by the Builder pattern might be a concern. The extra method calls and object creations involved in the builder process could impact performance, especially if the object construction is frequent and time-sensitive.
- Immutable Objects with Final Fields:
- If you are working with a language that supports immutable objects with final fields (e.g., Java’s
final keyword), and the object’s structure is relatively simple, you might prefer using constructors with parameters or static factory methods.
- Increased Code Complexity:
- Introducing a builder class for every complex object can lead to an increase in code complexity. If the object being constructed is simple and doesn’t benefit significantly from a step-by-step construction process, using a builder might add unnecessary complexity to the codebase.
- Tight Coupling with Product:
- If the builder is tightly coupled with the product it constructs, and changes to the product require corresponding modifications to the builder, it might reduce the flexibility and maintainability of the code.
Like Article
Suggest improvement
Share your thoughts in the comments
Please Login to comment...