Normally authentication is seen using databases like MYSQL, Firebase, MongoDB, etc. One of the biggest drawbacks is the chance of the data getting corrupted. The data can be modified by anyone who is in control of the database itself.
To overcome the above problem here a web app authentication using blockchain will be created.
Components in Web Authentication Application:
- Ganache: A local Ethereum blockchain.
- Web3 JS: For the application to be able to communicate to the blockchain.
- Solidity: For compilation smart contract.
- React JS: For the application’s front-end.
- Truffle: For a development environment, asset pipeline, and testing framework for developing smart contracts.
- Metamask: For cryptocurrency wallet.
Step 1: Truffle Installation globally
Open your command prompt and install truffle using the below command:
npm install -g truffle@5.4.29
Step 2: React app installation
Follow the below steps to create the application:
npx create-react-app auth-app
cd auth-app
Now install all required modules for the project by using the below command:
npm install react-router-dom web3
Step 3: Working with frontend
Step 3.1: Open the “src” folder and select the App.js file.
This file contains routing logic, where routing helps the user to navigate different pages. Go through react-router-dom documentation to understand more about routing in React JS.
Below is the code for App.js file:
Javascript
import "./App.css";
import { BrowserRouter, Routes, Route, Navigate } from "react-router-dom";
import SignIn from "./Screens/Signin";
import SignUp from "./Screens/Signup";
import Home from "./Screens/Home";
function App() {
const email = localStorage.getItem("email");
return (
<div className="App">
<BrowserRouter>
<Routes>
<Route exact path="/" element={<SignIn />} />
<Route path="/Signup" element={<SignUp />} />
<Route
path="/Home"
element={email ? <Home /> : <Navigate to="/" />}
/>
</Routes>
</BrowserRouter>
</div>
);
}
export default App;
|
Step 3.2: Create the “Screens” folder and Create files “Signin.js”, “Signup.js”, “Home.js”.
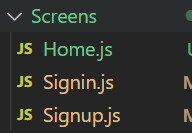
Screens folder
Step 3.3: Working with the Signin.js file
Here users need to enter their email and password. Below code authenticates the user’s input email and password and navigates to the home page:
Javascript
const res = await auth.methods.usersList(email).call();
if (res.password === password)
{
localStorage.setItem("email", email);
localStorage.setItem("account", accounts);
navigate("/Home");
}
else
{
alert("wrong user credentials or please signup");
}
|
1. If the user is not registered give an alert as the user is not found.
2. If the user entered the wrong credentials give an alert as the wrong password.
After Sign in success, users navigate to the home page
Signin.js:
Javascript
import * as React from "react";
import { loadBlockchainData, loadWeb3 } from "../Web3helpers";
import { useNavigate } from "react-router-dom";
export default function SignIn() {
const [email, setEmail] = React.useState("");
const [password, setPassword] = React.useState("");
const navigate = useNavigate();
const [accounts, setAccounts] = React.useState(null);
const [auth, setAuth] = React.useState(null);
const loadAccounts = async () => {
let { auth, accounts } = await loadBlockchainData();
setAccounts(accounts);
setAuth(auth);
};
const login = async () => {
if (!email || !password) {
alert("please fill all details");
return;
}
try {
const res = await auth.methods.usersList(email).call();
if (res.password === password) {
localStorage.setItem("email", email);
localStorage.setItem("account", accounts);
navigate("/Home");
} else {
alert("wrong user credentials or please signup");
}
} catch (error) {
alert(error.message);
}
};
React.useEffect(() => {
loadWeb3();
}, []);
React.useEffect(() => {
loadAccounts();
}, []);
return (
<div style={rootDiv}>
<img
style={image}
alt="geeks"
/>
<input
style={input}
value={email}
onChange={(e) => setEmail(e.target.value)}
placeholder="Email"
type="text"
/>
<input
style={input}
value={password}
onChange={(e) => setPassword(e.target.value)}
placeholder="Password"
type="password"
/>
<button style={button} onClick={login}>
{" "}
Sign In
</button>
<span
style={{ cursor: "pointer" }}
onClick={() => {
navigate("/Signup");
}}
>
{" "}
Create new account{" "}
</span>
</div>
);
}
const rootDiv = {
display: "flex",
flexDirection: "column",
alignItems: "center",
justifyContent: "center",
height: "100vh",
};
const input = {
width: 300,
padding: 10,
margin: 10,
borderRadius: 10,
outline: "none",
border: "2px solid grey",
fontSize: 17,
};
const button = {
width: 325,
padding: 10,
borderRadius: 10,
margin: 10,
cursor: "pointer",
fontSize: 17,
color: "white",
backgroundColor: "#9D27CD",
border: "none",
};
const image = {
width: 70,
height: 70,
objectFit: "contain",
borderRadius: 70,
};
|
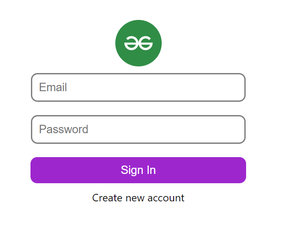
Sign in page
Step 3.4: Working with the Signup.js file
Here users need to Register/Signup with a username, email, and password. Below code creates a new user in the blockchain database
await auth.methods
.createUser(username, email, password)
.send({ from: accounts });
After Registration, the user navigates to the Sign-in page.
Signup.js
Javascript
import * as React from "react";
import { loadBlockchainData, loadWeb3 } from "../Web3helpers";
import { useNavigate } from "react-router-dom";
export default function SignUp() {
const [username, setUsername] = React.useState("");
const [email, setEmail] = React.useState("");
const [password, setPassword] = React.useState("");
const navigate = useNavigate();
const [accounts, setAccounts] = React.useState(null);
const [auth, setAuth] = React.useState(null);
const loadAccounts = async () => {
let { auth, accounts } = await loadBlockchainData();
setAccounts(accounts);
setAuth(auth);
};
const signUp = async () => {
if (!username || !email || !password) {
alert("please fill all details");
return;
}
var mailformat = /^\w+([\.-]?\w+)*@\w+([\.-]?\w+)*(\.\w{2,3})+$/;
if (!email.match(mailformat)) {
alert("please enter valid email address");
return;
}
try {
await auth.methods
.createUser(username, email, password)
.send({ from: accounts });
localStorage.setItem("username", username);
localStorage.setItem("email", email);
navigate("/");
} catch (e) {
console.log(e.message);
}
};
React.useEffect(() => {
loadWeb3();
}, []);
React.useEffect(() => {
loadAccounts();
}, []);
return (
<div style={rootDiv}>
<img
style={image}
alt="geeks"
/>
<input
style={input}
value={username}
onChange={(e) => setUsername(e.target.value)}
placeholder="Username"
type="text"
/>
<input
style={input}
value={email}
onChange={(e) => setEmail(e.target.value)}
placeholder="Email"
type="text"
/>
<input
style={input}
value={password}
onChange={(e) => setPassword(e.target.value)}
placeholder="Password"
type="password"
/>
<button style={button} onClick={signUp}>
{" "}
Sign Up
</button>
</div>
);
}
const rootDiv = {
display: "flex",
flexDirection: "column",
alignItems: "center",
justifyContent: "center",
height: "100vh",
};
const input = {
width: 300,
padding: 10,
margin: 10,
borderRadius: 10,
outline: "none",
border: "2px solid grey",
fontSize: 17,
};
const button = {
width: 325,
padding: 10,
borderRadius: 10,
margin: 10,
cursor: "pointer",
fontSize: 17,
color: "white",
backgroundColor: "#9D27CD",
border: "none",
};
const image = {
width: 70,
height: 70,
objectFit: "contain",
borderRadius: 70,
};
|
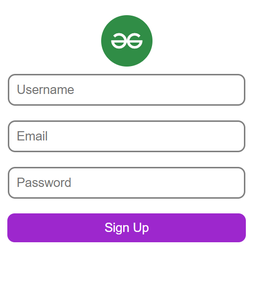
Sign Up page
Step 3.5: Working with the Home.js file
Here we find the user address and email
Home.js
Javascript
import React from "react";
import { useNavigate } from "react-router-dom";
export default function Home() {
const email = localStorage.getItem("email");
const account = localStorage.getItem("account");
const navigate = useNavigate();
return (
<div>
<h3>Your account: {account} </h3>
<h3>Your email: {email} </h3>
<button
style={button}
onClick={() => {
localStorage.removeItem("email");
localStorage.removeItem("account");
window.location.reload();
}}
>
{" "}
Log out
</button>
</div>
);
}
const button = {
width: 100,
padding: 10,
borderRadius: 5,
margin: 10,
cursor: "pointer",
fontSize: 17,
color: "white",
backgroundColor: "#9D27CD",
border: "none",
};
|
Step 3.6: Now create Web3helpers.js file in the src folder, to store web3 functions used for loading address from Metamask. Below is the code for Web3helpers.js file:
Javascript
import Web3 from "web3/dist/web3.min.js";
import Auth from "./build/contracts/Auth.json";
export const loadWeb3 = async () => {
if (window.ethereum) {
window.web3 = new Web3(window.ethereum);
await window.ethereum.enable();
} else if (window.web3) {
window.web3 = new Web3(window.web3.currentProvider);
} else {
window.alert(
"Non-Ethereum browser detected. You should consider trying MetaMask!"
);
}
};
export const loadBlockchainData = async () => {
const web3 = window.web3;
const accounts = await web3.eth.getAccounts();
const networkId = await web3.eth.net.getId();
if (networkId) {
const auth = new web3.eth.Contract(
Auth.abi,
Auth.networks[networkId].address
);
return { auth, accounts: accounts[0] };
}
};
|
Step 4 : Setting up Metamask and Ganache
- Install Metamask extension Ganache.
- First, open Ganache, Click on Quickstart, and 10 addresses with each 100 ETH coins will be visible.
- On top, one would be able to see Network id as 1337 and RPC server as HTTP://127.0.0.1:7545, if there are different id and server, go to settings, change them, and click on save, and restart.
- Now open Metamask, Go to settings -> Add networks -> Given below details exactly -> Click on save

Metamask network details
Step 5: Working with the Backend
- Create a smart contract which is a main part of Blockchain.
- Now open the command line -> Go to your auth-app (frontend) -> Apply the below commands.
cd src
truffle build
Now you are able to see folders “migrations”, “contracts”, and “build” in the src folder.
Step 5.1: Open the migrations folder and create a Javascript file as 2_deploy_migration.js.
Here we are deploying our smart contract that we are going to create
2_deploy_migration.js:
Javascript
const Auth = artifacts.require("Auth");
module.exports = function (deployer) {
deployer.deploy(Auth);
};
|
Step 5.2: Open the contracts folder and create a solidity file as “Auth.sol”.
Here a smart contract will be created for our authentication. Below is the code for defining a map with a struct:
 mapping(string => user) public usersList;

     struct user{
      string username;
      string email;
      string password;
  }
The below function takes parameters of the user’s email, password, and username and maps user details to the user email:
function createUser(string memory _username,
                    string memory _email,
                    string memory _password) public
{
    userCount++;
    usersList[_email] = user(_username,_email,_password);
    emit userCreated(_username,_email,_password);
}
Auth.sol:
Solidity
pragma solidity >=0.4.22 <0.9.0;
contract Auth
{
uint public userCount = 0;
mapping(string => user) public usersList;
struct user
{
string username;
string email;
string password;
}
event userCreated(
string username,
string email,
string password
);
function createUser(string memory _username,
string memory _email,
string memory _password) public
{
userCount++;
usersList[_email] = user(_username,
_email,
_password);
emit userCreated(_username,
_email,
_password);
}
}
|
Step 6: Apply the below command it will create a contract address:
truffle migrate --reset

contract address
Step 7: Adding accounts to Metamask from ganache
- Open Ganache, click on the key icon of any address copy the private key.
- Open Metamask -> select ganache network -> Click on profile (right top) -> Click on import account -> paste the copied private key.
- Now you are able to see 100 ETH coins in your account.
Step 8: Running and Building the application: We can run this application by using the following command. This will start React’s development server that can be used for debugging our application.
npm run start
- Once the webpage opens connect your Metamask account.
- Click on “Not connected” and it will connect.

Connect account
Output:

output
Now Authentication using Blockchain is completed. Check out git repo for full code.
Like Article
Suggest improvement
Share your thoughts in the comments
Please Login to comment...