Bootstrap | Navigation Bar
Last Updated :
15 Feb, 2023
In this article, we will learn to create a Navigation Bar. A navigation bar is used in every website to make it more user-friendly so that the navigation through the website becomes easy and the user can directly search for the topic of their interest.
Navbar: Bootstrap provide various types of navigation bar:
- Basic Navbar
- Inverted Navbar
- Coloured Navigation Bar
- Right-Aligned Navbar
- Fixed Navigation Bar
- Drop-Down menu Navbar
- Collapsible Navigation Bar
We will see separately:
Basic Navbar: First of all, we will initialize it by using a nav tag which is an inbuilt tag just like the paragraph tag and the header tags. Within this tag, we will call the class=”navbar navbar-default” which are the inbuilt classes of the bootstrap that give the top space of your web page to your navigation part and the default part is for the default view of that bar which is white in color. Then going further, we will have two div tags one class=”container-fluid” and the other class=”navbar-header”. These classes are basically for the navigation bar to take the full upper width of the page and then we add the homepage and the other links to it.
Example:
HTML
<!DOCTYPE html>
<html lang="en">
<head>
<title>Bootstrap Example</title>
<meta charset="utf-8">
<meta name="viewport"
content="width=device-width, initial-scale=1">
<link rel="stylesheet" href=
<script src=
</script>
<script src=
</script>
</head>
<body>
<nav class="navbar navbar-default">
<div class="container-fluid">
<div class="navbar-header">
<a class="navbar-brand" href="#">
WebSiteName</a>
</div>
<ul class="nav navbar-nav">
<li class="active"><a href="#">Home</a></li>
<li><a href="#">Page 1</a></li>
<li><a href="#">Page 2</a></li>
<li><a href="#">Page 3</a></li>
</ul>
</div>
</nav>
</body>
</html>
|
Output:

Inverted Navbar: It is quite similar to what we studied earlier in the Basic Navbar section. The change comes inside the class associated with the nav tag i.e. instead of the navbar-default we will use the navbar-inverse and the colors of the navigation bar get inverted.
Example:
HTML
<!DOCTYPE html>
<html lang="en">
<head>
<title>Bootstrap Example</title>
<meta charset="utf-8">
<meta name="viewport"
content="width=device-width, initial-scale=1">
<link rel="stylesheet" href=
<script src=
</script>
<script src=
</script>
</head>
<body>
<nav class="navbar navbar-inverse">
<div class="container-fluid">
<div class="navbar-header">
<a class="navbar-brand" href="#">
WebSiteName</a>
</div>
<ul class="nav navbar-nav">
<li class="active"><a href="#">Home</a></li>
<li><a href="#">Page 1</a></li>
<li><a href="#">Page 2</a></li>
<li><a href="#">Page 3</a></li>
</ul>
</div>
</nav>
</body>
</html>
|
Output:

Coloured navigation Bar : In Bootstrap 4, To change the background colour of the navigation bar we can use various classes with the nav tag-
- .bg-primary – Blue
- .bg-success – Green
- .bg-warning – Yellow
- .bg-danger – Red
- .bg-secondary – Grey
- .bg-dark – Black
- .bg-light – White
Use .bg-color class to change the color of the navbar to the above-listed colors.
HTML
<!DOCTYPE html>
<html lang="en">
<head>
<title>Bootstrap Example</title>
<meta charset="utf-8">
<meta name="viewport"
content="width=device-width, initial-scale=1">
<link rel="stylesheet" href=
<script src=
</script>
<script src=
</script>
</head>
<body>
<nav class="navbar navbar-default">
<div class="container-fluid">
<div class="navbar-header">
<a class="navbar-brand" href="#">
WebSiteName</a>
</div>
<ul class="nav navbar-nav">
<li class="active"><a href="#">
Home</a></li>
<li class="bg-primary"><a href="#">
Page 1</a></li>
<li class="bg-success"><a href="#">
Page 2</a></li>
<li class="bg-danger"><a href="#">
Page 3</a></li>
<li class="bg-warning"><a href="#">
Page 4</a></li>
</ul>
</div>
</nav>
</body>
</html>
|
Output:

Right-Aligned Navbar: By default, the links on a navigation bar are arranged on the left, To arrange the links on the right side of the navigation bar In this section, we will see that in the navigation bar not only the space on the left but also in the right can be used. This makes the navigation bar much more interactive. The change comes inside the last div tag in which the list is present to be shown on the navbar. We simply add a new class in the already existing class i.e. class= “nav navbar-nav” and we add navbar-right to it. Now we can see the content on the right side of the navigation bar too. The content that will be written last will appear closer to the center of the screen.
Example:
HTML
<!DOCTYPE html>
<html lang="en">
<head>
<title>Bootstrap Example</title>
<meta charset="utf-8">
<meta name="viewport"
content="width=device-width, initial-scale=1">
<link rel="stylesheet" href=
<script src=
</script>
<script src=
</script>
</head>
<body>
<nav class="navbar navbar-inverse">
<div class="container-fluid">
<div class="navbar-header">
<a class="navbar-brand" href="#">
WebSiteName</a>
</div>
<ul class="nav navbar-nav">
<li class="active"><a href="#">Home</a></li>
<li><a href="#">Page 1</a></li>
<li><a href="#">Page 2</a></li>
<li><a href="#">Page 3</a></li>
</ul>
<ul class="nav navbar-nav navbar-right">
<li><a href="#">
<span class="glyphicon glyphicon-user"></span>
Register</a></li>
<li><a href="#">
<span class="glyphicon glyphicon-log-in"></span>
Login</a></li>
</ul>
</div>
</nav>
</body>
</html>
|
Output:

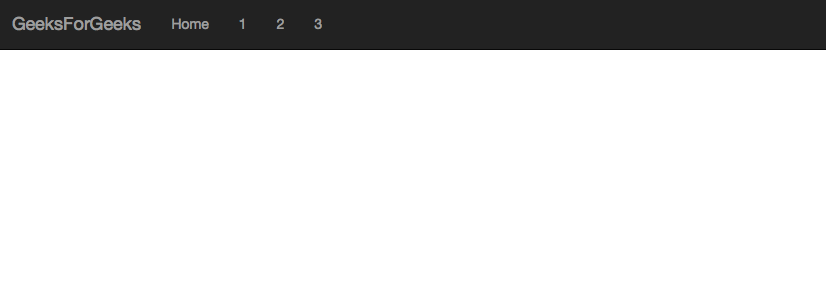
Fixed Navigation Bar: We can fix a navigation bar at the top of the webpage so that, if you scroll down that webpage you can still view the navigation bar from any position on the page. Scroll down the GeeksForGeeks HomePage to see this effect.
To make a navigation bar fixed at the top of the webpage, add a navbar-fixed-top class to the navbar like this :
HTML
<!DOCTYPE html>
<html lang="en">
<head>
<title>Bootstrap Example</title>
<meta charset="utf-8">
<meta name="viewport"
content="width=device-width, initial-scale=1">
<link rel="stylesheet" href=
<script src=
</script>
<script src=
</script>
</head>
<body>
<nav class="navbar navbar-inverse navbar-fixed-top">
<div class="container-fluid">
<div class="navbar-header">
<a class="navbar-brand" href="#">
GeeksForGeeks</a>
</div>
<ul class="nav navbar-nav">
<li class="active"><a href="#">
Home</a></li>
<li><a href="#">1</a></li>
<li><a href="#">2</a></li>
<li><a href="#">3</a></li>
</ul>
</div>
</nav>
</body>
</html>
|
Output:
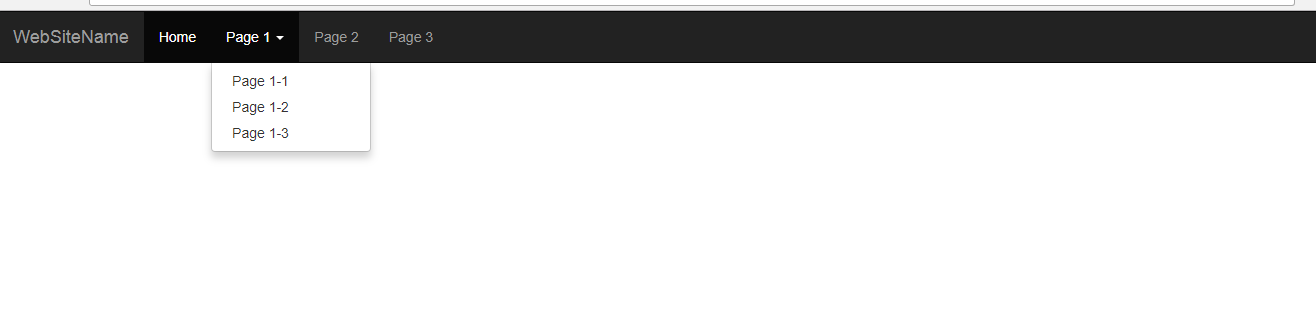
Drop-Down Menu Navbar: This is a good approach to be used in designing a navigation bar because if we are creating a website that has a lot of content in it and is quite big to scroll then we can use this approach. The benefit of this approach is that the whole navigation bar does not get occupied with these links. In this, the only change is the introduction of a drop-down menu after the addition of the homepage. We will initialize a div tag with class=”dropdown” to make a drop-down interface and after that, we can add the content to it.
Example:
HTML
<!DOCTYPE html>
<html lang="en">
<head>
<title>Bootstrap Example</title>
<meta charset="utf-8">
<meta name="viewport"
content="width=device-width, initial-scale=1">
<link rel="stylesheet" href=
<script src=
</script>
<script src=
</script>
</head>
<body>
<nav class="navbar navbar-inverse navbar-fixed-top">
<div class="container-fluid">
<div class="navbar-header">
<a class="navbar-brand" href="#">WebsiteName</a>
</div>
<ul class="nav navbar-nav">
<li class="active"><a href="#">Home</a></li>
<li class="dropdown">
<a class="dropdown-toggle"
data-toggle="dropdown" href="#">
Page 1<span class="caret"></span></a>
<ul class="dropdown-menu">
<li><a href="#">Page 1-1</a></li>
<li><a href="#">Page 1-2</a></li>
<li><a href="#">Page 1-3</a></li>
</ul>
</li>
<li><a href="#">Page 2</a></li>
<li><a href="#">Page 3</a></li>
</ul>
</div>
</nav>
</body>
</html>
|
Output:
Collapsible Navigation Bar: To hide links on the navigation bar and make them visible after clicking a button, we add a collapsible navigation bar.
Add a navbar-toggle class to a button, then add data-toggle=”collapse”, then add an id to the list of links and add the name of that id inside data-target=”#id”. Then finally, wrap all the content of the navbar inside a div element with class navbar-collapse collapse
HTML
<!DOCTYPE html>
<html lang="en">
<head>
<title>Bootstrap Example</title>
<meta charset="utf-8">
<meta name="viewport"
content="width=device-width, initial-scale=1">
<link rel="stylesheet" href=
<script src=
</script>
<script src=
</script>
</head>
<body>
<nav class="navbar navbar-inverse navbar-fixed-top">
<div role="navigation">
<div class="container">
<div class="navbar-header">
<button class="navbar-toggle"
type="button" data-toggle="collapse"
data-target=".navbar-collapse">
<span class="sr-only">Toggle navigation</span>
<span class="icon-bar"></span>
<span class="icon-bar"></span>
<span class="icon-bar"></span>
</button>
<a href="#" class="navbar-brand">GeeksforGeeks</a>
</div>
<div class="navbar-collapse collapse">
<ul class="nav navbar-nav navbar-right">
<li class="active"><a href="#">Home</a></li>
<li> <a href="#">About</a> </li>
<li><a href="#">Contact</a> </li>
</ul>
</div>
</div>
</div>
</nav>
</body>
</html>
|
Output:

Supported Browser:
- Google Chrome
- Internet Explorer
- Firefox
- Opera
- Safari
Like Article
Suggest improvement
Share your thoughts in the comments
Please Login to comment...