Best Practices for Using Text in Android
Last Updated :
16 Jun, 2021
Text is the most widely used element in Android apps. Text is used in the form of a TextView or an EditText. As a result, in order to improve our performance, we must make the greatest use of text. We’ll explore some of the best practices for using text on Android in this article.
- Text Design
- Text Performance Improvement
- The Android System Fonts
- The Custom Font Legacy
1. Text Design
The first step which shall be taken in this regard is to design the text. We modify the appearance and feel of the text by styling it. This can be accomplished in a variety of ways viz:
Using the styles.xml file
You may set a style for your TextViews in the styles.xml file and then use that style whenever you require a TextView. As an example, consider the following:
XML
<style name="GeeksforGeeks.Widget.Text.Body" parent="Something">
<item name="android:textSize">14sp</item>
<item name="android:textColor">?android:attr/purple_500</item>
</style>
<TextView
...
style:"@style/GeeksforGeeks.Widget.Text.Body"
/>
|
The style of TextView in the upcoming example will be comparable to the styles defined in this styles.xml file.
TextView Properties are Used
TextView characteristics such as textColor, fontFamily, and others can be used to design the text. As an example, consider the following:
XML
<TextView
...
android:text="Geeks for Geeks"
android:textColor="@color/purple_500"
android:textSize="16sp"
android:textStyle="bold"
...
/>
|
However, the difficulty with this approach is that we can only style one TextView with the above way. You’ll have to use the style.xml method (as mentioned in the previous example for a uniform effect). Now, there may be times when you just want to update a few characteristics of a TextView while keeping the rest the same as other TextViews in the application. For example, you could wish to change the fontFamily of a TextView to Roboto.
What is the best way to accomplish this you ask? Let’s have a look.
Order of precedence
So, we’d want to modify the textSize of one TextView while keeping the rest of the characteristics the same. We may achieve this by manually adding the textSize property to the TextView we want. Consider the following scenario:
XML
<TextView
...
android:text="Geeks for Geeks"
style:"@style/GeeksforGeeks.Widget.Text.Body"
android:textSize="14sp"
/>
|
According to the above example, you will notice that even if every view has a default style, but if we add another style manually, it will override the default style. As a result, the following is the order of precedence:
TextAppearance > View > Style > Default Style
2. Text Performance Improvement
An Android application’s performance is critical. As we all know, the text takes up over 70% of the screen real estate in an Android app, and as a result, the app’s performance is heavily reliant on text. As a result, Android developers all around the world used a variety of approaches to accomplish this. The following modifications were announced during Google I/O 2019:
Hyphenation: In Android Q and AppCompact v1.1.0, hyphenation is now disabled by default. Because hyphenation has a significant influence on text performance, this is done. To be more specific, hyphenation accounts for 70% of the text effort. You must manually add the hyphenation code if you wish to enable hyphenation. Set the hyphenation frequency to normal in the style.xml file to achieve this:
Precomputed Text is a tool that is used in the background thread to conduct text operations. As a result, it does 90% of the TextView labor. It’s available starting with API 21. New utility APIs for simple interaction with RecyclerView prefetch were implemented in Google I/O 2019. To use this amazing piece of formatting drive the following code and do note that it is in Kotlin
Kotlin
override fun onBindViewHolder(viewHolder: ViewHolder, pos:Int) {
viewHolder.textView.setTextFuture(
PrecomputedTextCompat.getTextFuture(
dataSet[pos],
viewHolder.textView.getTextMetricsParamsCompat(),
null)
)
}
|
3. The Android System Fonts
More than 100 languages are supported by Android, and each of these languages may require distinct font files. The Hindi typeface, for example, requires the Devanagari font. As a result, Android devices include a high number of font files to support a huge number of languages. To draw text, NDK apps such as document viewers must first determine whether system font is capable of rendering the provided text.
4. The Custom Font Legacy
Because there are so few fonts accessible on Android (by default), the notion of downloaded fonts was born. Look at the Image Below:
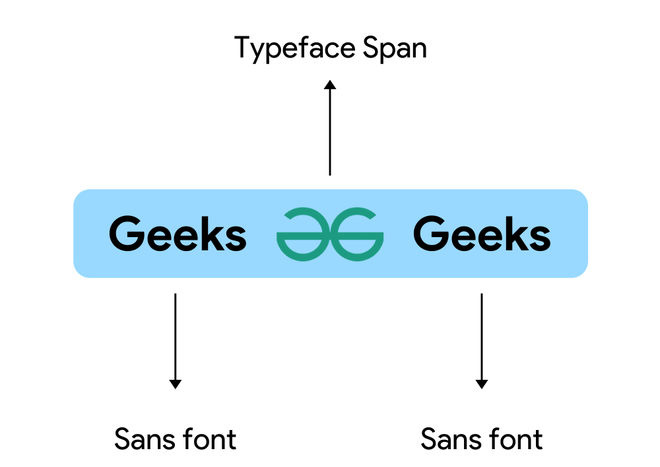
Image I. The Custom Font Triage
There is only one button here, and on the button is a GfG Logo with inscriptions on both sides. So, for the logo, we’d want to use a different font, and for the rest of the text, we’d want to use a different font. However, we’ll be in difficulty since a button can only have one typeface, which can be accomplished by having just one font family. However, we’ll need two font families in this case (one for text and the other for the icon). Here, we may use a typeface span, insert the logo font, and cover the icon character, after which we may pick any font for the entire button. Things get worse if we have more than one language supported by several typefaces. We can’t utilize spans in this situation. As a result, CustomFallbackBuilder has been introduced to the Typeface class in Android Q. It allows you to make a typeface or font family with several fonts. An example of multi-language and multi-font is as follows:
Java
textView.typeface = Typeface.CustomFallbackBuilder(
FontFamily.Builder(Font.Builder(assets, "sans.ttf").build()).build()).addCustomFallback(
FontFamily.Builder(Font.Builder(assets, "sansPro.ttf").build()).build()).build()
|
You can use this builder to create a typeface with up to 64 font families, but you can’t combine typefaces that are conceptually different. Also, fonts of the same style cannot be included in the same font family. In general, the system searches for typefaces in a sequential manner. If the typeface is sans, for example, it will look for sans. If sans is available, that font will be allocated; otherwise, the system will fall back to using the system font.
Java
Typeface.CustomFallbackBuilder(
FontFamily.Builder(Font.Builder(assets, "sans.ttf").build()).build()).setSystemFallback("sans-serif").build()
|
That’s it for this article, hope you enjoyed this article and it makes you a pro in Text for Android!
Like Article
Suggest improvement
Share your thoughts in the comments
Please Login to comment...