Automation Using Selenium in C# With Example
Last Updated :
14 Jun, 2022
Selenium is an open-source Web UI automation testing suite. It was developed by Jason Huggins in 2004 as an internal tool at Thought Works. It supports automation across different browsers, platforms, and programming languages which includes Java, Python, C#, etc. It can be easily be deployed on Windows, Linux, Solaris, and Macintosh Operating Systems. It also provides the support for different OS (Operating System) for mobile applications like iOS, windows mobile and android.
Selenium consists of drivers specific to each language. Selenium Web driver is mostly used with Java and C#. Test scripts can be coded in selenium in any of the supported programming languages and can be run directly in most of the modern web browsers which include Internet Explorer, Microsoft Edge, Mozilla Firefox, Google Chrome, Safari, etc.
Steps for Automation Using Selenium in C#
Selenium WebDriver is set up for C# in which test cases are made for testing. For this first, make a new project in C# in visual studio. For installing and setting up Visual Studio, you can read the article How to Install and Setup Visual Studio for C#?. We make this project with the name Selenium Automation, and make it as a C# application. Proceed the steps as follows:
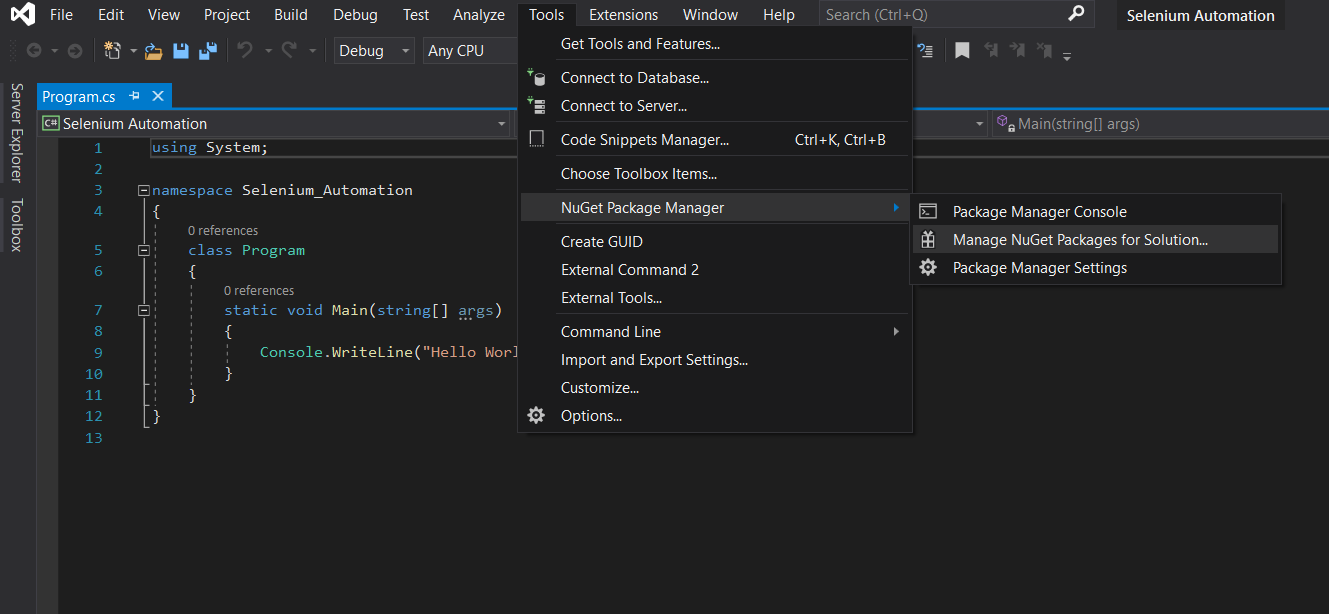
Step 1: First download the Selenium Web Driver. For Downloading the WebDriver go to Tools option then select Nuget Package Manager and then Manage Nuget Packages for Solution.
Step 2: In the Search Bar on the top, search for Selenium. Select Selenium.WebDriver and check the Project checkbox, here it will be Selenium Automation and click on Install.

Step 3: After that, a dialogue box will open asking to accept the licenses. This will start the installation process and install the selenium WebDriver.


Once Visual Studio is finished with the successful installation of the Selenium WebDriver, it will show output in logs
Writing the First Selenium C# Test
After setting up the selenium on C#, its ready for working. In the following steps it is a guide to make the first test case. At the top of your project import two namespaces as following:
using OpenQA.Selenium;
using OpenQA.Selenium.ChromeDriver;
Download the Chrome driver from ChromeWebDriver according to the Chrome browser version. Unzip the file and copy the path of the file into the ‘ChromeDriver’ Constructor in the code written below. Add the following code in your static void Main section to test it. The final code look like:
csharp
using OpenQA.Selenium;
using OpenQA.Selenium.Chrome;
using System;
namespace Selenium_Automation
{
class Program
{
static void Main(string[] args)
{
IWebDriver driver = new ChromeDriver("Path to Chrome Driver");
}
}
}
|
Output:


After the above procedure run the test case. Note that this code will not execute unless Chrome driver for the Selenium is not downloaded and unzipped on the system.
Like Article
Suggest improvement
Share your thoughts in the comments
Please Login to comment...