Automatic color correction with OpenCV and Python
Last Updated :
17 Apr, 2023
Colour correction is an important aspect of image processing and is used to correct any colour imbalances in an image. OpenCV is an open-source library for computer vision and image processing tasks that provides several functions and tools to analyze and manipulate images.
In this tutorial, we will explore how to perform automatic colour correction using OpenCV and Python. The following concepts will be covered in this tutorial:
- Histogram Equalization: This technique is used to enhance the contrast of an image by adjusting the intensity distribution of the image.
- Colour Space Conversion: Images are usually represented in RGB colour space, but other colour spaces such as HSV and LAB can be used for colour correction.
- Image Filtering: Different filters can be applied to an image to enhance the colour balance and remove any colour casts.
Now, let’s look at some examples of how to perform automatic colour correction using OpenCV and Python.
Example 1:
Histogram Equalization
STEPS:
- Load the image using cv2.imread function.
- Convert the image to grayscale using cv2.cvtColor function with COLOR_BGR2GRAY parameter.
- Apply histogram equalization using cv2.equalizeHist function.
- Display the equalized image using cv2.imshow function.
- Wait for a keyboard event using cv2.waitKey function.
Python3
import cv2
img = cv2.imread('image.jpg')
gray = cv2.cvtColor(img, cv2.COLOR_BGR2GRAY)
equalized = cv2.equalizeHist(gray)
cv2.imshow('Equalized Image', equalized)
cv2.waitKey(0)
|
Output:
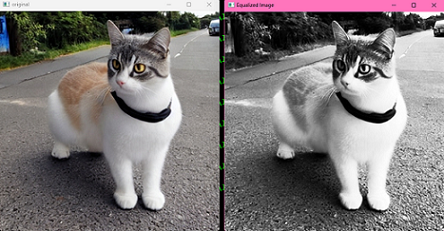
histogram equalized image
Example 2:
Colour Space Conversion
STEPS:
- Import necessary libraries including OpenCV.
- Load the input image using cv2.imread function.
- Convert the input image from BGR color space to LAB colour space using cv2.cvtColor function.
- Split the LAB image into three separate channels using cv2.split function.
- Create a CLAHE object using cv2.createCLAHE function.
- Apply CLAHE to the L channel using the apply method of the class object.
- Merge the LAB channels back together using cv2.merge function.
- Convert the corrected LAB image from LAB colour space to BGR colour space using cv2.cvtColor function.
- Display the output image using cv2.imshow function and wait for a key press using cv2.waitKey function.
Python3
import cv2
img = cv2.imread('image.jpg')
lab = cv2.cvtColor(img, cv2.COLOR_BGR2LAB)
l, a, b = cv2.split(lab)
clahe = cv2.createCLAHE(clipLimit=3.0, tileGridSize=(8,8))
l = clahe.apply(l)
lab = cv2.merge((l,a,b))
output = cv2.cvtColor(lab, cv2.COLOR_LAB2BGR)
cv2.imshow('Color space conversion ', output)
cv2.waitKey(0)
|
Output:

color space conversion
Example 3:
Image Filtering
STEPS:
- Import the OpenCV library.
- Load the input image using the cv2.imread function.
- Apply a bilateral filter to the image using the cv2.bilateralFilter function with the parameters 15, 75, and 75.
- Display the output image using the cv2.imshow function and wait for a key press using the cv2.waitKey function.
Python3
import cv2
img = cv2.imread('image.jpg')
filtered = cv2.bilateralFilter(img, 15, 75, 75)
cv2.imshow('Color Corrected Image', filtered)
cv2.waitKey(0)
|
Output:

colour corrected image
Share your thoughts in the comments
Please Login to comment...