Android Emulator is Not Able to Access the Internet
Last Updated :
31 Aug, 2022
An Android Emulator is used to simulate Android devices on any computer. It proves to be handy for testing an application on a variety of devices and Android API levels without requiring each physical device. It also offers the following advantages:
- Flexibility: The emulator provides predefined configurations for various Android phones, tablets, Wear OS, and Android TV devices. It can simulate a variety of devices and Android API levels.
- High Accuracy: The emulator provides almost all of the capabilities of a real Android device. It can simulate incoming phone calls and text messages, specify the location of the device, simulate different network speeds, simulate rotation and other hardware sensors, access the Google Play Store, and much more.
- Speed: Testing an app on the emulator is in some ways faster and easier than doing so on a physical device. For example, data transferring to an emulator is faster than that via a USB cable to an actual device.
In most cases, the emulator is the best choice for testing needs.
What are we going to learn in this article?
Nowadays, almost all android applications require Internet access. The problem arises when the emulator is unable to access the Internet and the developer is not willing to run the application on his/her physical device. In this article, we will be learning a few solutions to fix this problem. The problem statement may appear like this as shown in the video below:
Solutions
Method 1:
First of all, try Cold Booting the emulator. A cold boot refers to the general process of starting the hardware components of a computer, laptop, or server to the point that its operating system and all startup applications and services are launched. Cold boot is also known as hard boot, cold start, or dead start. This trick works in most cases. The Cold Boot button is located under the dropdown button in the Device Manager section of Android Studio as shown below:
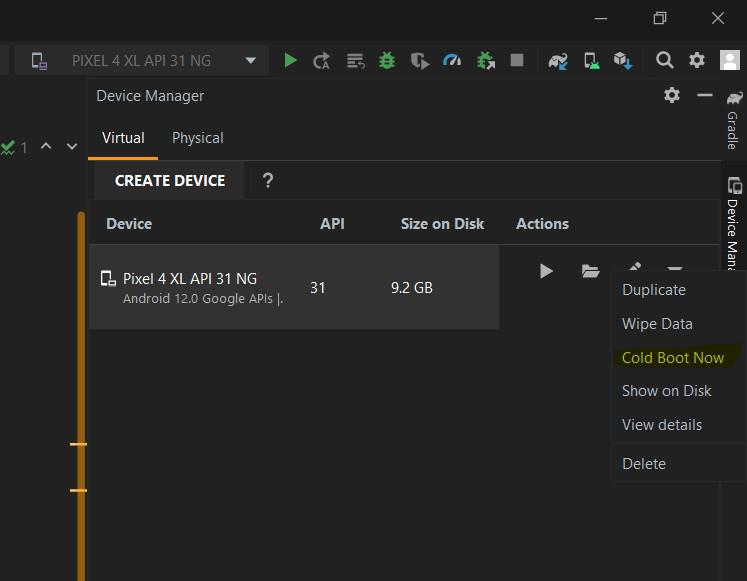
Location of Cold Boot Button
After the cold boot is completed, restart the desired application and check whether the problem is resolved or not. If yes, Congratulations! Otherwise, check out the next two methods.
Method 2:
Check whether the permission for accessing the internet is added in the Manifest.XML file or not. Add the following permission if not added.
<uses-permission android:name = “android.permission.INTERNET”/>
Restart the application after checking the permission. If the problem persists, go through the third method.
Method 3:
Try to change the DNS address of your network to Google’s DNS i.e. 8.8.8.8 or any other DNS of your choice. It changes the DNS “switchboard” operator from the user’s ISP to Google Public DNS. In most cases, the Dynamic Host Configuration Protocol (DHCP) automatically configures the system to use the IP addresses of your ISP’s domain name servers. To use Google Public DNS, it is required to explicitly change the DNS settings in the operating system or device to use the Google Public DNS IP addresses. The procedure for changing the DNS settings varies according to the operating system and version (Windows, Mac, Linux, or Chrome OS) or the device (computer, phone, or router). Depending on your system you may also have the option of enabling a new privacy-oriented feature called DNS-over-TLS. This feature provides privacy and security for the DNS messages sent between your device and Google’s DNS servers.
Important: Before you start
Before you change your DNS settings to use Google Public DNS, be sure to write down the current server addresses or settings on a piece of paper. It is very important that you keep these numbers for backup purposes, in case you need to revert to them at any time.
Google Public DNS IP addresses:
- The Google Public DNS IP addresses (IPv4) are as follows: 8.8.8.8 and 8.8.4.4
- The Google Public DNS IPv6 addresses are as follows: 2001:4860:4860::8888 and 2001:4860:4860::8844
Some devices require explicit values for all eight fields of IPv6 addresses and cannot accept the abbreviated :: IPv6 address syntax. For such devices enter:
2001:4860:4860:0:0:0:0:8888 or 2001:4860:4860:0:0:0:0:8844
Expand the 0 entries to 0000 if four hexadecimal digits are required. You can use either address as your primary or secondary DNS server.
Important: For the most reliable DNS service, configure at least two DNS addresses. Do not specify the same address as both primary and secondary.
Change your DNS servers settings:
Many systems let you specify multiple DNS servers, to be contacted in priority order. In the following instructions, we provide steps to specify only the Google Public DNS servers as the primary and secondary servers, to ensure that your setup correctly uses Google Public DNS in all cases.
Note: Depending on your network setup, you may need administrator/root privileges to change these settings.
Windows
DNS settings are specified in the TCP/IP Properties window for the selected network connection.
Example: Changing DNS server settings on Windows 10.
- Go to the Control Panel.
- Click Network and Internet > Network and Sharing Center > Change adapter settings.
- Select the connection for which you want to configure Google Public DNS. For example: To change the settings for an Ethernet connection, right-click the Ethernet interface and select Properties. To change the settings for a wireless connection, right-click the Wi-Fi interface and select Properties. If you are prompted for an administrator password or confirmation, type the password or provide confirmation.
- Select the Networking tab. Under This connection uses the following items, select Internet Protocol Version 4 (TCP/IPv4) or Internet Protocol Version 6 (TCP/IPv6) and then click Properties.
- Click Advanced and select the DNS tab. If there are any DNS server IP addresses listed there, write them down for future reference, and remove them from this window. Click OK.
- Select Use the following DNS server addresses. If there are any IP addresses listed in the Preferred DNS server or Alternate DNS server, write them down for future reference.
- Replace those addresses with the IP addresses of the Google DNS servers:
- For IPv4: 8.8.8.8 and/or 8.8.4.4.
- For IPv6: 2001:4860:4860::8888 and/or 2001:4860:4860::8844.
- For IPv6-only: you can use Google Public DNS64 instead of the IPv6 addresses in the previous point.
- Test that your setup is working correctly.
Repeat the procedure for additional network connections you want to change.
Note: There is no support for DNS-over-TLS in the base OS. To use DNS-over-TLS requires setting up a proxy resolver that supports DNS-over-TLS. Due to the complexity of the setup, we do not describe it here.
Test your new settings
To test that the Google DNS resolver is working:
- From your browser, enter a hostname URL (such as http://www.google.com/). If it resolves correctly, quit the browser, load the page again, and refresh it several times to make sure the result is not from a cached web page.
- If you are using Google Public DNS64 on an IPv6-only system, repeat the above test with an IPv4-only hostname URL (such as http://ipv4.google.com/). If all of these tests work, everything is working correctly. If not, go to the next step.
- From your browser, type in a fixed IP address. You can use http://216.218.228.119/ (which points to the test-ipv6.com website) as the URL.
- If you are using Google Public DNS64 on an IPv6-only system, use http://[64:ff9b::d8da:e477]/ as the URL instead. If this test does not work, you do not have access to a NAT64 gateway at the reserved prefix 64:ff9b::/96 and cannot use Google Public DNS64.
- If you are using an IPv6-only system without Google Public DNS64, use http://[2001:470:1:18::119]/ as the URL instead.
- If this works correctly, reload the page with a newly opened browser to make sure the page is loaded from scratch. If these tests work (but step 1 fails), then there is a problem with your DNS configuration; check the steps above to make sure you have configured everything correctly. If these tests do not work, go to the next step.
- Roll back the DNS changes you made and run the tests again. If the tests still do not work, then there is a problem with your network settings; contact your ISP or network administrator for assistance.
Switch Back to your old DNS settings
If you had not previously configured any customized DNS servers, to switch back to your old settings, in the window in which you specified the Google IP addresses, select the option to enable obtaining DNS server addresses automatically, and/or delete the Google IP addresses. This reverts your settings to using your ISP’s default servers. If you need to manually specify any addresses, use the procedures above to specify the old IP addresses. Restart your system if necessary.
Output:
Share your thoughts in the comments
Please Login to comment...