Android Annotation Processing
Last Updated :
23 Jul, 2021
You’ve undoubtedly seen a lot of annotations as an Android developer: They’re those strange code components that begin with @ and sometimes have parameters connected to them. Annotations link metadata to other code components, allowing you to include extra information in your code. Annotations may be used to produce new source files based on that information using annotation processing.

Image 1. An android annotation.
In the example image shown above the “@” followed by the word, Override is actually what is known as an Android Annotation. In this article, we will know about the same in detail.
Overview
Annotation processing is used by several well-known libraries in Android development, including Picasso, Glide, PlaceHolderView, and others. Annotation processing has evolved into one of the most critical language features in current Java programming. Java has supported annotation processing since the introduction of Java 5, although its full potential has only recently been realized. In layman’s terms, annotation processing is used to produce files during compilation. But before you get too much into the annotation, here’s a note:
GeekTip: Annotation processing may only be used to create new files and cannot be used to change existing ones. Annotation processing is used for many types of files, not just.java files.
How Exactly do the Annotations Generate the files?
Many compilation cycles are spent on annotation processing. During each cycle, the compiler reads a java source file and looks for annotations that have been registered for processing before calling the relevant annotation processor. This cycle continues until a file is produced or it ends if no file is generated in that cycle. Without further ado, let’s go on and create a simple annotation ourselves! It may sound overwhelming but is actually easy.
Step #1: Creating a new Module
The first step is to build a new module that will house your annotations. Go to Android Studio and then click on File -> New ->New Module then choose Kotlin and after that, you need to add a name to the module like you usually do with your android projects.
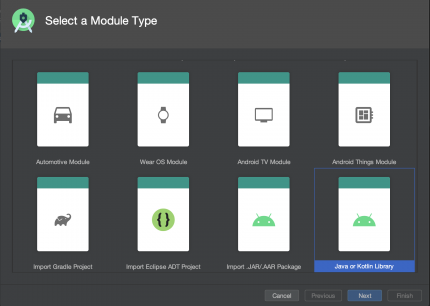
Image 2. Selecting the Module
AdapterModel is now a regular Kotlin class, but converting it to an annotation class is straightforward. Simply place the annotation keyword in front of the class. As an example:
Step #2: Configuring the Module
- Name the module gfg-annotations.
- Set the package to com.geeksforgeeks.gfg_annotations.
- Set the class name to AdapterModule.
- Set the language as kt or Kotlin.
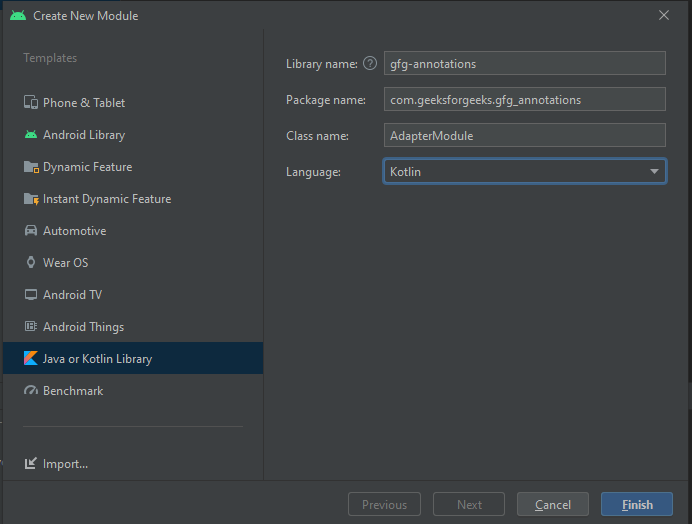
Image 3. Configuring the Module.
Press ‘Finish’ after that to create your new annotation module!
Note: AdapterModule is now a regular Kotlin class, but converting it to an annotation class is straightforward. Simply place the annotation keyword in front of the class. Like:
annotation class AdapterModule
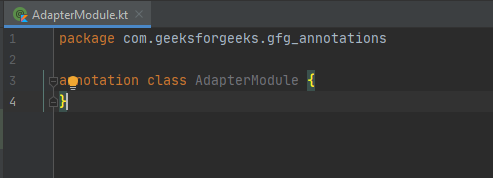
Image 4. Making the standard module as an annotation.
Step #3: Adding Functionality to the Annotation
Even if you’re creating a basic annotation, you can’t help but use additional annotations on it! Two common annotations will be used to annotate your annotation classes. The very first one is creating a value data object like the one mentioned below:
Kotlin
annotation class AdapterModule(val layoutId: Int)
|
Step #4: Adding Another Annotation
Only one annotation is not enough to make the module worth using, as a fact all the modern days’ libraries which are mentioned in the former part of this article have used around 100s of different annotations to achieve the functionality. Although the issue of annotation usage and consumption is vast and complex, it all comes down to achieving more with less. That is, less code (annotations) magically transforms into greater functionality, and annotation processing catalyzes this computational alchemy.
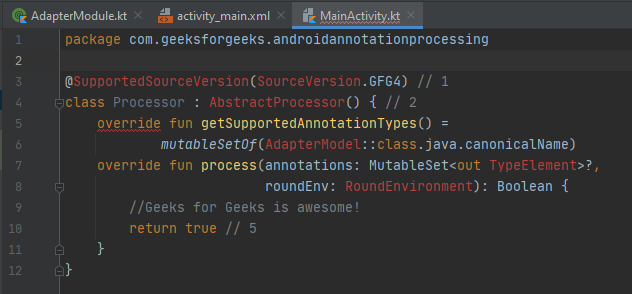
Image 5. Adding another Annotation to the Module.
Don’t worry about all the red lines of the codes, they are just persistent as a warning because the module isn’t published with proper documentation, and adding the documentation to them will remove them, as in the Android Project on GitHub all the red lines are removed.
The final version of this project may be downloaded by clicking here.
Like Article
Suggest improvement
Share your thoughts in the comments
Please Login to comment...