Amazon RDS – Rebooting a DB Instance
Last Updated :
27 Mar, 2023
This article is a step by step guide for Rebooting a DB Instance. But before learning the process of rebooting an instance, we need to know about DB Instances and how to create one on AWS.
DB Instance or Database Instance
DB Instance is an obscure database dominion running on a cloud platform, here that platform is AWS. It is a cellular block of Amazon RDS, it can also contain databases which are created by multiple users, and can be retrieved using the same tools, features and applications you usually use while accessing a standalone database instance. It is one of the simplest services present on the AWS cloud platform.
Note: DB Instances are region specific, i.e. if you wish to create an instance in a different region other than your default region. Then you must switch to your desired region first. And then proceed with the process of creating an instance.
Let’s start with the process of creating an instance followed by rebooting it.
Step 1: Login to your aws account and click on “services” present on the leftmost part of aws management console. And from the drop down menu tap on “EC2”.

Step 2: EC2 console will be loaded on your screen. Once it is done, from the list of options on the left, click on “Instances”. Please refer to the image for better understanding.

Step 3: A fresh screen will be loaded. On which at the right corner there will be an orange box named as “Launch Instance”. Click on that.

Step 4: The next screen will contain a bunch of options to choose your AMI(Amazon Machine Image) from. And horizontally, there is a 7-step procedure written to be followed for successfully launching an instance. I have chosen “Amazon Linux 2 AMI” as my AMI. And then Go ahead click “Next”. Refer to the image for resolving any confusions.

Step 5: Now comes the sub step 2 of creating the instance i.e. “Choose Instance Type”. I have chosen “t2 micro” as my instance type and then click “Next”. Refer to the image for better understanding.

Step 6: Next comes the sub step 3 of creating the instance, i.e. “Configure Instance”. Here we will confirm the configurations we need for our AMI. By default the configurations are filled, we just confirm them and click “Next” to proceed. Here’s the image for better understanding.

Step 7: Next comes the sub step 4 of creating the instance, i.e. “Add Storage”. Here we will look at the storage configurations and modify them as per our requirements. Then click “Next”. Here’s the image to understand better.

Step 8: Next comes the sub step 5 of creating the instance, i.e. “Add Tags”. Here we will just click “Next” and proceed. Here’s the image.

Step 9: Now we will complete next two sub steps which are “Configure Security Group” and “Review” together.
In Security Group, we have to give group name and description followed by ports to open and source.
In review, we will launch the instance and then a dialog box will appear to ask about “Key Pair”. We have two options to choose from, whether choosing an existing key pair or creating a new one and downloading it to launch.
Here are the images attached.
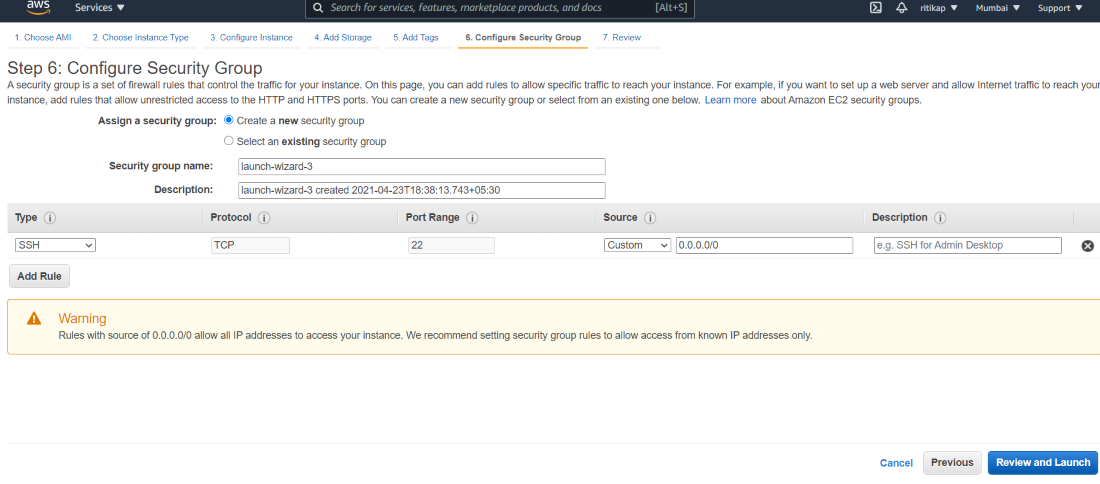
IMAGE OF SECURITY GROUP
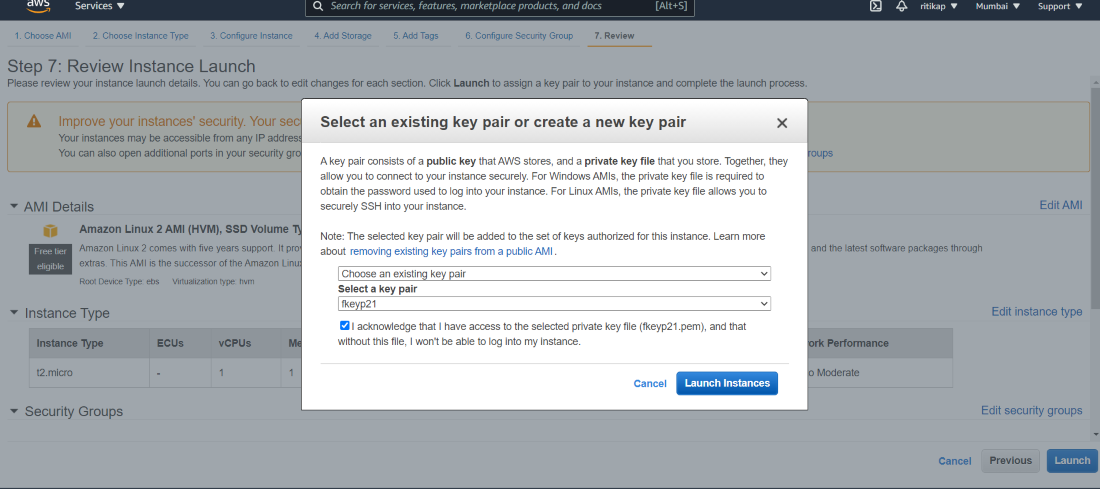
IMAGE OF REVIEW
Now, finally the instance has been created from our end. In a while the instance will be appearing on the instances page.
Let’s “Reboot the instance” we have created.
First select the instance you want to reboot. Then click on “Actions” and select “Reboot”. Image to understand more.

Again confirm that you are sure you want to reboot and wait.
After a while the instance state will change to “Reboot” from “Running”
Like Article
Suggest improvement
Share your thoughts in the comments
Please Login to comment...