All about HC-05 Bluetooth Module | Connection with Android
Last Updated :
28 Oct, 2021
Ever wanted to control your Mechanical Bots with an Android Phone or design the robots with custom remote, here in this tutorial we will learn about a Bluetooth Module HC-05 used for the above mentioned and many other cases. Here we will be understanding the connection and working of a HC-05 module and also its interfacing with custom android app.
Basics
Wireless communication is swiftly replacing the wired connection when it comes to electronics and communication. Designed to replace cable connections HC-05 uses serial communication to communicate with the electronics. Usually, it is used to connect small devices like mobile phones using a short-range wireless connection to exchange files. It uses the 2.45GHz frequency band. The transfer rate of the data can vary up to 1Mbps and is in range of 10 meters.
The HC-05 module can be operated within 4-6V of power supply. It supports baud rate of 9600, 19200, 38400, 57600, etc. Most importantly it can be operated in Master-Slave mode which means it will neither send or receive data from external sources.

HC-05 module
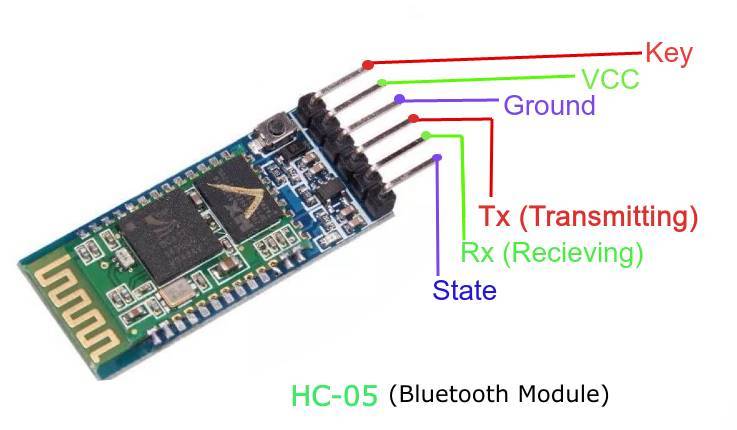
Description of pins
Enable - This pin is used to set the Data Mode or and AT command mode (set high).
VCC - This is connected to +5V power supply.
Ground - Connected to ground of powering system.
Tx (Transmitter) - This pin transmits the received data Serially.
Rx (Receiver) - Used for broadcasting data serially over bluetooth.
State -Used to check if the bluetooth is working properly.
Modes of Operation
The HC-05 Bluetooth Module can be used in two modes of operation: Command Mode and Data Mode.
Command Mode
In Command Mode, you can communicate with the Bluetooth module through AT Commands for configuring various settings and parameters of the Module like get the firmware information, changing Baud Rate, changing module name, it can be used to set it as master or slave.
A point about HC-05 Module is that it can be configured as Master or Slave in a communication pair. In order to select either of the modes, you need to activate the Command Mode and sent appropriate AT Commands.
Data Mode
Coming to the Data Mode, in this mode, the module is used for communicating with other Bluetooth device i.e. data transfer happens in this mode.
Programming HC-05 with Microcontroller
Technical specs of the code:
- Arduino-Uno is used as the microcontroller.
- Name: HC-05
- Password: 1234 (or 0000)
- Type: Slave
- Mode: Data
- Baud Rate: 9600 with 8 data bits, no parity and 1 stop bit
C
#define ledPin 7
int state = 0;
void setup() {
pinMode(ledPin, OUTPUT);
digitalWrite(ledPin, LOW);
Serial.begin(9600);
}
void loop() {
if(Serial.available() > 0){
state = Serial.read();
}
Deciding functions for LED on and off
if (state == '0') {
digitalWrite(ledPin, LOW);
Serial.println("LED: OFF");
state = 0;
}
else if (state == '1') {
digitalWrite(ledPin, HIGH);
Serial.println("LED: ON");;
state = 0;
}
}
|
Android App interfacing with HC-05
Now, we will develop a small android application to demonstrate the connection of bluetooth module and the android app. We will be using Android Studio for this purpose and above mentioned C code on the microcontroller.
Algorithm:
Create an empty project on Android Studio
Create a ListView containing all the available bluetooth devices.
Get the name and MAC-address of HC-05 module.
Open connection with HC-05 module.
Instruct the module with data as bytes.
Understanding the code
1.Getting all the Bluetooth devices in ListView
This code is for the MainActivity or first activity where the list will be displayed then after that when device will be selected, Control activity will come to give the command.
Java
private BluetoothAdapter BluetoothAdap = null;
private Set Devices;
BluetoothAdap = BluetoothAdapter.getDefaultAdapter();
private void pairedDevices()
{
Devices = BluetoothAdap.getBondedDevices();
ArrayList list = new ArrayList();
if (Devices.size() > 0) {
for (BluetoothDevice bt : Devices) {
list.add(bt.getName() + "\n" + bt.getAddress());
}
}
else {
Toast.makeText(getApplicationContext(), "No Paired Bluetooth Devices Found.", Toast.LENGTH_LONG).show();
}
final ArrayAdapter adapter = new ArrayAdapter(this, android.R.layout.simple_list_item_1, list);
devicelist.setAdapter(adapter);
devicelist.setOnItemClickListener(myListListener);
}
|
2.Getting the name and MAC address of device
Now we will create a OnClick Listener for the list so that thename and MAC address can be extracted from the device.
Java
private AdapterView.OnItemClickListener myListListener = new AdapterView.OnItemClickListener() {
public void onItemClick(AdapterView av, View v, int arg2, long arg3)
{
String name = ((TextView)v).getText().toString();
String address = info.substring(info.length() - 17);
Intent i = new Intent(MainActivity.this, Control.class);
i.putExtra("add", address);
startActivity(i);
}
};
|
3.Establishing a connection between both of them
The connect() function in the Control.java will help to make the connection between both.
Java
BluetoothAdapter myBluetooth = null;
BluetoothSocket btSocket = null;
static final UUID myUUID = UUID.fromString("00001101-0000-1000-8000-00805F9B34FB");
Intent intent = getIntent();
address = intent.getStringExtra("add");
try {
if (btSocket == null || !isBtConnected) {
myBluetooth = BluetoothAdapter.getDefaultAdapter();
BluetoothDevice hc = myBluetooth.getRemoteDevice(address);
btSocket = hc.createInsecureRfcommSocketToServiceRecord(myUUID);
BluetoothAdapter.getDefaultAdapter().cancelDiscovery();
Now you will start the connection
btSocket.connect();
}
}
catch (IOException e) {
e.printStackTrace();
}
|
4.Finally commanding the HC-05 module
Here first we will check if our socket is connected, then only we will proceed to avoid the Null Pointer exception.
Java
private void turnOffLed()
{
if (btSocket != null) {
try {
btSocket.getOutputStream().write("0".toString().getBytes());
}
catch (IOException e) {
e.printStackTrace();
}
}
}
|
Now finally as we have done our first basic project with the HC-05 module and the Android programming, we can move on to complex electronic bots and make there wired connection to wireless using this amazing module HC-05 and also we now know to make a custom app.
You can find the above code in form of Android Studio Project committed here.
Like Article
Suggest improvement
Share your thoughts in the comments
Please Login to comment...