A Complete Guide to Learn XML For Android App Development
Last Updated :
17 Oct, 2022
XML stands for Extensible Markup Language. XML is a markup language much like HTML used to describe data. It is derived from Standard Generalized Markup Language(SGML). Basically, the XML tags are not predefined in XML. We need to implement and define the tags in XML. XML tags define the data and used to store and organize data. It’s easily scalable and simple to develop. In Android, the XML is used to implement UI-related data, and it’s a lightweight markup language that doesn’t make layout heavy. XML only contains tags, while implementing they need to be just invoked.

The simple syntax of XML is
<tag_name>Hello World!</tag_name>
So in this article, there is a deep discussion on how to learn and understand what XML is for Android Development.
Basics of User Interface(UI)
Basically in Android XML is used to implement the UI-related data. So understanding the core part of the UI interface with respect to XML is important. The User Interface for an Android App is built as the hierarchy of main layouts, widgets. The layouts are ViewGroup objects or containers that control how the child view should be positioned on the screen. Widgets here are view objects, such as Buttons and text boxes. Considering the following simple example of the activity_main.xml file.
XML
<?xml version="1.0" encoding="utf-8"?>
<LinearLayout
android:layout_width="match_parent"
android:layout_height="match_parent"
android:clipToPadding="false"
android:orientation="vertical"
android:padding="24dp"
tools:context=".MainActivity">
<TextView
style="@style/TextAppearance.MaterialComponents.Headline5"
android:layout_width="wrap_content"
android:layout_height="wrap_content"
android:text="GEEKSFORGEEKS"
android:textColor="@color/green_500" />
<TextView
style="@style/TextAppearance.MaterialComponents.Headline6"
android:layout_width="wrap_content"
android:layout_height="wrap_content"
android:layout_marginTop="16dp"
android:text="Enter the user information"
app:layout_constraintBottom_toBottomOf="parent"
app:layout_constraintLeft_toLeftOf="parent"
app:layout_constraintRight_toRightOf="parent"
app:layout_constraintTop_toTopOf="parent" />
<RelativeLayout
android:layout_width="match_parent"
android:layout_height="wrap_content"
android:layout_marginTop="8dp"
android:clipToPadding="false">
<EditText
android:id="@+id/editText1"
android:layout_width="match_parent"
android:layout_height="wrap_content"
android:hint="Enter first name" />
<EditText
android:id="@+id/editText2"
android:layout_width="match_parent"
android:layout_height="wrap_content"
android:layout_below="@id/editText1"
android:hint="Enter last name" />
<Button
android:layout_width="wrap_content"
android:layout_height="wrap_content"
android:layout_below="@id/editText2"
android:layout_alignParentEnd="true"
android:text="Submit" />
</RelativeLayout>
</LinearLayout>
|
Output UI:

In the above example of XML file, There are 2 view groups one is LinearLayout and another is RelativeLayout and the TextView1 and TextView2 is child widgets under the ViewGroup1 that is LinearLayout. EditText1, EditText2, and Button are the child widgets under ViewGroup2 that is RelativeLayout. ViewGroup2(RelativeLayout) is nested under the ViewGroup1 which produces the following hierarchy.
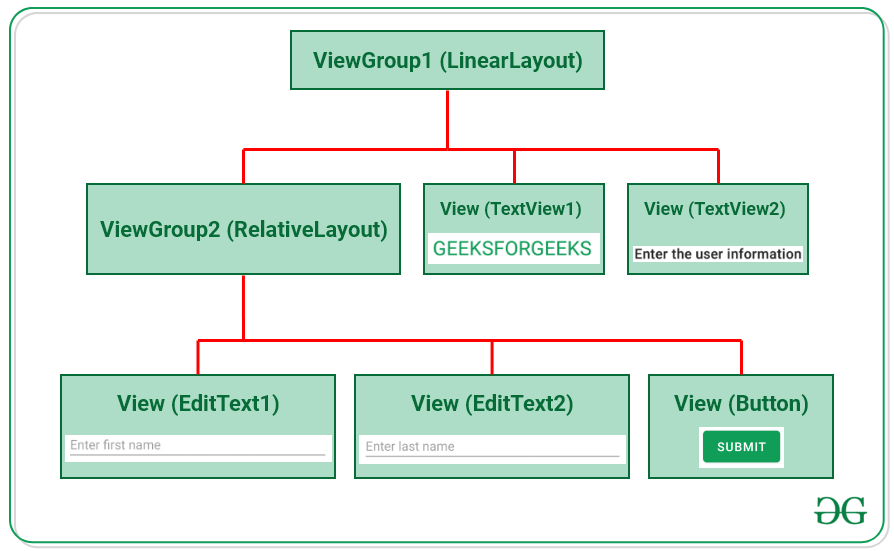
From the hierarchy, it’s been observed that every widget like EdtText, TextView, or Button is one of the View. These Views are contained inside the ViewGroup, like RelativeLayout, LinearLayout, FrameLayout, etc.
Different Types of XML Files Used in Android Studio
Different XML files serve different purposes in Android Studio. The list of various XML files in Android Studio with their purposes is discussed below.
1. Layout XML files in android
The Layout XML files are responsible for the actual User Interface of the application. It holds all the widgets or views like Buttons, TextViews, EditTexts, etc. which are defined under the ViewGroups. The Location of the layout files in Android is:
app -> src -> main -> res -> layout

The folder contains the layout files for respective activity, fragments. The basic layout of the is as follows for activity_main.xml:
XML
<?xml version="1.0" encoding="utf-8"?>
<LinearLayout
android:layout_width="match_parent"
android:layout_height="match_parent"
android:clipToPadding="false"
android:orientation="vertical"
android:padding="24dp"
tools:context=".MainActivity">
<TextView
style="@style/TextAppearance.MaterialComponents.Headline5"
android:layout_width="wrap_content"
android:layout_height="wrap_content"
android:text="GEEKSFORGEEKS"
android:textColor="@color/green_500" />
<TextView
style="@style/TextAppearance.MaterialComponents.Headline6"
android:layout_width="wrap_content"
android:layout_height="wrap_content"
android:layout_marginTop="16dp"
android:text="Enter the user information"
app:layout_constraintBottom_toBottomOf="parent"
app:layout_constraintLeft_toLeftOf="parent"
app:layout_constraintRight_toRightOf="parent"
app:layout_constraintTop_toTopOf="parent" />
<RelativeLayout
android:layout_width="match_parent"
android:layout_height="wrap_content"
android:layout_marginTop="8dp"
android:clipToPadding="false">
<EditText
android:id="@+id/editText1"
android:layout_width="match_parent"
android:layout_height="wrap_content"
android:hint="Enter first name" />
<EditText
android:id="@+id/editText2"
android:layout_width="match_parent"
android:layout_height="wrap_content"
android:layout_below="@id/editText1"
android:hint="Enter last name" />
<Button
android:layout_width="wrap_content"
android:layout_height="wrap_content"
android:layout_below="@id/editText2"
android:layout_alignParentEnd="true"
android:text="Submit" />
</RelativeLayout>
</LinearLayout>
|
2. AndroidManifest.xml file
This file describes the essential information about the application’s, like the application’s package names which matches code’s namespaces, a component of the application like activities, services, broadcast receivers, and content providers. Permission required by the user for the application features also mentioned in this XML file. Location of the AndroidManifest.xml file:
app -> src -> main

A typical code inside AndroidManifest.xml with internet permission looks like this:
XML
<?xml version="1.0" encoding="utf-8"?>
package="com.adityamshidlyali.gfgarticle">
<uses-permission android:name="ANDROID.PERMISSION.INTERNET" />
<application
android:allowBackup="true"
android:icon="@mipmap/ic_launcher"
android:label="@string/app_name"
android:roundIcon="@mipmap/ic_launcher_round"
android:supportsRtl="true"
android:theme="@style/Theme.GFGArticle">
<activity android:name=".MainActivity">
<intent-filter>
<action android:name="android.intent.action.MAIN" />
<category android:name="android.intent.category.LAUNCHER" />
</intent-filter>
</activity>
</application>
</manifest>
|
3. strings.xml file
This file contains texts for all the TextViews widgets. This enables reusability of code, and also helps in the localization of the application with different languages. The strings defined in these files can be used to replace all hardcoded text in the entire application. Location of the strings.xml file
app -> src -> main -> res -> values

A typical code inside strings.xml looks like this:
XML
<resources>
<string name="app_name">GFG Article</string>
<string name="gfg_heading">GEEKSFORGEEKS</string>
<string name="settings_label">settings</string>
</resources>
|
4. themes.xml file
This file defines the base theme and customized themes of the application. It also used to define styles and looks for the UI(User Interface) of the application. By defining styles we can customize how the views or widgets look on the User Interface. Location of styles.xml file
app -> src -> main -> res -> values

A typical code inside themes.xml looks like this:
XML
<style name="Theme.GFGArticle" parent="Theme.MaterialComponents.DayNight.DarkActionBar">
<item name="colorPrimary">@color/green_500</item>
<item name="colorPrimaryVariant">@color/green_700</item>
<item name="colorOnPrimary">@color/white</item>
<item name="colorSecondary">@color/teal_200</item>
<item name="colorSecondaryVariant">@color/teal_700</item>
<item name="colorOnSecondary">@color/black</item>
<item name="android:statusBarColor" tools:targetApi="l">?attr/colorPrimaryVariant</item>
</style>
</resources>
|
5. Drawable XML files
These are the XML files that provide graphics to elements like custom background for the buttons and its ripple effects, also various gradients can be created. This also holds the vector graphics like icons. Using these files custom layouts can be constructed for EditTexts. Location for the Drawable files are:
app -> src -> main -> res -> drawable

A typical code inside my_custom_gradient.xml looks like this:
XML
<?xml version="1.0" encoding="utf-8"?>
<gradient
android:centerColor="@color/green_500"
android:endColor="@color/green_700"
android:startColor="@color/green_200" />
</shape>
|
which produces the following gradient effect:

6. colors.xml file
The colors.xml file is responsible to hold all the types of colors required for the application. It may be primary brand color and its variants and secondary brand color and its variants. The colors help uphold the brand of the applications. So the colors need to be decided cautiously as they are responsible for the User Experience. The colors need to be defined in the hex code format. Location of colors.xml file:
app -> src -> main -> res -> values

A typical code inside custom.xml looks like this:
XML
<?xml version="1.0" encoding="utf-8"?>
<resources>
<color name="purple_200">#FFBB86FC</color>
<color name="purple_500">#FF6200EE</color>
<color name="purple_700">#FF3700B3</color>
<color name="teal_200">#FF03DAC5</color>
<color name="teal_700">#FF018786</color>
<color name="black">#FF000000</color>
<color name="white">#FFFFFFFF</color>
<color name="green_200">#55cf86</color>
<color name="green_500">#0f9d58</color>
<color name="green_700">#006d2d</color>
</resources>
|
7. dimens.xml file
As the file name itself suggests that the file is responsible to hold the entire dimensions for the views. it may be the height of the Button, padding of the views, the margin for the views, etc. The dimensions need to in the format of pixel density(dp) values. Which replaces all the hard-coded dp values for the views. This file needs to be created separately in the values folder. Location to create dimens.xml file:
app -> src -> main -> res -> values

A typical code inside dimens.xml looks like this:
XML
<?xml version="1.0" encoding="utf-8"?>
<resources>
<dimen name="button_height">58dp</dimen>
<dimen name="default_start_margin">16dp</dimen>
<dimen name="default_end_margin">16dp</dimen>
<dimen name="card_view_elevation">12dp</dimen>
</resources>
|
Like Article
Suggest improvement
Share your thoughts in the comments
Please Login to comment...