2048 Game in Python
Last Updated :
23 Jan, 2023
In this article we will look python code and logic to design a 2048 game you have played very often in your smartphone. If you are not familiar with the game, it is highly recommended to first play the game so that you can understand the basic functioning of it.
How to play 2048 :
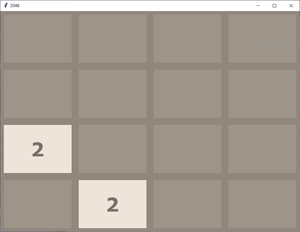
1. There is a 4*4 grid which can be filled with any number. Initially two random cells are filled with 2 in it. Rest cells are empty.
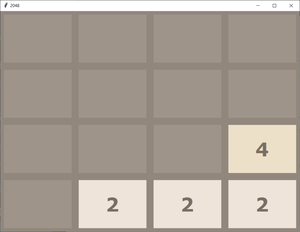
2. we have to press any one of four keys to move up, down, left, or right. When we press any key, the elements of the cell move in that direction such that if any two identical numbers are contained in that particular row (in case of moving left or right) or column (in case of moving up and down) they get add up and extreme cell in that direction fill itself with that number and rest cells goes empty again.
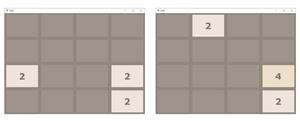
3. After this grid compression any random empty cell gets itself filled with 2.
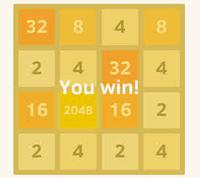
4. Following the above process we have to double the elements by adding up and make 2048 in any of the cell. If we are able to do that we wins.
5. But if during the game there is no empty cell left to be filled with a new 2, then the game goes over.
In above process you can see the snapshots from graphical user interface of 2048 game. But all the logic lies in the main code. So to solely understand the logic behind it we can assume the above grid to be a 4*4 matrix ( a list with four rows and four columns). You can see below the way to take input and output without GUI for the above game.
Example :
Commands are as follows :
'W' or 'w' : Move Up
'S' or 's' : Move Down
'A' or 'a' : Move Left
'D' or 'd' : Move Right
[0, 0, 0, 0]
[0, 0, 0, 0]
[0, 0, 0, 0]
[0, 0, 2, 0]
Press the command : a
GAME NOT OVER
[0, 0, 0, 2]
[0, 0, 0, 0]
[0, 0, 0, 0]
[2, 0, 0, 0]
Press the command : s
GAME NOT OVER
[0, 0, 0, 0]
[0, 0, 0, 0]
[0, 0, 2, 0]
[2, 0, 0, 2]
Press the command : d
GAME NOT OVER
[0, 0, 0, 0]
[0, 0, 0, 0]
[2, 0, 0, 2]
[0, 0, 0, 4]
Press the command : a
GAME NOT OVER
[0, 2, 0, 0]
[0, 0, 0, 0]
[4, 0, 0, 0]
[4, 0, 0, 0]
Press the command : s
GAME NOT OVER
[0, 0, 0, 0]
[0, 0, 0, 0]
[0, 0, 0, 0]
[8, 2, 0, 2]
.
.
.
And the series of input output will go on till we lose or win!
Programming Approach :
- We will design each logic function such as we are performing a left swipe then we will use it for right swipe by reversing matrix and performing left swipe.
- Moving up can be done by taking transpose then moving left.
- Moving down can be done by taking transpose the moving right.
- All the logic in the program are explained in detail in the comments. Highly recommended to go through all the comments.
We have two python files below, one is 2048.py which contains main driver code and the other is logic.py which contains all functions used. logic.py should be imported in 2048.py to use these functions. just place both the files in the same folder then run 2048.py will work perfectly.
logic.py
Python3
import random
def start_game():
mat =[]
for i in range(4):
mat.append([0] * 4)
print("Commands are as follows : ")
print("'W' or 'w' : Move Up")
print("'S' or 's' : Move Down")
print("'A' or 'a' : Move Left")
print("'D' or 'd' : Move Right")
add_new_2(mat)
return mat
def add_new_2(mat):
r = random.randint(0, 3)
c = random.randint(0, 3)
while(mat[r] != 0):
r = random.randint(0, 3)
c = random.randint(0, 3)
mat[r] = 2
def get_current_state(mat):
for i in range(4):
for j in range(4):
if(mat[i][j]== 2048):
return 'WON'
for i in range(4):
for j in range(4):
if(mat[i][j]== 0):
return 'GAME NOT OVER'
for i in range(3):
for j in range(3):
if(mat[i][j]== mat[i + 1][j] or mat[i][j]== mat[i][j + 1]):
return 'GAME NOT OVER'
for j in range(3):
if(mat[3][j]== mat[3][j + 1]):
return 'GAME NOT OVER'
for i in range(3):
if(mat[i][3]== mat[i + 1][3]):
return 'GAME NOT OVER'
return 'LOST'
def compress(mat):
changed = False
new_mat = []
for i in range(4):
new_mat.append([0] * 4)
for i in range(4):
pos = 0
for j in range(4):
if(mat[i][j] != 0):
new_mat[i][pos] = mat[i][j]
if(j != pos):
changed = True
pos += 1
return new_mat, changed
def merge(mat):
changed = False
for i in range(4):
for j in range(3):
if(mat[i][j] == mat[i][j + 1] and mat[i][j] != 0):
mat[i][j] = mat[i][j] * 2
mat[i][j + 1] = 0
changed = True
return mat, changed
def reverse(mat):
new_mat =[]
for i in range(4):
new_mat.append([])
for j in range(4):
new_mat[i].append(mat[i][3 - j])
return new_mat
def transpose(mat):
new_mat = []
for i in range(4):
new_mat.append([])
for j in range(4):
new_mat[i].append(mat[j][i])
return new_mat
def move_left(grid):
new_grid, changed1 = compress(grid)
new_grid, changed2 = merge(new_grid)
changed = changed1 or changed2
new_grid, temp = compress(new_grid)
return new_grid, changed
def move_right(grid):
new_grid = reverse(grid)
new_grid, changed = move_left(new_grid)
new_grid = reverse(new_grid)
return new_grid, changed
def move_up(grid):
new_grid = transpose(grid)
new_grid, changed = move_left(new_grid)
new_grid = transpose(new_grid)
return new_grid, changed
def move_down(grid):
new_grid = transpose(grid)
new_grid, changed = move_right(new_grid)
new_grid = transpose(new_grid)
return new_grid, changed
|
Code Explanation:
- The code starts by importing the random package.
- This package provides methods for generating random numbers.
- Next, the start_game() function is declared.
- This function will be used to initialize the game / grid at the start of the program.
- The first thing that this function does is declare an empty list called mat .
- Then, it appends four lists each with four elements as 0 .
- These lists represent the cells on the game / grid.
- The first list (mat[0] ) represents cell 0 , and so on.
- Next, the for loop iterates through 4 values (i in range(4)) .
- For each value, it generates a new list containing 4 elements ( [0] * 4 ).
- These lists represent each of the 4 possible positions on the game / grid.
- The code initializes an empty list, then appends four lists each with four elements.
- The first list has 0 elements, the second list has 1 element, the third list has 2 elements, and so on.
- The code starts by declaring two variables, r and c. These will hold the row and column numbers at which the new 2 will be inserted into the grid.
- Next, the code calls a function named add_new_2().
- This function takes one argument, mat.
- mat is a Python list object (a data structure that stores multiple items).
- The add_new_2() function begins by choosing two random numbers, r and c. It then uses these numbers to specify the row and column number at which the new 2 should be inserted into the grid.
- Finally, it returns mat as its result.
- When you run this code on your computer, you’ll see something like this: ‘W’ or ‘w’ : Move Up S’ or ‘s’ : Move Down A’ or ‘a’ : Move Left D’ or ‘d’ : Move Right
- The code first randomly selects a row and column index.
- Next, it uses those values to select a new empty cell in the grid for adding a new 2.
- Finally, the add_new_2 function is called with the newly selected cell as its argument.
- The code starts by declaring two variables.
- The first, mat, is an array of four integers.
- The second, r, is a random number between 0 and 3.
- The code then loops through each integer in the mat array.
- It checks to see if the value stored at that location in the mat array matches 2048 (which is the winning condition in this game).
- If it does, the code returns ‘WON’.
- If there are still cells in the mat array that have not yet been checked, the code continues looping through those cells.
- For each cell that has not yet been checked, it checks to see if its value matches 2048.
- If it does not, then the code declares victory for the player and ends the program execution.
- If all of the cells in mat have already been checked or if one of those cells contains 2048 (the winning condition), then no victory can be declared and control passes back to get_current_state() so that another round of checking can begin.
- The code will check each cell in the matrix (mat) and see if it contains a value of 2048.
- If any cell does, then the code will return ‘WON’.
- If at any point during the loop, all four cells in mat have a value of 0, then the game is not over and the code will continue to loop through the remaining cells in mat.
- The code starts by checking to see if the game has already ended.
- If it has not, then the code checks to see if any cells have been merged.
- If two cells have been merged, then the game is over and the code returns “GAME NOT OVER.”
- Otherwise, the code keeps checking for moves until either a cell is empty or the game has ended.
- In case of a tie, we declare that we have lost the game.
- The code will check to see if the cells at the given coordinates are equal.
- If they are, it will return “GAME NOT OVER.”
- If they are not, then it will return “LOST.”
- The code compresses the grid by copying each cell’s value to a new list.
- The code starts by creating an empty list, and then it loops through all of the cells in the matrix.
- For each cell, it calculates the sum of all of its values in the new list.
- Then it assigns this sum to the i variable.
- The next line creates a bool variable called changed.
- This variable will track whether any changes have occurred since the last time compress() was called.
- If there have been no changes, then changed is set to False .
- Otherwise, changed becomes True .
- Next, the code compacts the grid by copying each cell’s value into a new list.
- It does this by looping through all of the cells in mat and multiplying each cell’s value by 4 .
- Finally, it adds these lists together to create new_mat .
- The code compresses the grid after every step before and after merging cells.
- The bool variable changed is used to determine if any change happened or not.
- If no change occurred, then the code simply creates an empty grid.
- The code starts by declaring two variables, changed and new_mat.
- The changed variable will keep track of whether the cells in the matrix have been modified.
- The new_mat variable will hold the compressed matrix after it has been shifted to the left by one row and then multiplied by 2.
- Next, the code loops through each column in turn.
- For each cell in that column, if its value is equal to the next cell’s value and they are not empty, then they are double-checked to make sure that they are still equal.
- If they are, then their values are set to be 2 times their original value and the next cell in that column is emptied so that it can hold a new value for future calculations.
- The merge() function is called next.
- This function takes as input a matrix of 4×4 cells and merges all of the cells in it together based on their values.
- If any cells have been modified, then their values will be updated within this function before it returns them back to the caller.
- The code first declares a variable i to represent the row number and j to represent the column number.
- It then loops through each cell in the matrix, checking to see if the value of the current cell matches the next cell in the row and also making sure that both cells are not empty.
- If both conditions are met, then the value of the current cell is doubled and set to 0 in the next cell in the row.
- This process is repeated for every row in the matrix.
- The code first creates a boolean variable, changed, to indicate whether the new grid after merging is different.
- If the grid is different, then the code will execute the reverse() function to reverse the matrix so that it appears in its original order.
- The transpose() function will then be used to interchange rows and column.
- Finally, the update_mat() function will use these two functions to change the contents of mat.
- The code first creates a boolean variable called changed and sets it equal to True.
- Then it calls the reverse() function to reverse the matrix.
- Next, transpose() is called to interleave rows and column.
- Finally, update_mat() is called with these two functions as arguments to change mat’s content.
- The code first defines two variables, changed and mat.
- The changed variable will be set to True once the matrix has been merged and therefore represents the new grid.
- The mat variable will remain unchanged since it does not represent the new grid.
- The next block of code defines a function, reverse, which will reverses the sequence of rows in the mat variable.
- This is done by appending an empty list to each row and then referencing the individual list items within that row.
- Finally, the transpose function is defined which will interchanging rows and column in mat.
- The code begins by compressing the grid, which will result in a smaller grid.
- Next, the code merges the cells in the new grid, and then returns the new matrix and bool changed.
- Finally, the code compresses the new matrix again.
- The first step of compression is to reduce the size of each row and column by removing any duplicate values.
- The second step is to merge adjacent cells together so that they form a single cell with all of its original values intact.
- Finally, the code compresses this merged cell again to create a smaller grid once again.
- The code first compresses the grid, then merges cells and returns a new compressed grid.
- Next, it compresses the new grid again and compares the two results.
- Finally, it returns the new matrix and bool changed.
- The code in this section is used to update the grid on the screen.
- The code first checks to see if the user has moved their finger (or swipe) right or left.
- If the user has moved their finger (or swipe) right, then the code updates the grid by reversing it.
- Next, if the user moves their finger (or swipe) up, then instead of reversing the matrix, the code just takes its transpose value and updates the grid accordingly.
- The code firstly reverses the grid matrix.
- This is necessary in order to move right or up.
- Next, it updates the grid matrix based on the inputted direction.
- Finally, it returns the updated grid and changed values.
- The code starts by creating two new variables, new_grid and changed.
- The code then moves the grid left using the move_left function.
- Next, the code takes transpose of the new grid to create a new matrix.
- Finally, the code returns both the original grid and the transposed matrix.
- The move_down function works in a similar way.
- First, it creates two new variables, new_grid and changed.
- Then it moves down using the move_down function.
- Again, transpose is used to create a new matrix.
- Finally, both original grids and transposed matrices are returned.
- The code first creates a new 2×2 grid.
- Next, it moves the leftmost column of the new grid one row down and the rightmost column of the new grid one row up.
- Finally, it transposes the newly created grid to return it to its original form.
- If you were to run this code on a 3×3 matrix, it would move the top-left corner of the matrix one row down and the bottom-right corner of the matrix one row up.
2048.py
Python3
import logic
if __name__ == '__main__':
mat = logic.start_game()
while(True):
x = input("Press the command : ")
if(x == 'W' or x == 'w'):
mat, flag = logic.move_up(mat)
status = logic.get_current_state(mat)
print(status)
if(status == 'GAME NOT OVER'):
logic.add_new_2(mat)
else:
break
elif(x == 'S' or x == 's'):
mat, flag = logic.move_down(mat)
status = logic.get_current_state(mat)
print(status)
if(status == 'GAME NOT OVER'):
logic.add_new_2(mat)
else:
break
elif(x == 'A' or x == 'a'):
mat, flag = logic.move_left(mat)
status = logic.get_current_state(mat)
print(status)
if(status == 'GAME NOT OVER'):
logic.add_new_2(mat)
else:
break
elif(x == 'D' or x == 'd'):
mat, flag = logic.move_right(mat)
status = logic.get_current_state(mat)
print(status)
if(status == 'GAME NOT OVER'):
logic.add_new_2(mat)
else:
break
else:
print("Invalid Key Pressed")
print(mat)
|
Output :
Code Explanation:
- The code starts by importing the logic module.
- This module contains all the functions that we will use in our program.
- Next, we have a function to initialize the matrix.
- This is done by calling the start_game() function.
- The while loop runs until the user presses any of the keyboard keys (W, S, A, D).
- For each key press, we call one of the functions in logic.
- These are move_up(), move_down(), and move_left().
- We also need to call get_current_state() to get information about the current state of our matrix.
- Each function in logic takes two arguments: mat and flag.
- mat is the matrix object and flag is either ‘W’ for moving up or ‘S’ for moving down.
- If you recall from earlier in this chapter, these are references to variables that store data about our game board.
- After calling each function, we print out its results and then check to see if game is over yet using status variable.
- If it isn’t over yet, we add a new row to our matrix using add_new_2().
- Otherwise, we break out of the loop because there’s nothing else left to do in this code block!
- Finally, at
- The code starts by importing the logic.py file.
- This file contains all the functions used in this project.
- Next, we have written the driver code.
- In this code, we are checking for the input of a key and depending on that input, we are calling one of the function in logic.py file.
- We will be discussing each of these functions in detail later on in this article.
- The while loop is used to keep track of user input and execute the corresponding code inside it.
- The code inside this loop will be executed until user presses any other key or the game is over.
- Inside the if statement, we are checking for different keys and depending on that input, we are calling one of the functions from logic.py
Like Article
Suggest improvement
Share your thoughts in the comments
Please Login to comment...